
This blog contains all the instructions to connect to your server using WinSCP & Putty Terminal. We have selected the most popular server provider, i.e. Vultr, DigitalOcean, Linode, AWS, & Google, we will use them to connect to WinSCP and Putty.
But please make a note that, there are are many other service providers. We will add the process to connect to there is the server using WinSCP and Putty Shortly; We have covered detailed instructions to connect to Google Server, AWS EC2, Digital Ocean droplets using Winscp, and Putty Terminal.
Table of Contents
Installation of Winscp and Putty
Winscp is used to connect the remote servers to perform tasks like file upload, create, edit, etc. Putty Terminal is used to access the terminal of remote server and execute the commands. Before we connect the Google server, AWS EC2 instance with winscp and putty lets see how to install and configure them for quick access.
Installing WinSCP in Windows
Please follow the below steps to install WinSCP.
- Download WinSCP from the following URL: https://winscp.net/eng/download.php
- After the download is finished, run the downloaded setup file.
- The installation will prompt for to select mode, please select “Install for all users”. If didn’t ask ignore this step.
- The system will ask to accept terms and conditions. Please accept that. There is no way out of this.
- Hit Install on Ready to Install screen.
- Select Setup Type as Typical Installation and click on Next.
- Once installation is completed, click on Finish.

Installing Putty in Windows
The below step will install putty in your Windows operating system. Then putty will be used to connect to the server. In the server, we will execute commands to build our won cryptocurrency
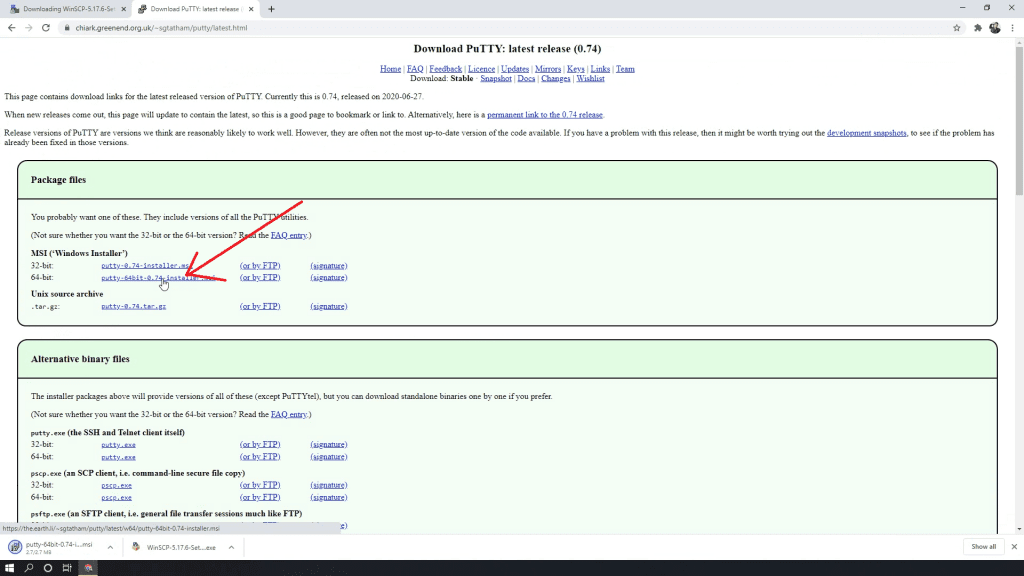
1: Download the Putty installation package from the link – (https://www.chiark.greenend.org.uk/~sgtatham/putty/latest.html.
But please make sure you download the right installation. The putty download page offers too many options to download and install. The below image highlights the best option.
2: Run the downloaded setup
3: Keep the default selections as it is and proceed with the installation.
4: Once installation is completed, click on Finish.
Connecting to Vultr Virtual Server with WinSCP and putty
In this blog, we will create an account in Vultr and will study how can we connect it using WinSCP and Putty.
Setting up Vultr Account
- Go to Vultr Official Website here.
- You will get a free $50 Credit in your Vultr account by using the above reference URL.
- On the Vultr main page, click on the Sign up button in the top right corner.
- Enter your valid email address and a strong password to register your account and click on the Create Account button.
- On the next page Billing, you can link your Credit Card for billing purposes. You can also choose any other payment method which is suitable for you. I have used a Credit Card for our demo.
- From given amounts, you can choose from $10 or other as per your needs. Otherwise, you can check on “I just want to link my credit card -$0.00 deposit”. It will not charge you anything unless you exhaust all your free credits.
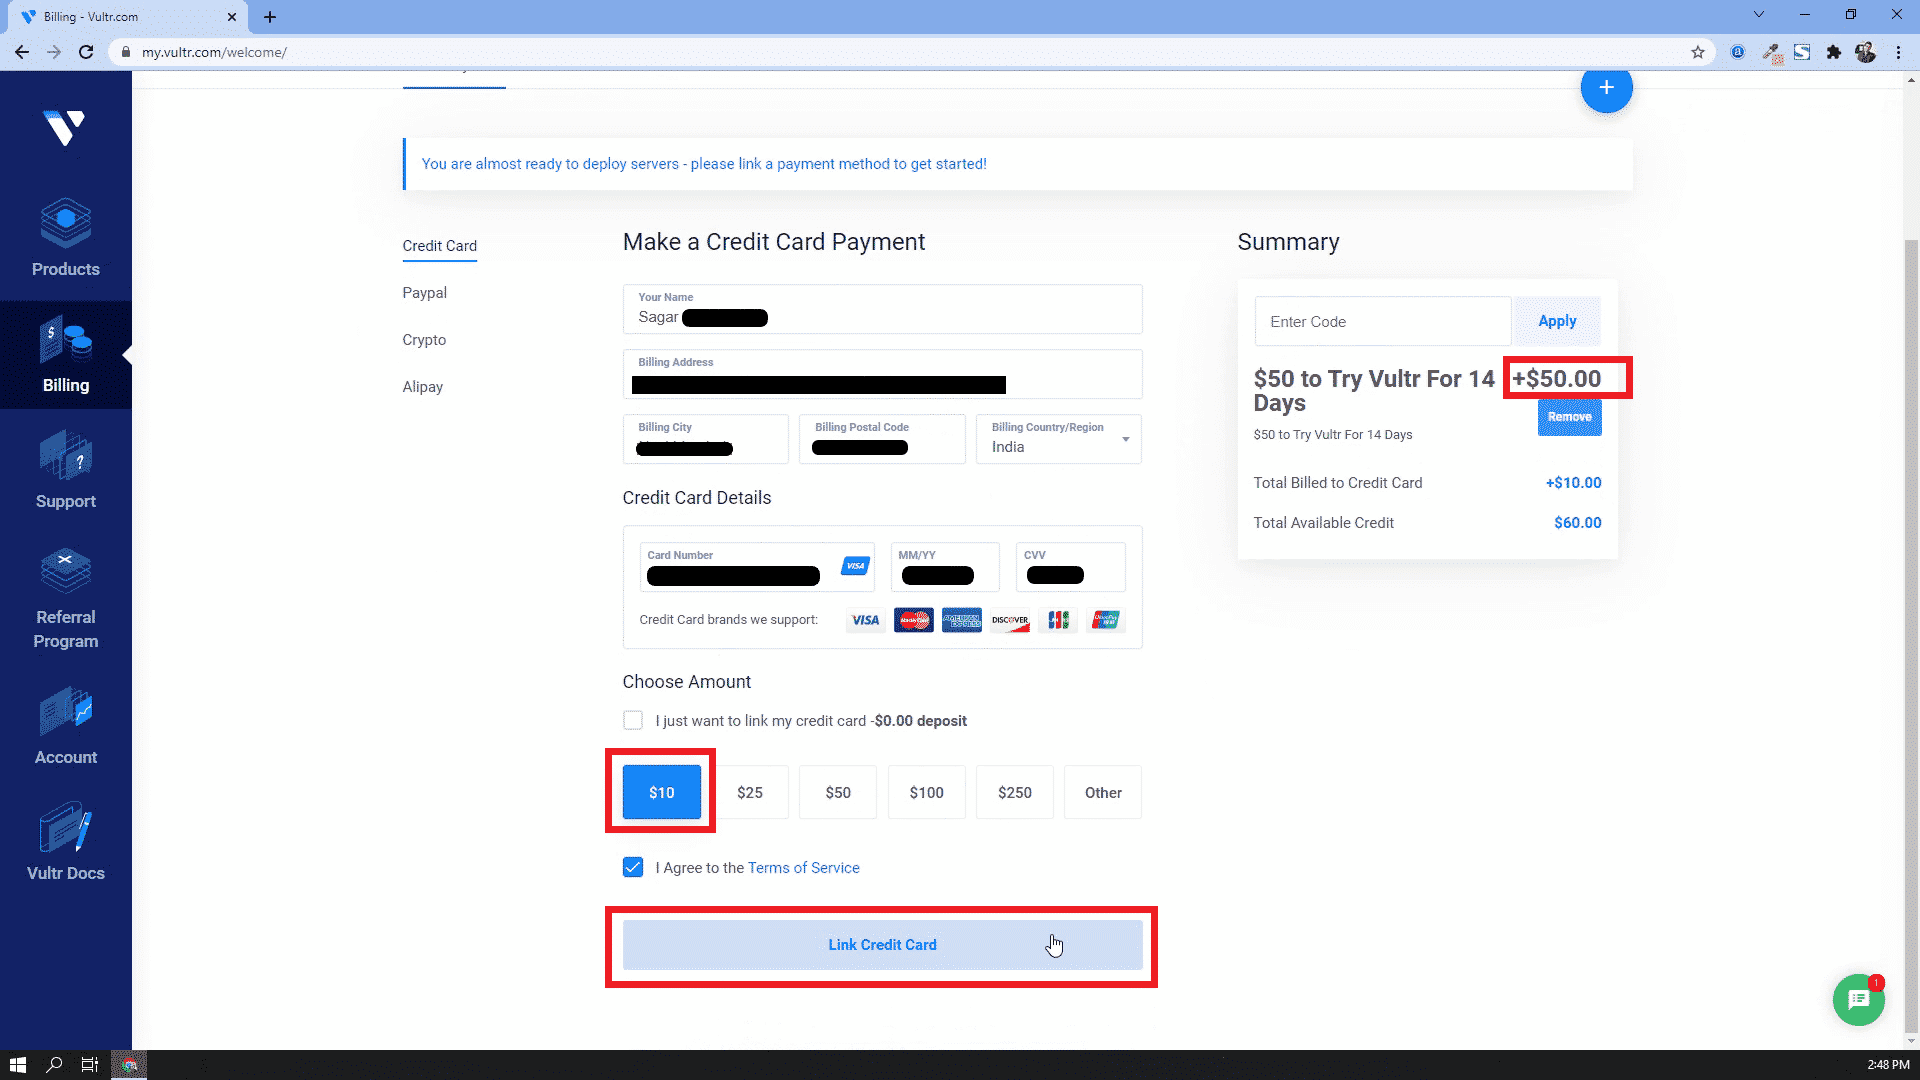

- Accept the Terms of Service and click on the button Link Credit Card to proceed.
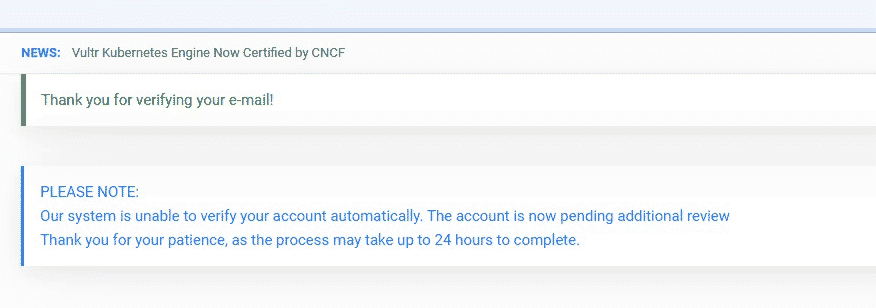
- Go into your mailbox of the email address that you’ve provided while registration. You’ll see an email from the Vultr team to verify your email address. Click on the Verify Your E-mail button from the mail. You’ll be redirected to Vultr Dashboard.
- That’s it. Your Vultr account is successfully activated.
- In case, if you see a message like this, please wait for 24-hours to get it activated.

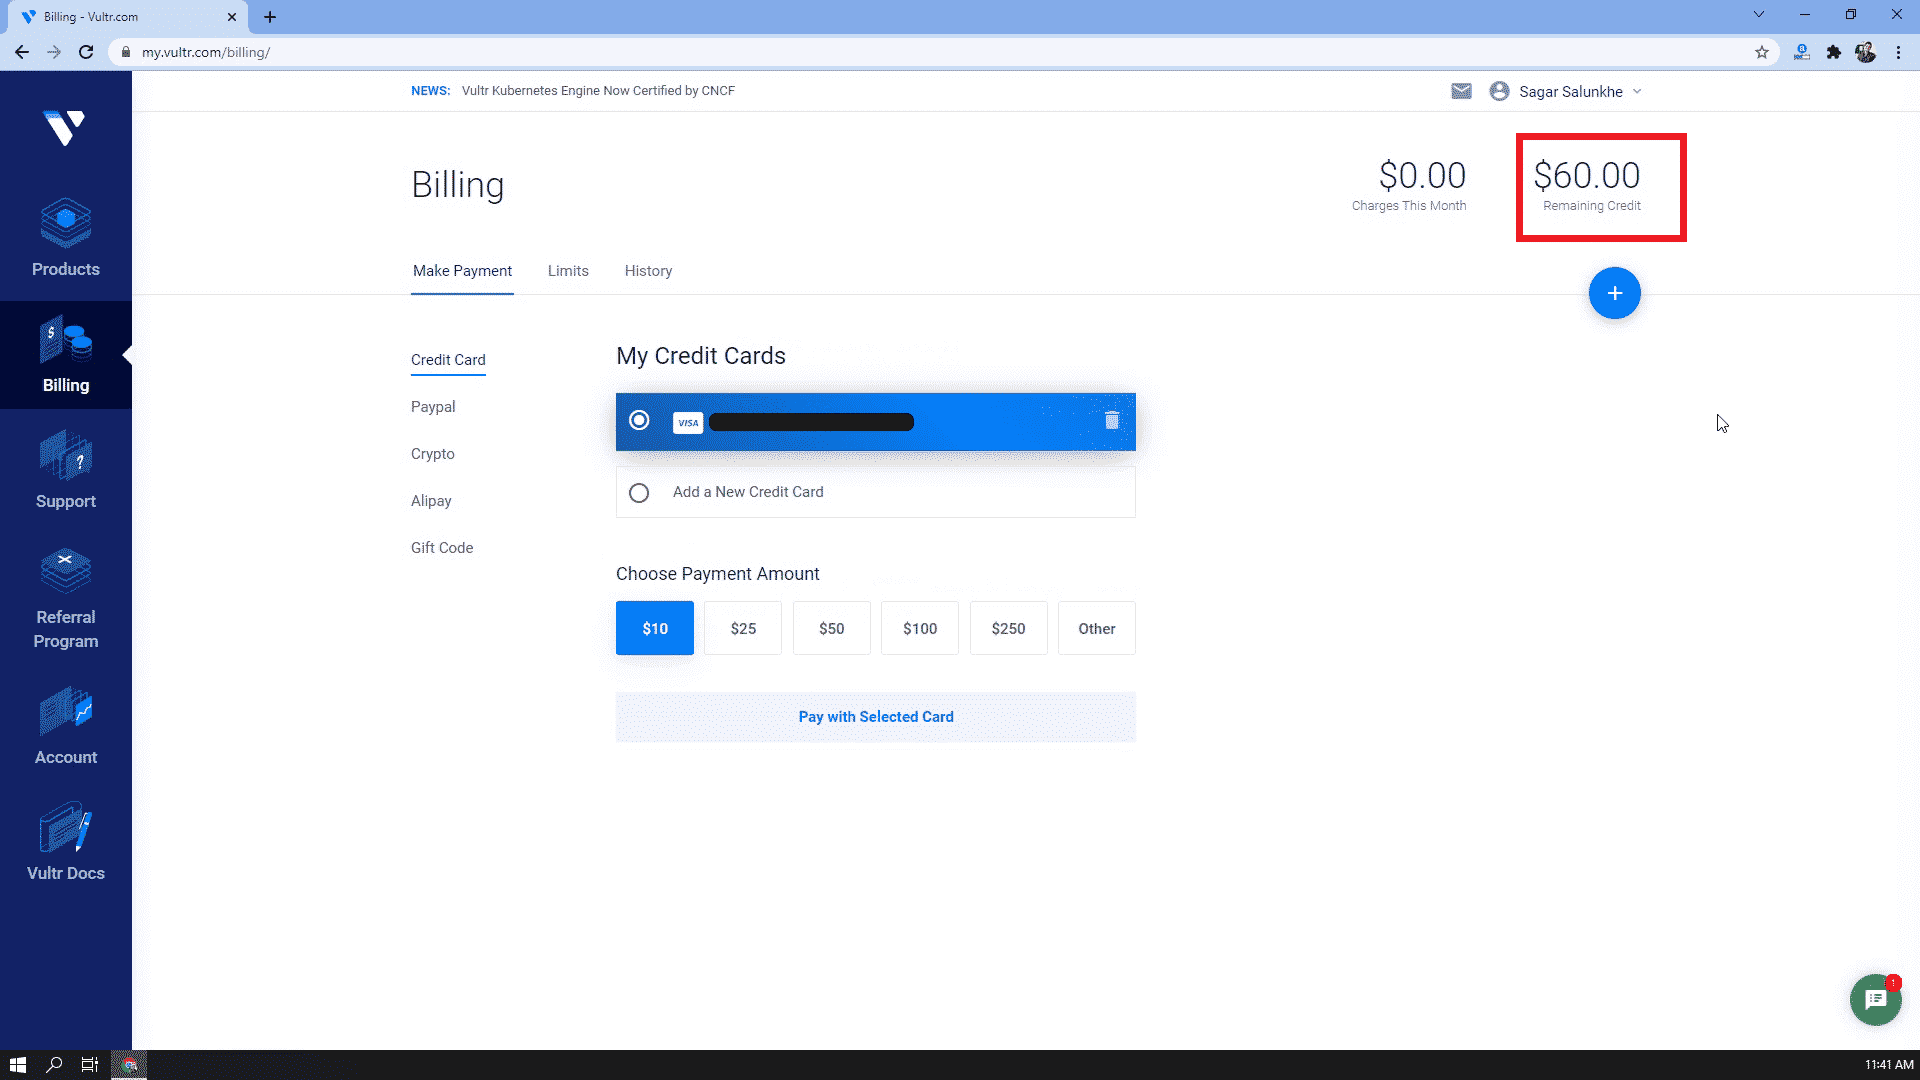
- To verify your free credits, go to the Billing menu option from Sidebar. You’ll see the Remaining Credit $50, and if you’ve added more amount then it’ll be visible there.
How to Create a Vultr Virtual Server instance?
Vultr has High Performance Cloud Servers. You can easily deploy cloud servers, bare metal, and storage worldwide using a Vultr account. Follow below steps to create your own virtual server on Vultr.
- Login into your Vultr account here – https://my.vultr.com/
- Enter your valid username and password credentials to login.
- On the Vultr dashboard, Go to the Products menu from the sidebar and on that page click on the Deploy Instance button from the Instances tab.
- On the Deploy New Instance screen, choose server as High Frequency.
- In the next section Server Location, choose a server location nearest to your current location. Here, I have selected Mumbai, Singapore.


- In Server Type, click on Ubuntu and from the versions list, select option Ubuntu 18.04 x64.
- In section Server Size, you can select your desired server configuration as per your need. I have selected 128GB NVMe (2CPU, 4GB Memory and 3TB BW).
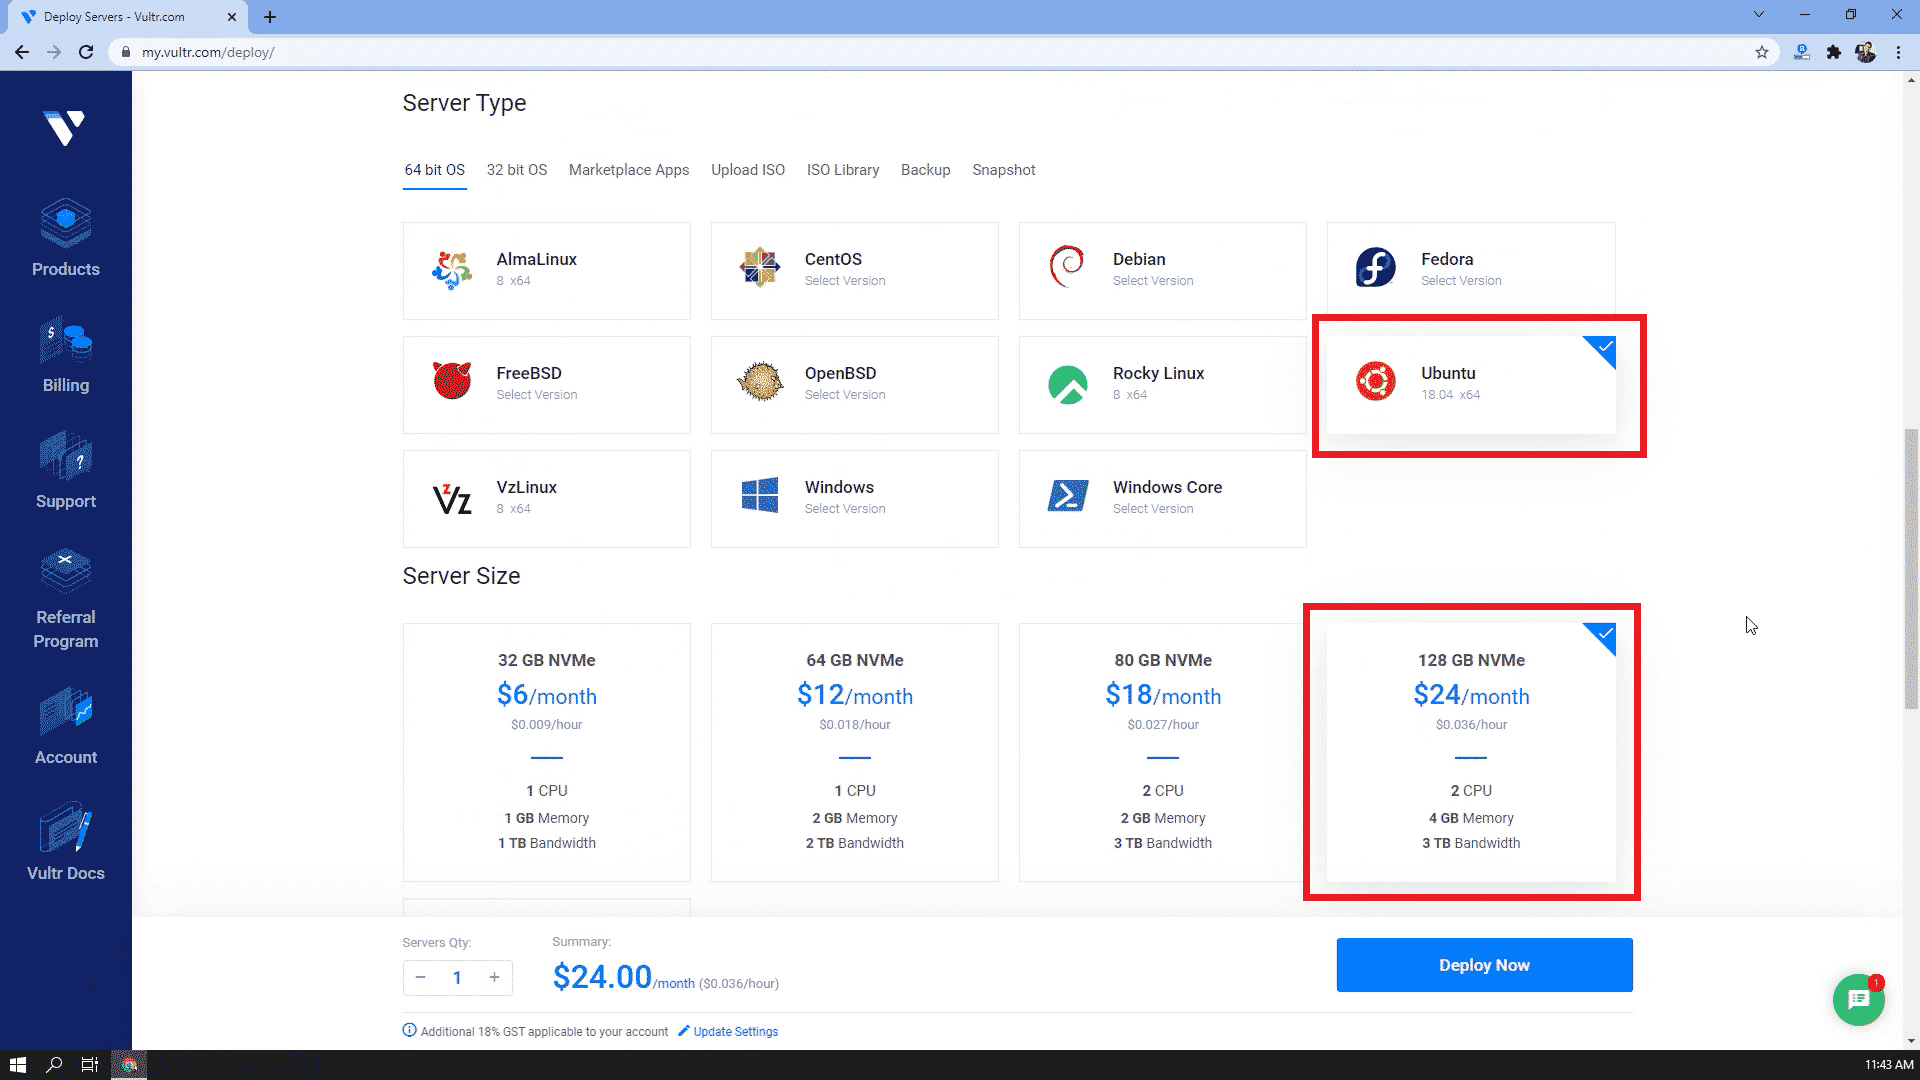
- You can set up an SSH key if you want, I have kept it blank.
- You can set your server hostname and label, in the section Server Hostname & Label.
- Once all these steps are completed, click on the Deploy Now button and wait for a few seconds.
- Your server setup is completed and ready to connect!
Static IP Allocation to a Vultr Server
All Vultr servers have a static ip assigned by default. So even if you reboot the server, your ip will remain the same.
Connect Vultr Server instance using WinSCP and Putty
- Open WinSCP application
- The Connection Host name will be the IP address of our Vultr Server instance.
- Go to the Vultr Servers list by clicking on the Products menu from the sidebar. You will see our instance in the list.
- Click on the server instance label name to view server details.
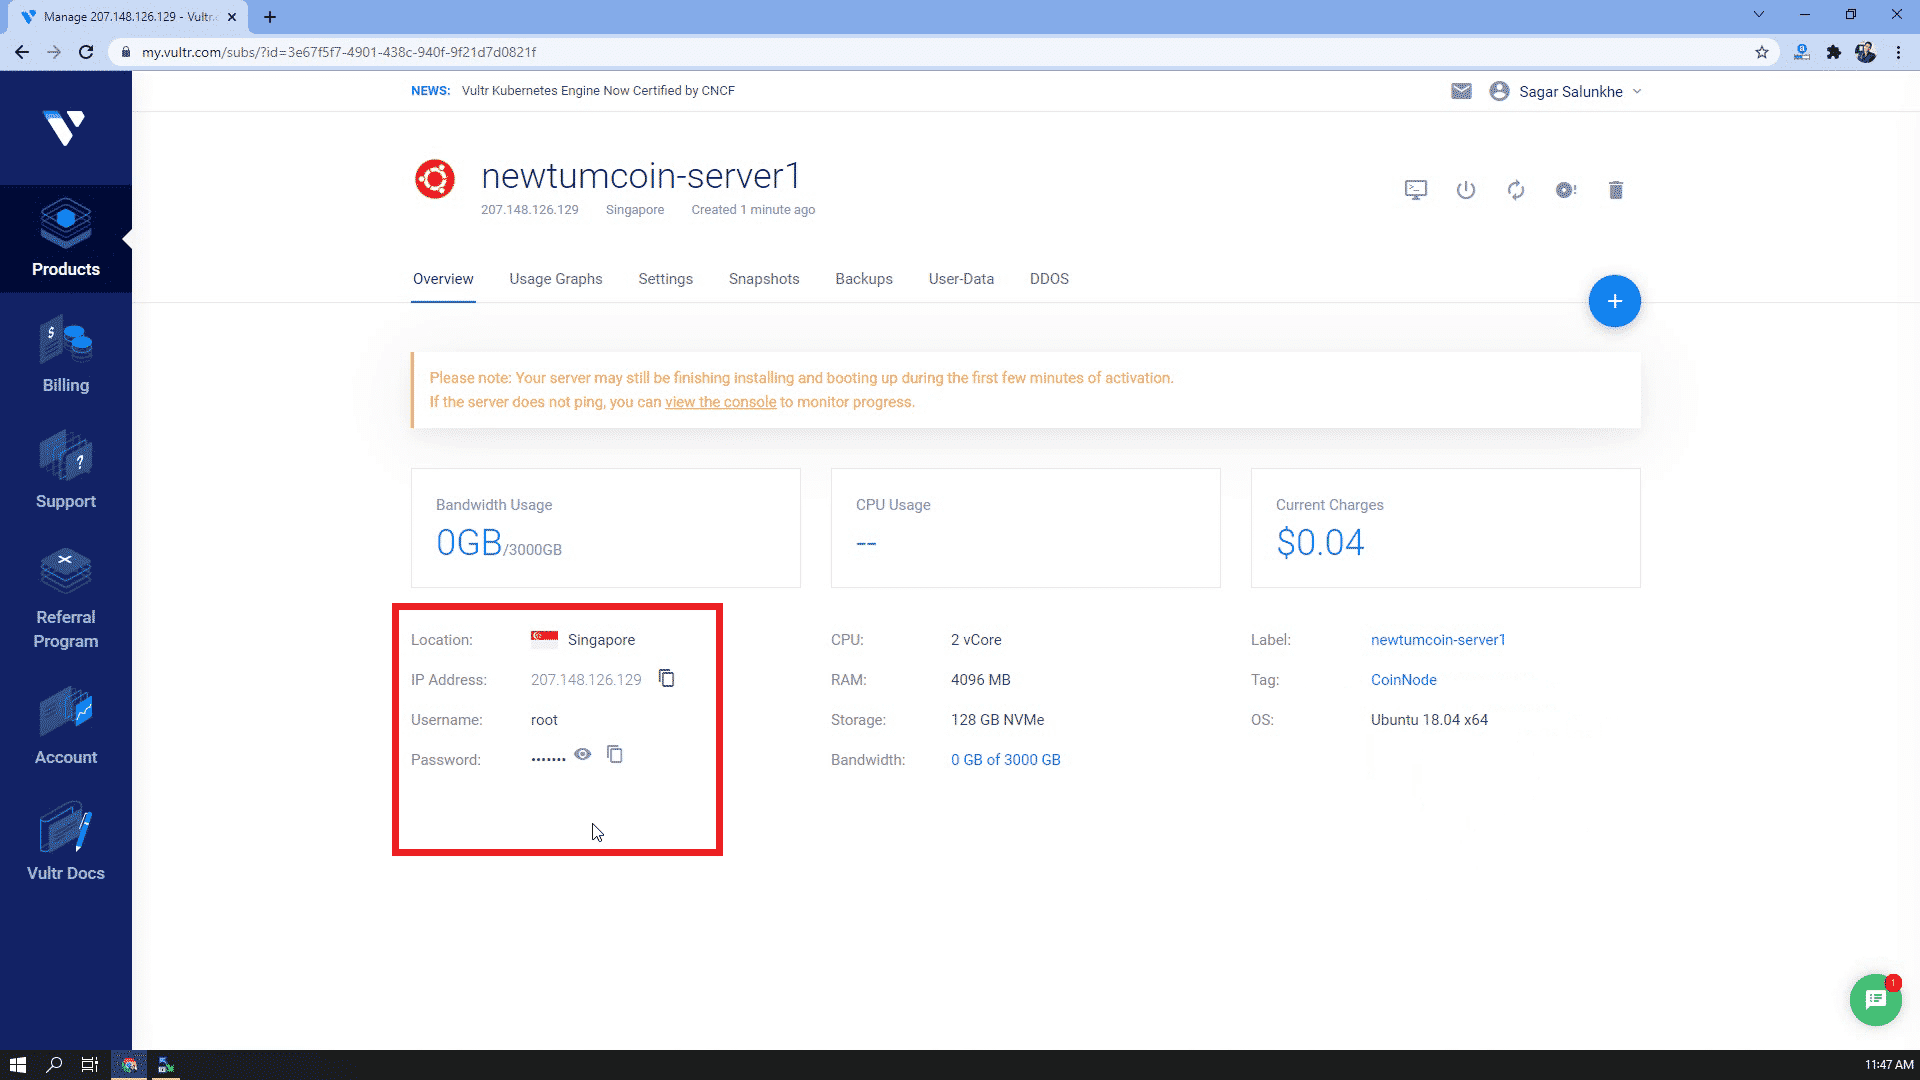
- Get the server IP address, username and password from server details.
- Enter User name as “root” in WinSCP. This will be the default username for our instance access.
- Enter your Password in the WinSCP Password textbox.
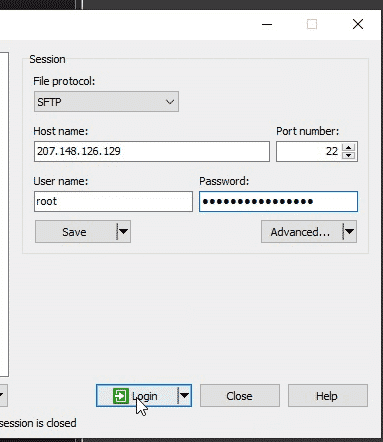

- Click on Login to continue login into the server.
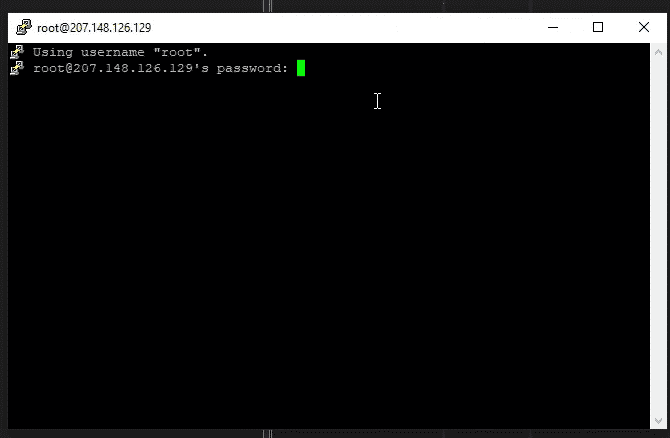
- WinSCP will show a dialog to add the host key in cache, click on Yes.
- You are now connected to the Vultr server instance.
Connect to Vultr instance using Putty
- Connect to the Vultr server instance using WinSCP.
- Go to the Commands menu, choose “Open in Putty” option from the list. You can also use “Ctrl + P” as a keyboard shortcut.

- Enter passphrase in putty command prompt, hit Enter.
- You are now connected to the Vultr server instance server command line using putty.
Connecting Digital Ocean Droplets(Server) with WinSCP and putty
DigitalOcean makes it simple to launch in the cloud and scale up as you grow – with an intuitive control panel, predictable pricing, team accounts, and more. You shall get $100 free credits to use across all services of DigitalOcean on new account registration.
Setting up DigitalOcean Account
1. Navigate to DigitalOcean Official Website here.
2. On page load, click on Sign Up button on the top right corner of the webpage.
3. On the Registration page, choose to Sign Up with Email, using you need to enter your email address to register.
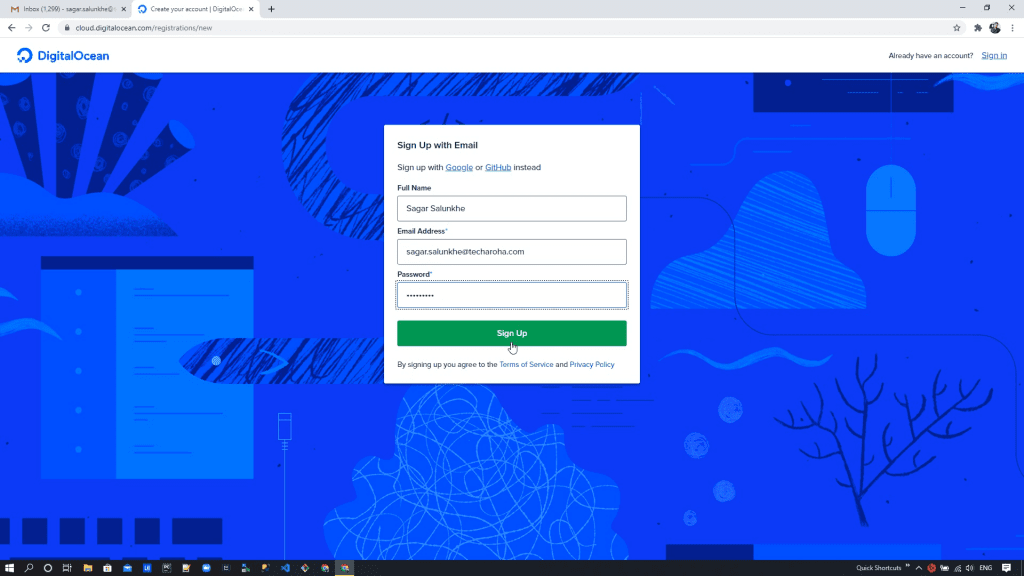
4. Sign up form will show up. Enter your Full Name, your valid Email Address and your Password. Remember email and password used here, as this will be necessary to login next time. Click on Sign Up button below form.
5. In the next step, you will see Confirm email screen. Go to your email inbox, check the verification email from DigitalOcean and click on the verification link
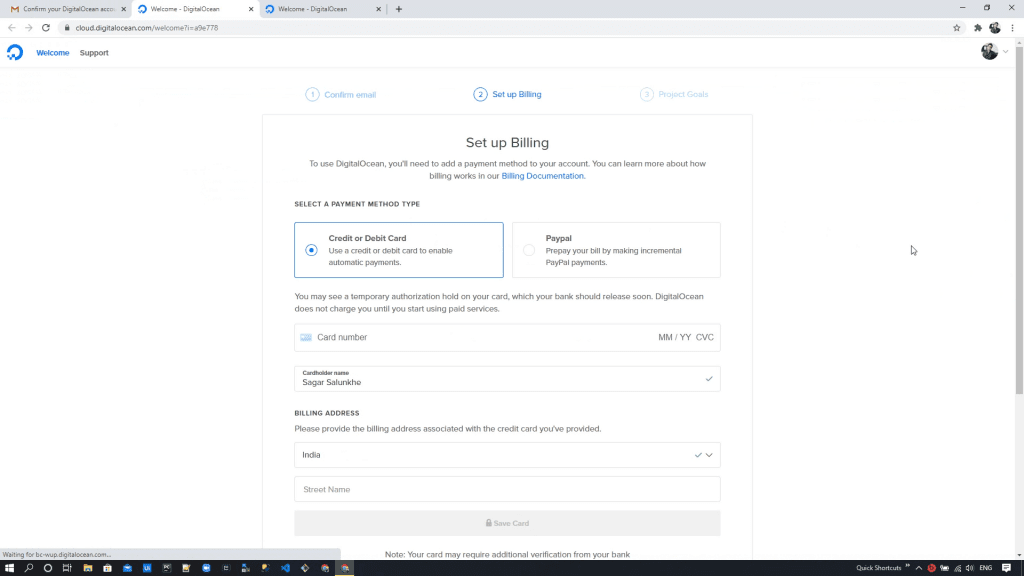
6. After clicking on verification link, you will see Setup Billing screen in next step. Enter your billing account details. For verification, $1 will be debited from your billing account by Digital Ocean.
7. In next step of registration, you need to enter your Project Details. Enter Project name as you want and choose project purpose as “Class project/Educational purposes”.
8. Done! Your DigitalOcean Account is ready to use.4
Create DigitalOcean Droplet (Cloud Server Instance)
Digital-ocean Droplets are Linux-based virtual machines (VMs) that run on top of virtualized hardware. Each Droplet you create is a new server you can use, either standalone or as part of a larger, cloud-based infrastructure.
Follow the Below step one by one to create your first Digital Ocean Droplet
1. Login into your DigitalOcean using this URL https://www.digitalocean.com/
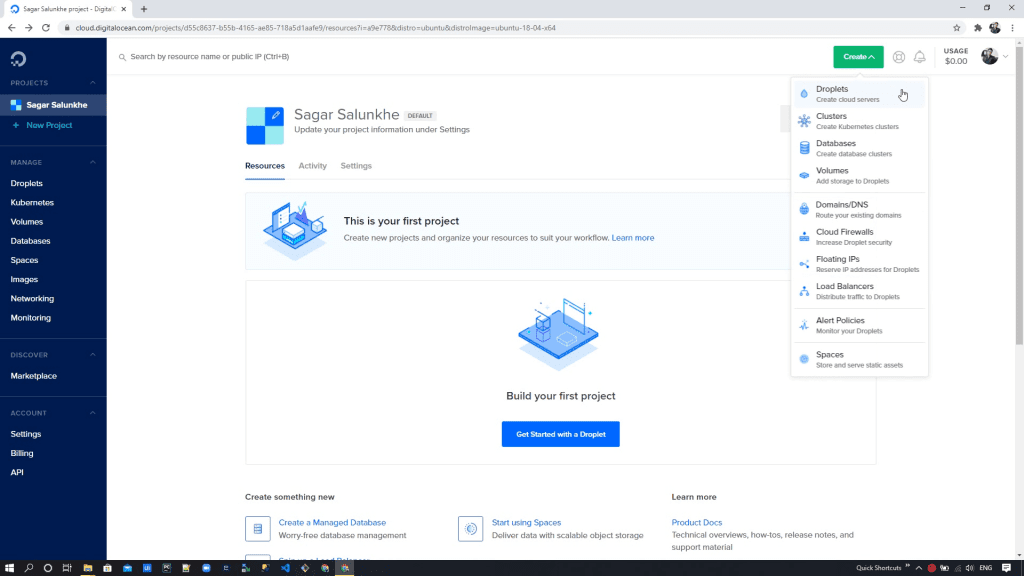
2. Click on Create button on the top left corner of your Project Dashboard. Choose Droplets from the list of options.
3. On Create Droplets configuration page, select distribution as Ubuntu. From the release versions dropdown, select 16.04.6 (LTS) x64 Ubuntu release.
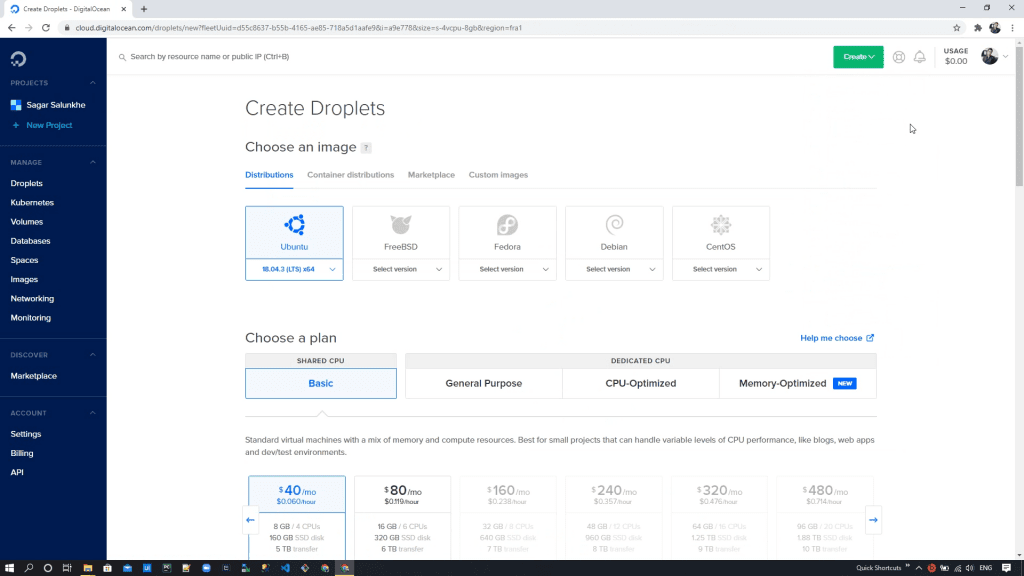
4. In Choose a plan section, keep the plan type to default Basic.
5. In server vm configuration plans, select the first plan, which has 1GB memory, 1 vCPU, and 25 ssd.
6. In Choose a datacenter region section, select server closest to your country region.
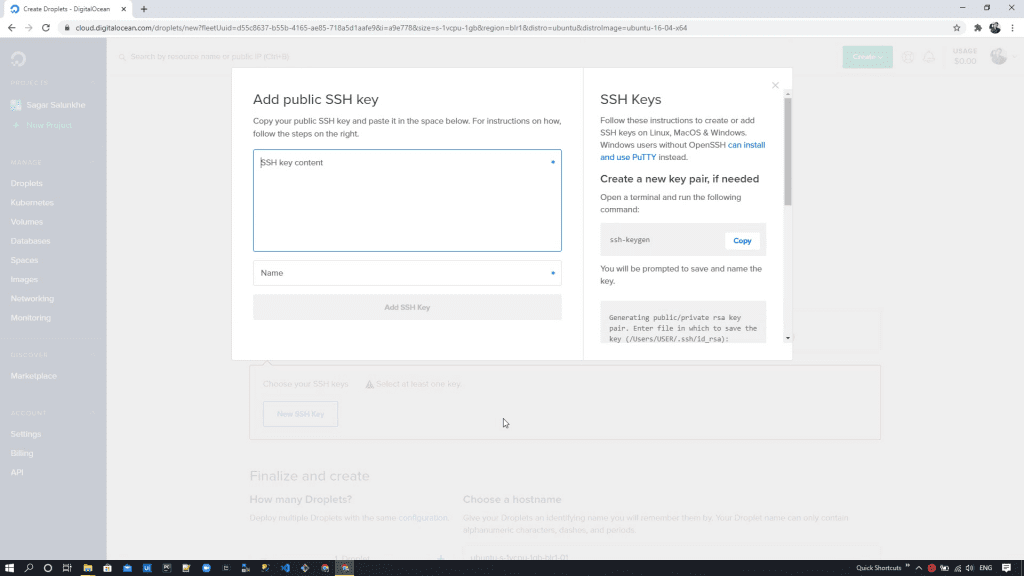
7. On Authentication section, choose SSH keys. Click on New SSH Key, if you are adding SSH key for the first time on DigitalOcean account. Add public SSH key dialogue box will appear on the screen.
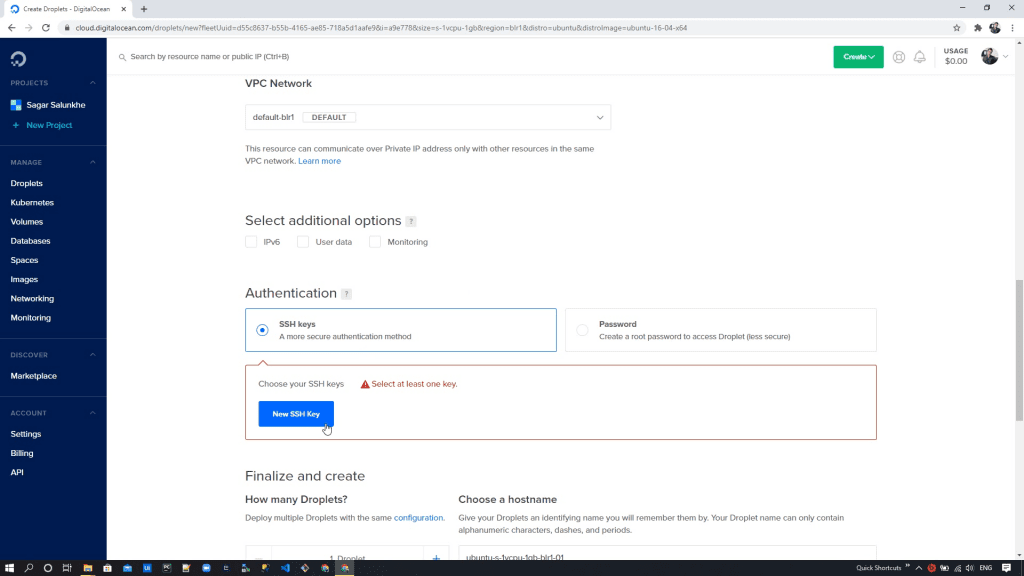
8. Follow the steps below to setup SSH keys to your instance:
- Open PuTTYgen Generator and click Generate.
- Move your mouse cursor randomly on key section blank area to generate key.
- Specify Key Comment as “newtum-digitalocean-key” in the Key comment box.
- Specify the password in the Key passphrase and Confirm passphrase box.
- Click on Save private key as “newtum-digitalocean-key.ppk”.
- Select all the contents in the Public key field and copy it to the clipboard.
9. Paste the clipboard content in the SSH key content textbox. Set key Name as “ntm-digiocn-key1” and click on Add SSH Key button.
10. Scroll down to the bottom of the page, and click on Create Droplet button.
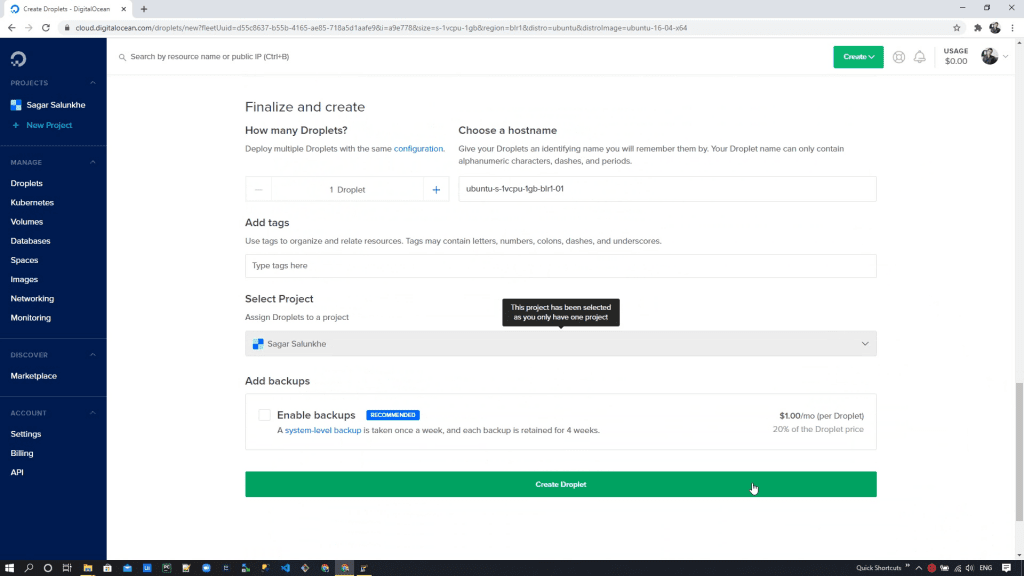
11. On project dashboard screen, you will see Droplet is being created. Once the Droplet is created, you can see the green point and IP address assigned to our droplet instance.
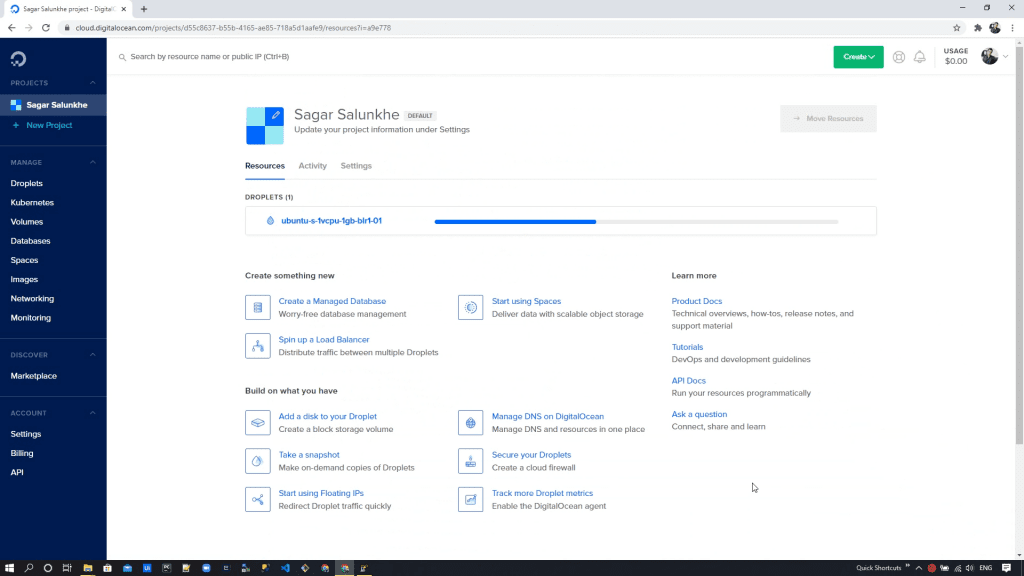
12. Your DigitalOcean Cloud Server Droplet is created and ready to use.
Assign Floating IP address to DigitalOcean Droplet
A Floating IP is an IP address that can be instantly moved from one Droplet to another Droplet in the same datacenter. Part of a highly available infrastructure is being able to immediately point an IP address to a redundant server. This is now possible with the addition of Floating IPs.
Follow Below Step to create Floating IP Address for Digital Ocean Server
1.Go to Project Dashboard in your DigitalOcean Account.
2. Click on Create button on the top left corner of your Project Dashboard. Choose Floating IPs from list of options.
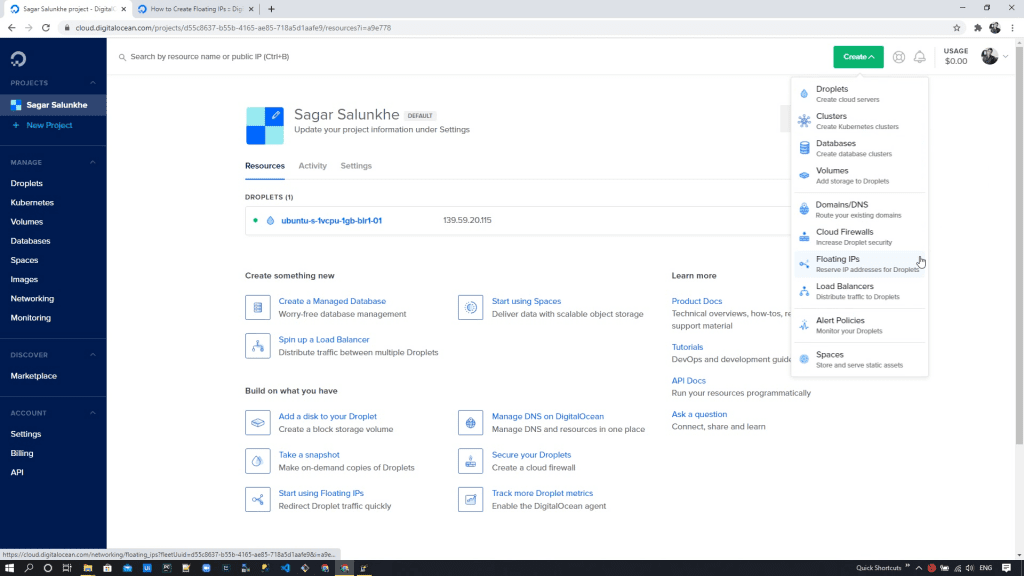
3. On the Floating IPs screen, select your Droplet Server instance in Search for a Droplet textbox. Assign Floating IP button will be enabled.
4. Click on the Assign Floating IP button and Floating IP address will be assigned to your droplet instance.
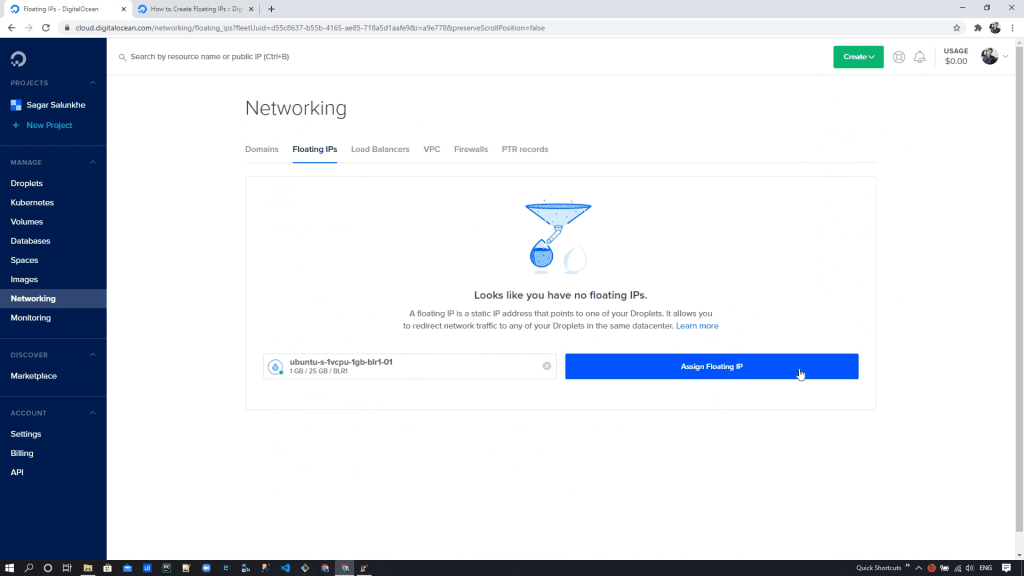
5. A list of Floating IPs will be visible after the successful assignment of the IP Address.
Connect to DigitalOcean Droplet using WinSCP & Putty
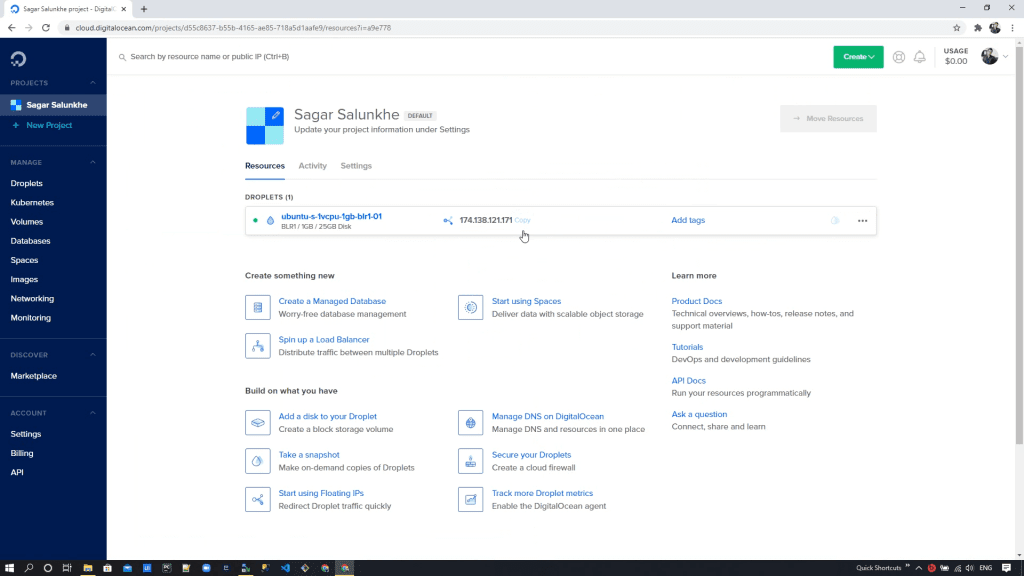
1. Go to the Project Dashboard screen in your DigitialOcean Account.
2. Copy the Floating IP address of your Droplet instance.
3. Open WinSCP.
4. In the Host name section, enter the copied IP from the Floating IP address.
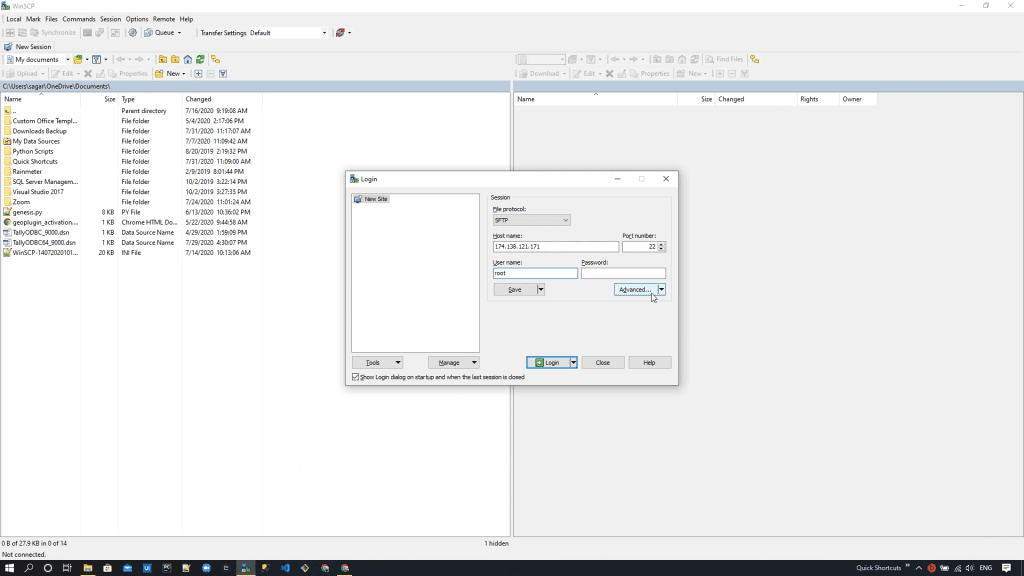
5. Enter the User name as “root”.
6. Click on Advanced, select Authentication.
7. In Private key file browse and select the saved ssh private key “newtum-digiocean-key.ppk”.
8. Click on Login.
9. Enter the Key Passphrase.
10. In the Menu bar, select Commands and click Open in PuTTy. You can use the shortcut keys as Ctrl+P.
11. Enter the Passphrase.
Connecting to a Linode Server with WinSCP and putty
People choose Linode because they demand a better customer support experience. Other cloud providers deprioritize support in pursuit of lowering costs and maximizing revenues. Linode’s independence and mission drive us to a different standard, where the customer is the driving force behind everything we do.
How to register a Linode Account?
- Go to Linode Cloud Official Website here – https://www.linode.com
- Use the given URL to get $100 Credits on signup. You can use these credits for 60-days, after which the remaining credits will get dissolved.
- Click on the Sign Up button in the top right corner.
- If you already have a Linode account, you can choose to Sign In. To create a fresh account, you can follow the below steps.
- Please enter your valid email address, username and password. Make sure you are entering a strong password to match the linode password policies.
- You can also choose to sign up using social accounts like google or Github. For this tutorial, we will follow the email sign-up method.
- Once you provide the account information, please check for a confirmation email from the Linode team. Click on the Confirm button link from the email body.
- Fill up the Billing Information form, and enter valid Credit Card details. Click on Create Account.
Note: A small transaction of INR 2 or 1 USD will be charged to confirm your card details. The amount will be released by Linode within 7-15 working days into the same credit card account as per their agreement.
- Once payment information is verified, you’ll see a Congratulations! Page. Click on the Go to Cloud Manager button on the screen.
- Your Account registration is completed. You can see the Linode Dashboard now.
- To verify your Free Credits worth $100, Click on your username in the top right corner and from the dropdown click on Billing & Contact Information.
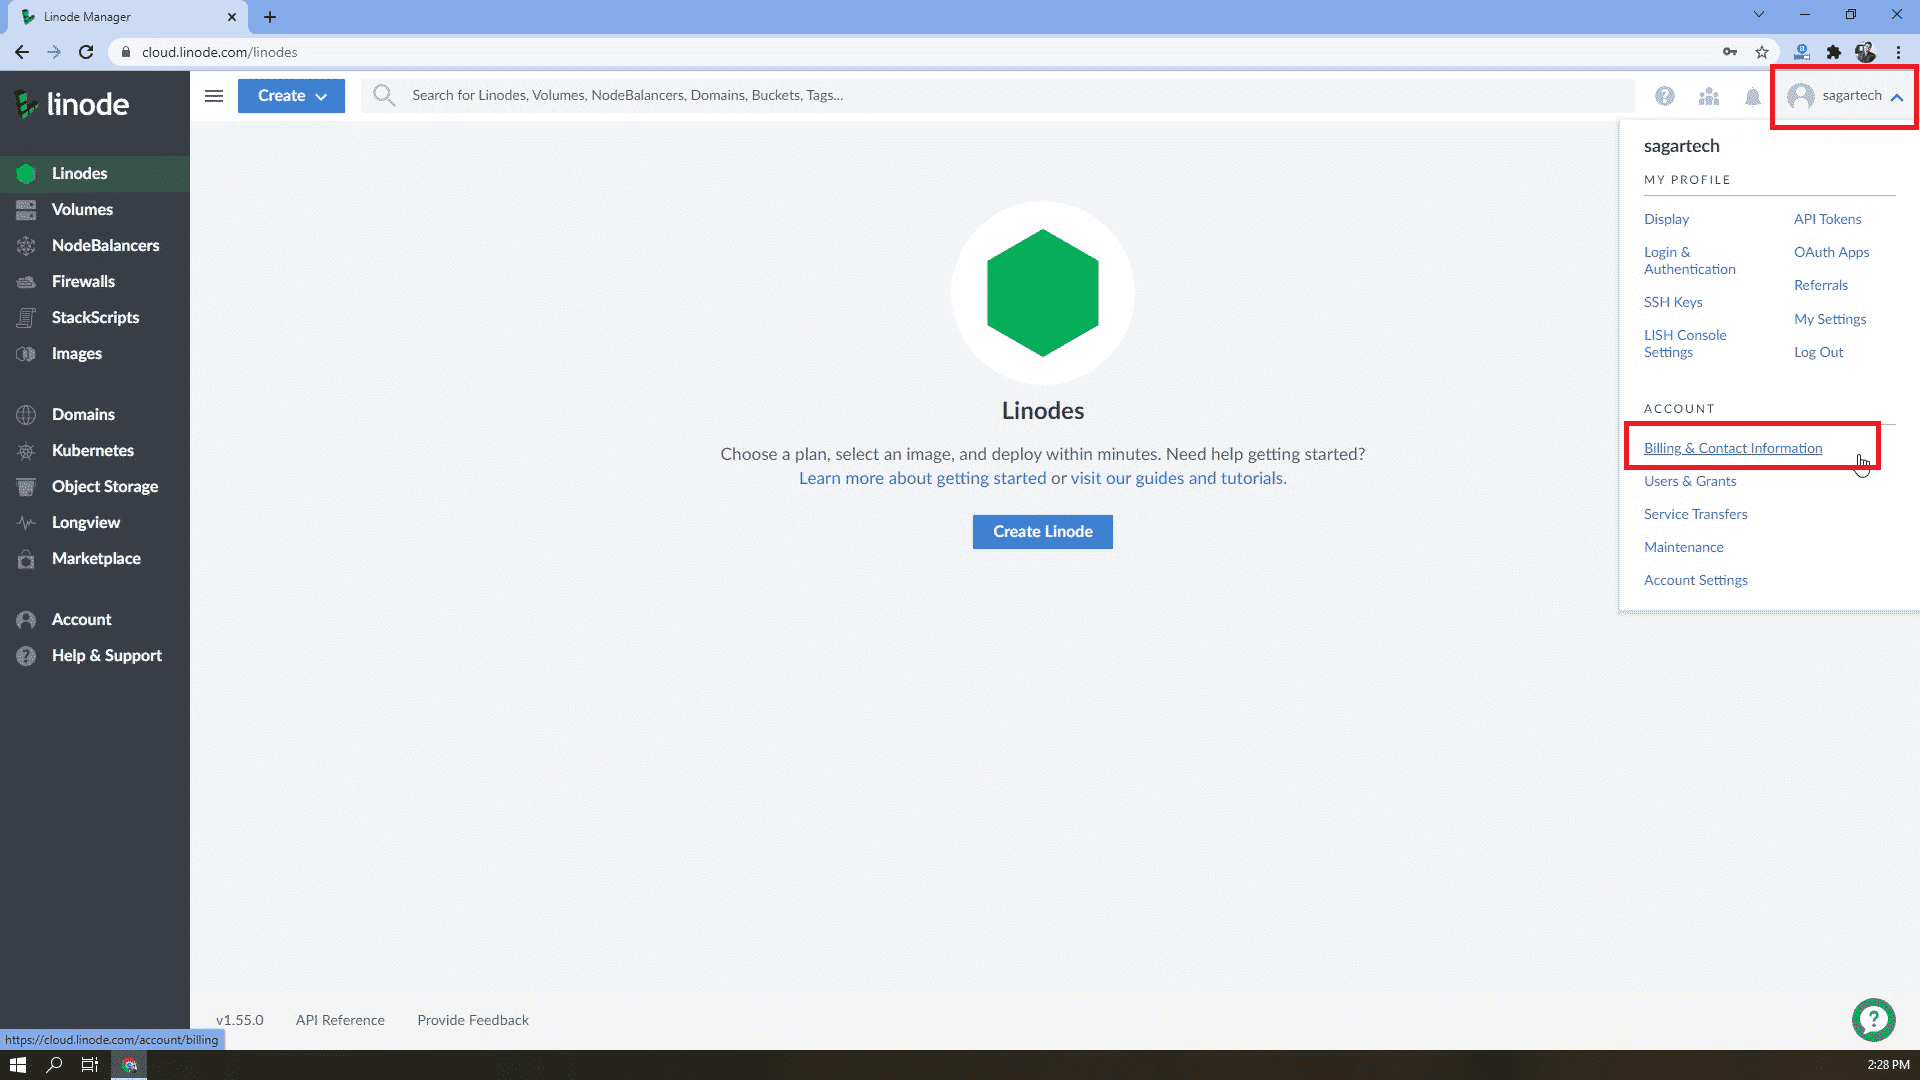
- You’ll see a promotional $100 Credit Balance under the Promotions section.
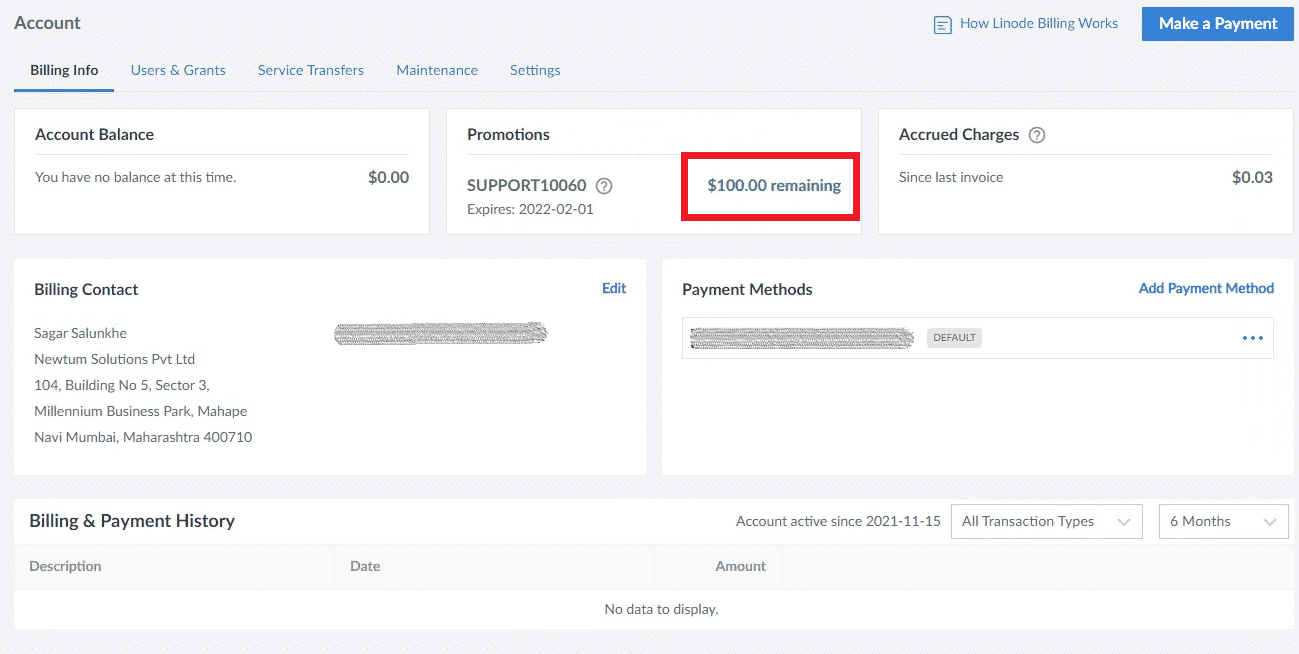

- In case you don’t see $100 credits after signing up, raise a ticket to the Linode Support team here – https://cloud.linode.com/support/tickets and claim your free credits.
How to Create a Linode Server instance?
Linode provides a wide range of dedicated and shared CPU linodes for all your server needs.
- Login into your Linode account here – https://login.linode.com/login
- Enter your valid username and password credentials to log in.
- On the Linode dashboard, Go to the Linodes menu from the sidebar, and on that page, click on the Create Linode button.
- Linode is nothing but the virtual server that we need for coin building.
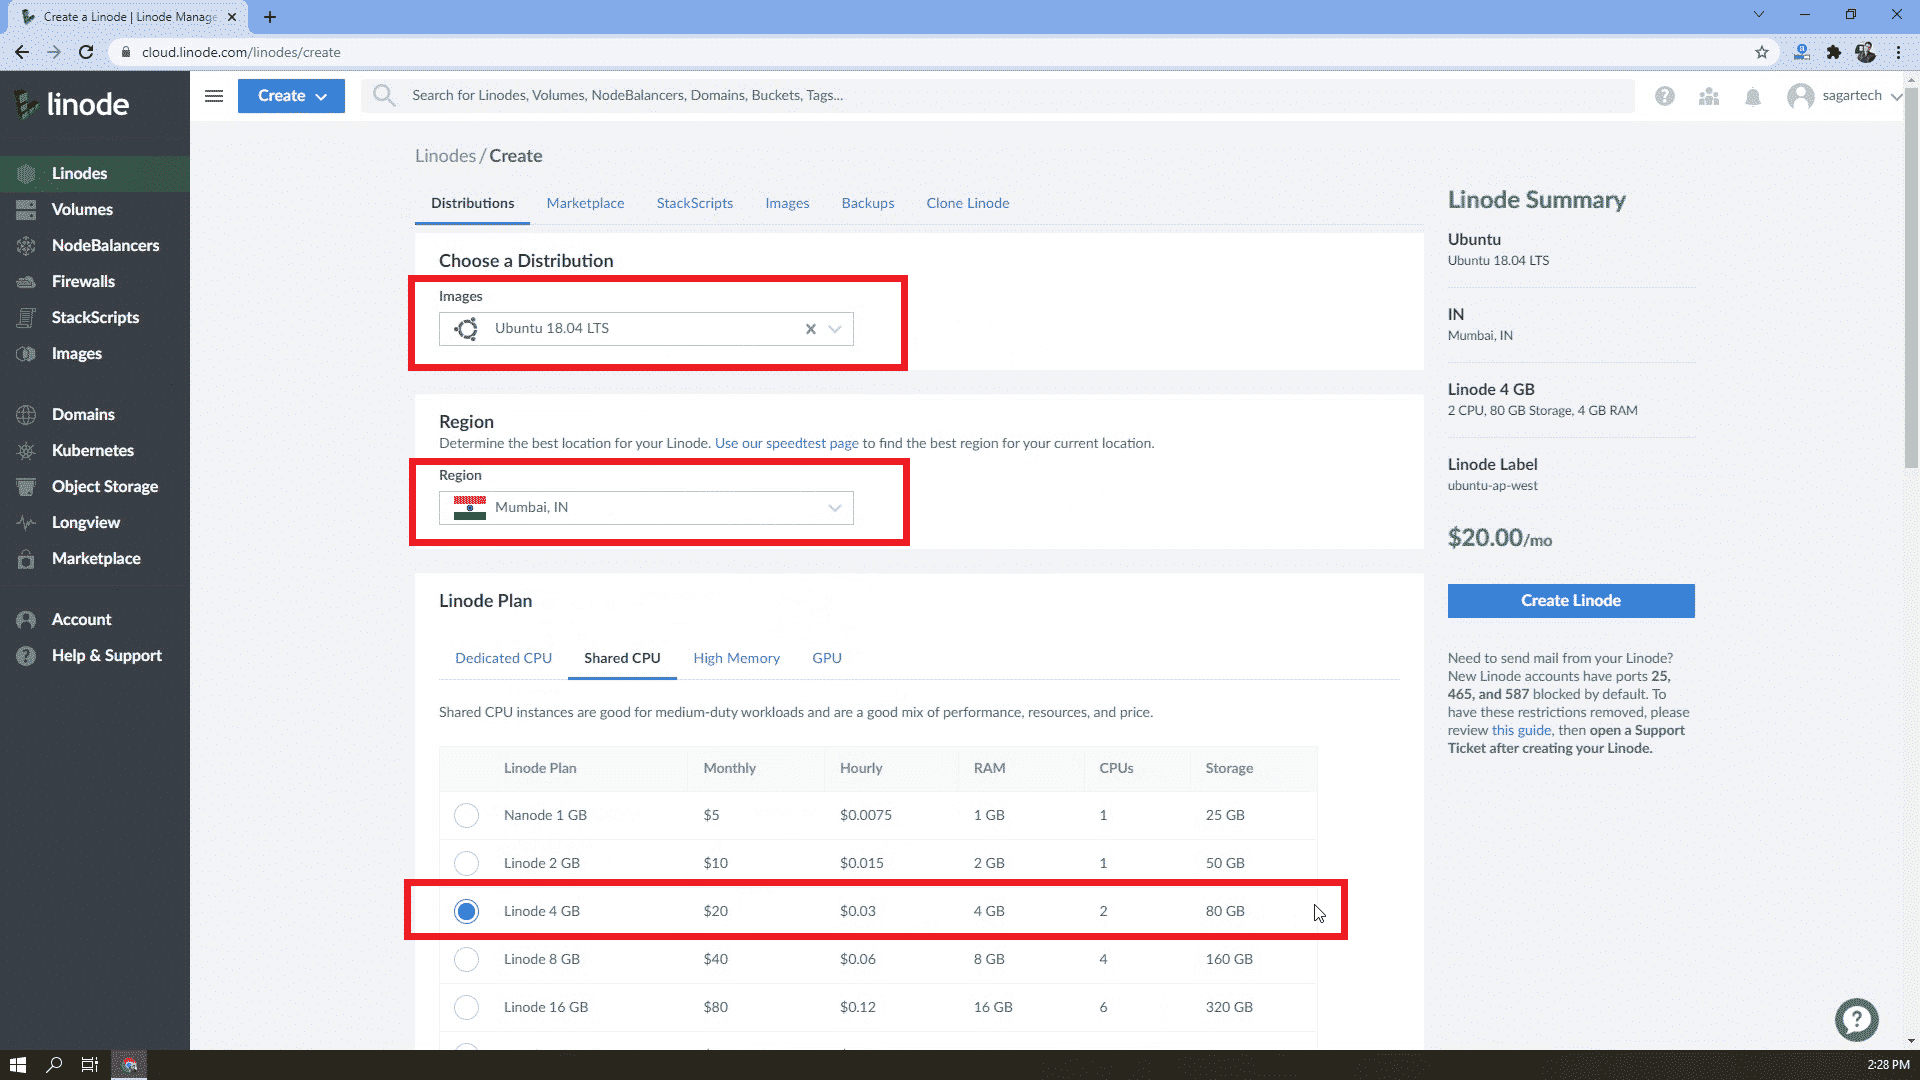
- On the Create Linode screen, the Distributions tab will be, by default, selected.
- In the Distributions tab, choose Images dropdown and select the option Ubuntu 18.04 LTS.
- In the next section, choose the server Region nearest to your current location. Here, I have selected Mumbai, IN.
- In Linode Plan, you can select server configuration as per your need. I have selected a Shared CPU Linode 4GB instance.
- You can set your Linode server instance label from the Linode Label section.
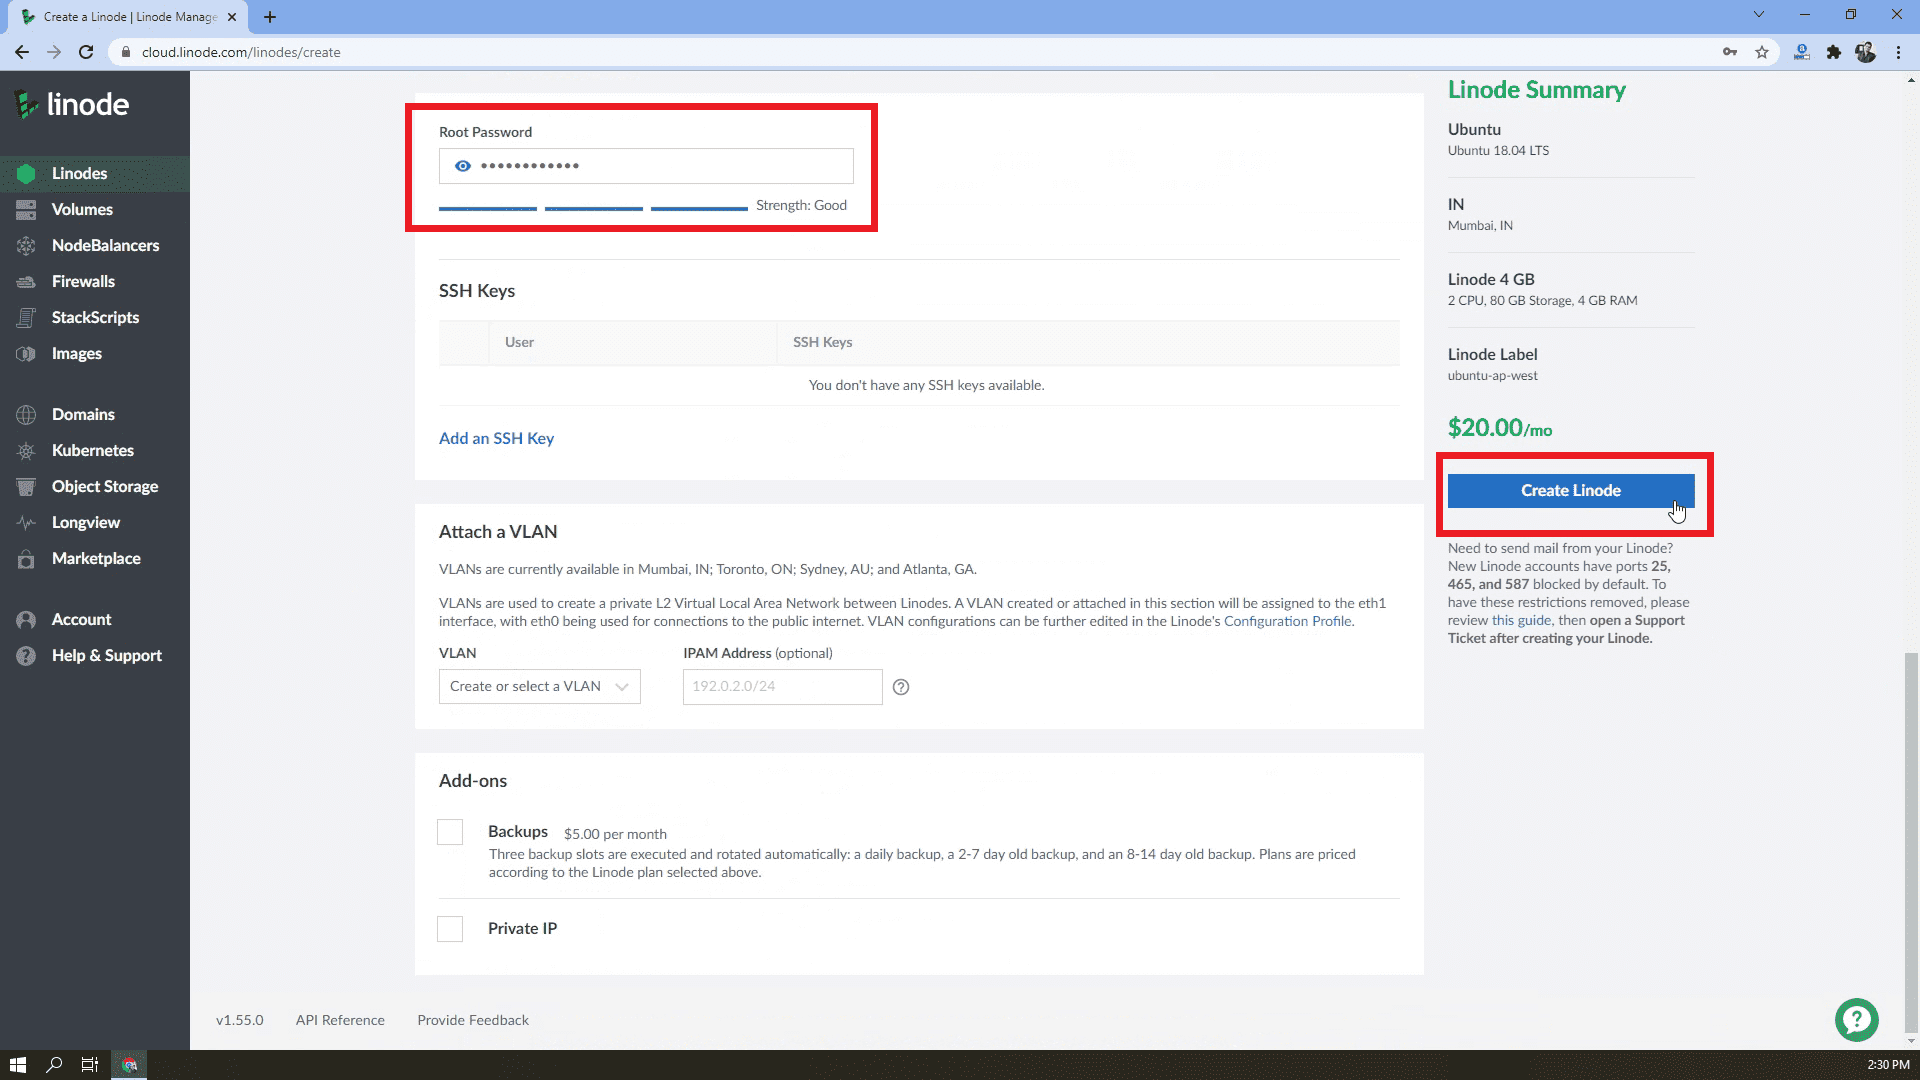
- In the Root Password section, please set up a strong password for your server Root user. Please store this password at a safe place, it will be required to login into your server.
- You can set up an SSH key if you want; I have left it blank.
- Once all these steps are completed, click on the Create Linode button from the Right sidebar section.
- Your server setup is completed and ready to connect!
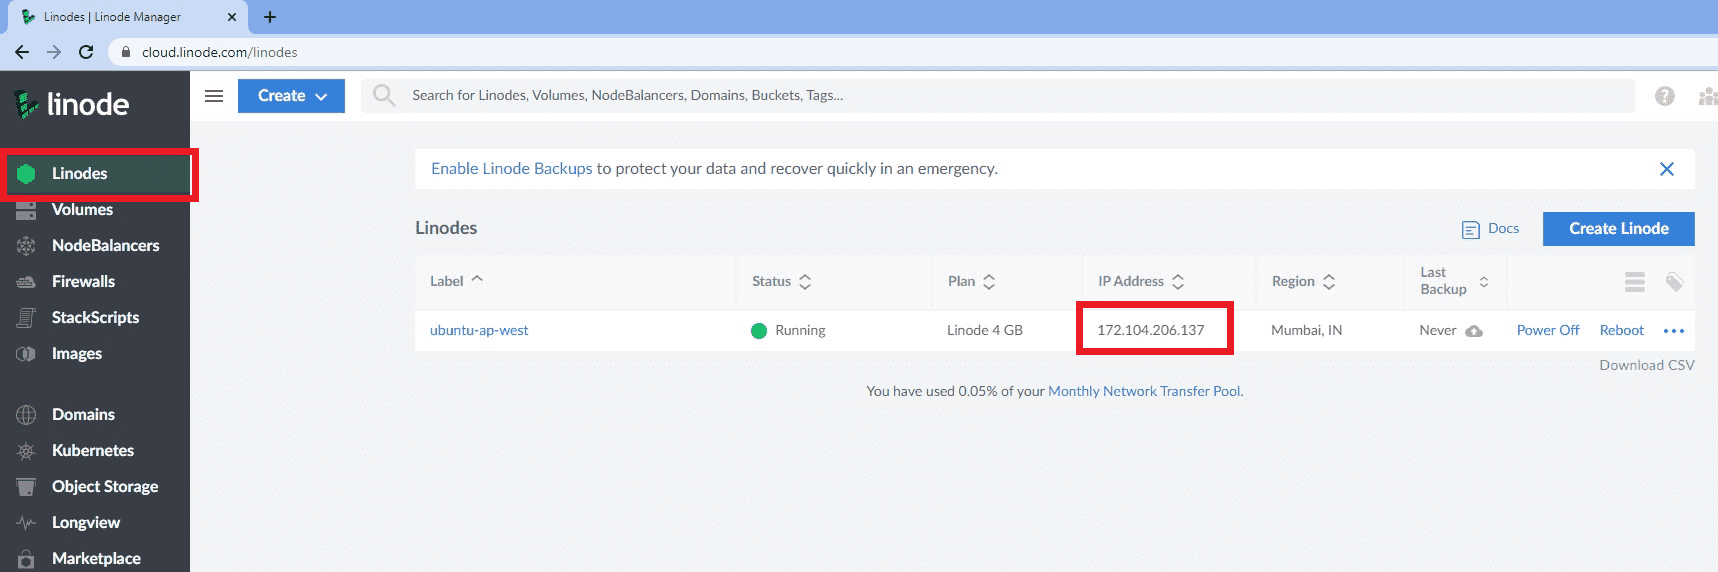
- Go to the Linodes list by clicking on the Linodes menu from the sidebar. You will see our new instance in the list with an IP address.
Static IP Allocation to a Linode Server
All Linode servers have a static IP assigned by default. So even if you reboot the server, your IP will remain the same.
Connect Linode instance using WinSCP
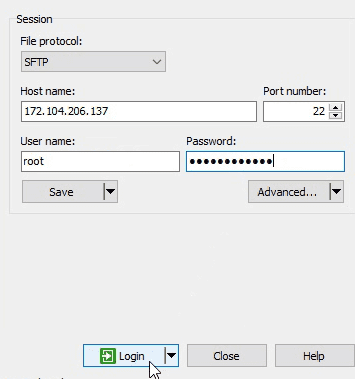
- Open WinSCP application
- Connection Host name will be the IP address of our Linode instance. Go to the Linodes list by clicking on the Linodes menu from the sidebar. You will see our instance in the list with an IP address.

- Enter User name as “root”. This will be the default username for our instance access.
- Enter your Root Password in the Password textbox. It is the same password that we’ve entered while creating our Linode server instance.
- Click on Login to continue login into the server.

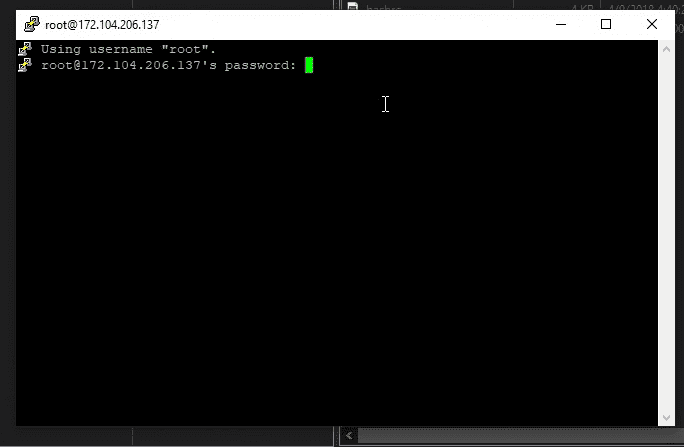
- WinSCP will show dialogue to add the host key in the cache; click on Yes.
- You are now connected to the Linode server instance.
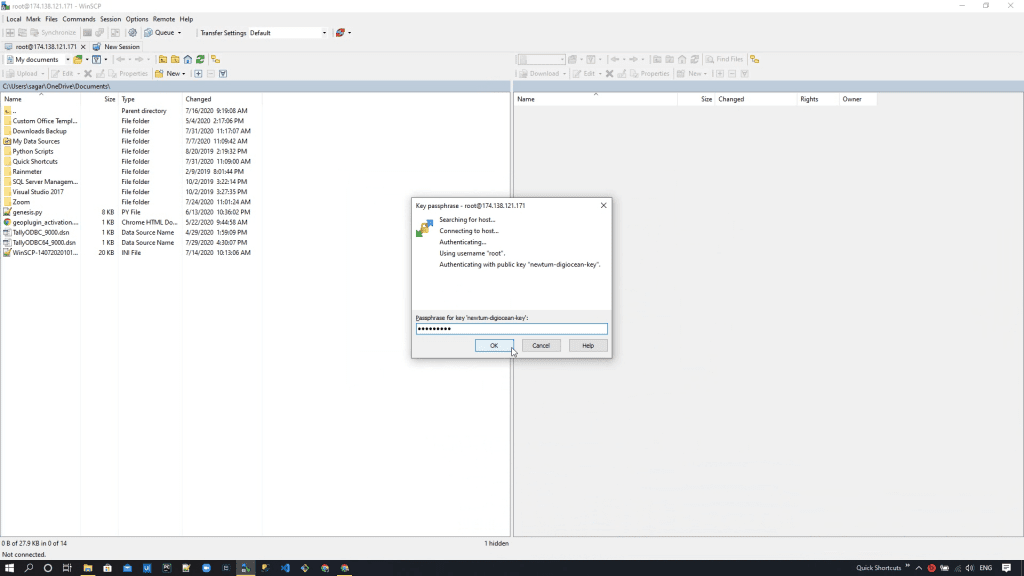
Connect to Linode instance using Putty
- Connect to the Linode server instance using WinSCP.
- Go to the Commands menu, choose “Open in Putty” option from the list. You can also use “Ctrl + P” as a keyboard shortcut.
- Enter passphrase in putty command prompt, hit Enter.
- You are now connected to the Linode server instance server command line using putty.
Connecting AWS EC2 instance with WinSCP and putty
Connecting AWS EC2 Instance (It’s nothing but a server VPS) will require to create the account. After the account is created we need to create an EC2 instance. Then finally we will connect that using WinSCP and putty.
Setting up AWS Account
1: Go to Amazon Webservices page here (link: https://aws.amazon.com/)
2: Click on Create an AWS Account button on top right corner

3. If you already have an AWS account, you can choose to Sign in to an existing AWS Account. To create a fresh account, you can follow the below steps.
4. Enter your correct account information and then click on the Continue button. Make sure you enter valid email address, here you will receive a confirmation email from AWS account.
5. Choose Account type as Personal and fill up the personal details form. Click on accept AWS Customer Agreement. Then choose Create Account and Continue.
6. On the next page Payment Information, please add valid Credit Card details and click on Verify and Add.
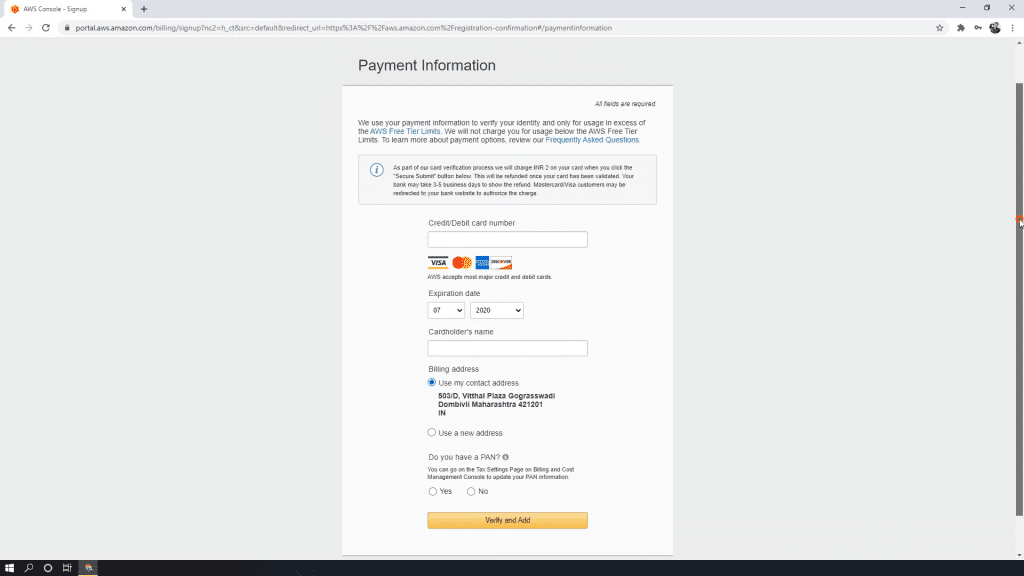
Note: A small transaction of INR 2 or 1 USD will be charged. But don’t worry; AWS will refund the amount within 7 working days into the same credit card account.
7. Once payment information is verified, you need to confirm your identity by verifying your mobile number. An OTP will be sent to your mobile number for verification.
8. On the next page, Select a Support Plan; choose Free Basic Plan, where you will be having free tier server for use
9. Once registration is completed, you can have an optional screen to Personalize your Experience. Select Role as “Student”, and I am interested in “Learning & Certification”.
10. You must have received a confirmation mail to your email account from AWS. Click on the Access Account link to verify your email address. You can use the same email address and password to login into your AWS account
The above 10 steps will ensure that your account is created with AWS. The next step will be to create an EC2 instance and connect that using WinSCP.
How to Create an EC2 instance Amazon?
Amazon Elastic Compute Cloud (Amazon EC2) is a web service that provides secure, resizable compute capacity in the cloud. It is designed to make web-scale cloud computing easier for developers.
Amazon EC2’s simple web service interface allows you to obtain and configure capacity with minimal friction. It provides you with complete control of your computing resources and lets you run on Amazon’s proven computing environment.
First, Login into your AWS account to create a Server for you (EC2 Instance)
- Go to the Amazon Webservices page here (link: https://aws.amazon.com/)
- Click on Create an AWS Account button on the top right corner
- Then click on Sign in to an existing AWS Account. Choose option Root user and enter your email address and password to sign in
Create EC2 Instance
1. Click on the Services Menu option situated in the top left corner. Here you will see a variety of services provided by amazon web services.
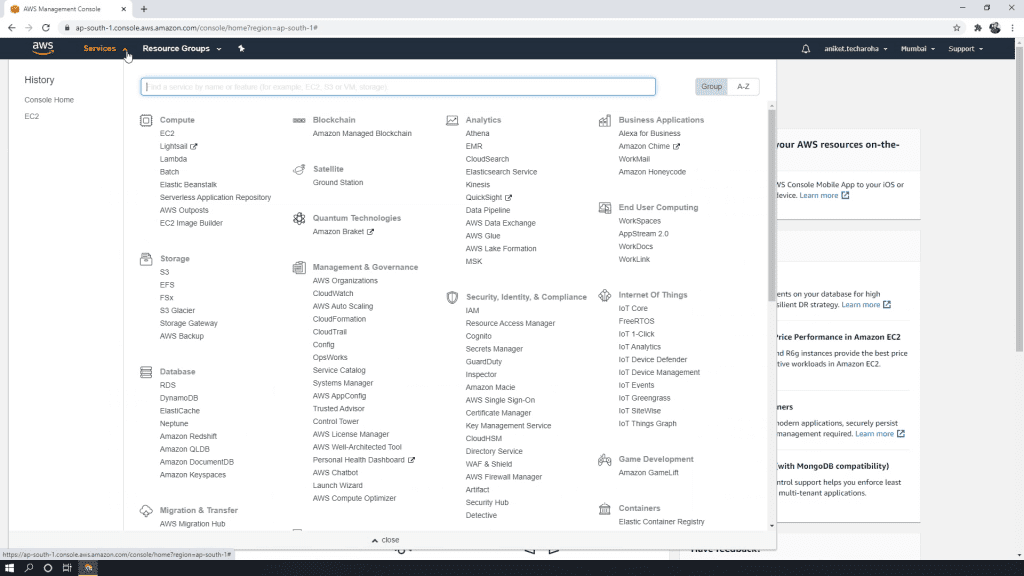
2. Click on the EC2 option under the Compute group. EC2 stands for Amazon Elastic Compute Cloud.
3. On the EC2 Dashboard page, you will see AWS Region in the top right corner. Select Asia Pacific (Mumbai) ap-south-1 from the list. Please choose your preferred region. Since our website users are from India, we have chosen a server in India. You can choose the region from the USA, UK, Japan, Australia, etc.
4. Click on the Launch Instance button.
After clicking on Launch Instance, you will have to follow a series of steps to create your instance. Actually, this is more of a configuration than an installation. The steps are plain and simple. Still, we have explained them below.
Steps to Configure Instance in AWS
5. In Step 1: Choose an Amazon Machine Image(AMI), type Ubuntu in the search box and hit enter.
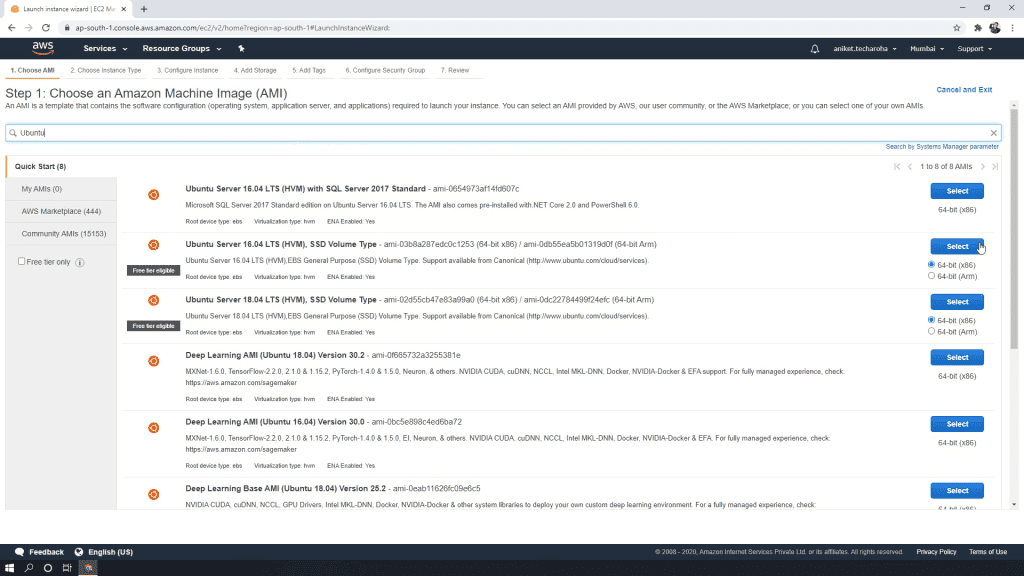
6. You will see a filtered list of ubuntu operating system releases. Select Ubuntu Server 18.04 LTS (64-bit) from the list.
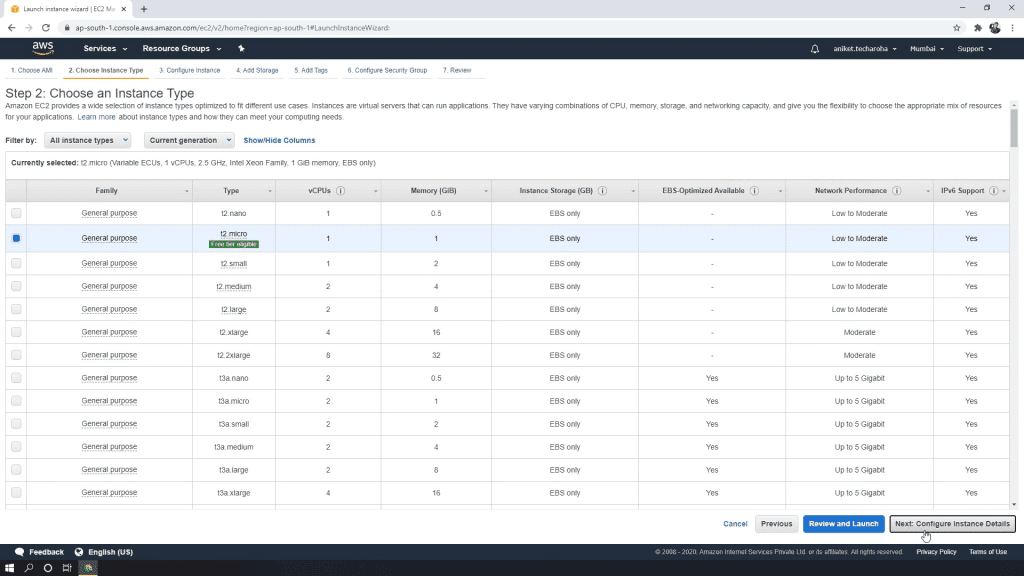
7. In Step 2: Choose an Instance Type; we will select the t2.micro instance type. This server instance has 1 virtual CPU and 1 GB RAM. This instance is available for free tier usage. Click on the Next: Configure Instance Details button.
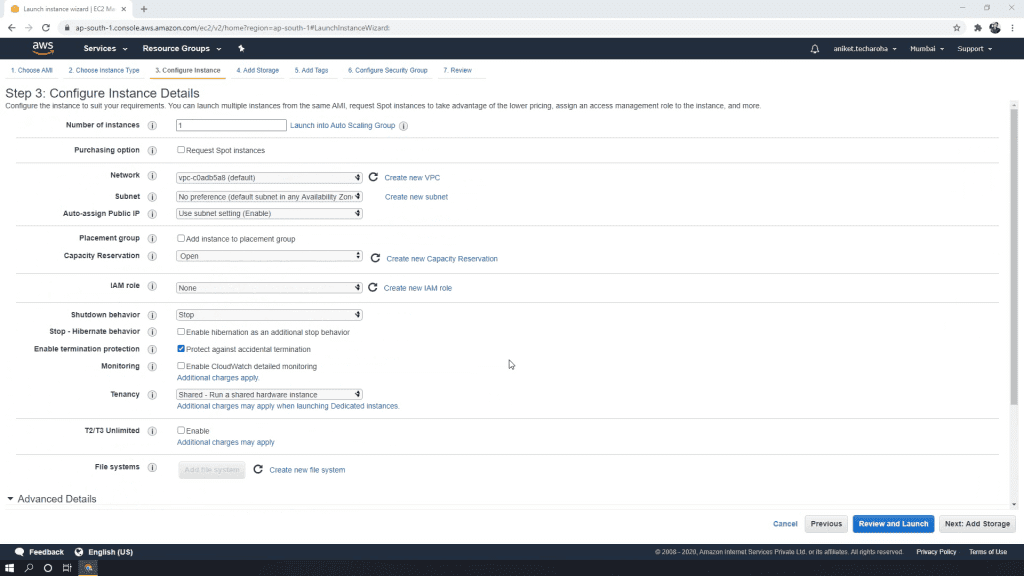
8. In Step 3: Configure Instance Details, keep all the default options selected as it is. Click on Next: Add Storage button to continue.
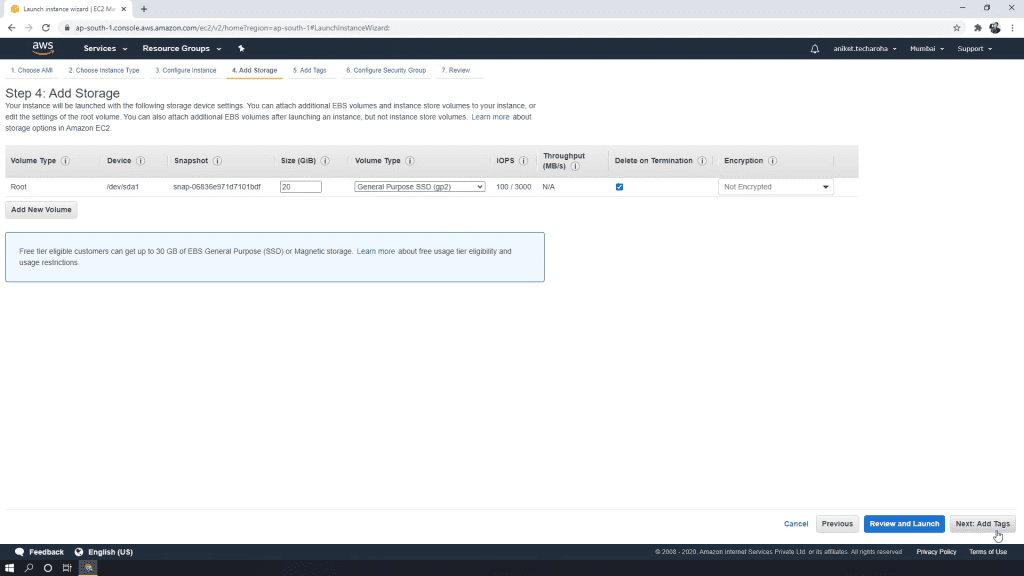
9. On the next page, Step 4: Add Storage, you can mention the size of your virtual disk volume. Mention it as 20GB in the Size (GiB) textbox column. Click on the Next: Add Tags button.
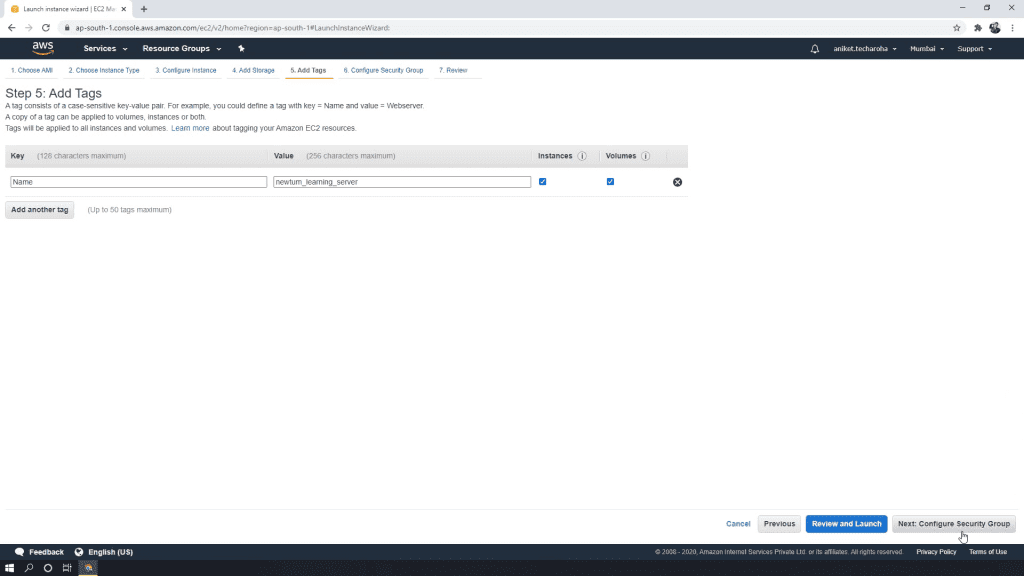
10. In Step 5: Tag Instance, Click on Add Tag button. Mention key as “Name” and Value as “newtum_learning_server”. Click button. Next: Configure the Security Group button to continue.
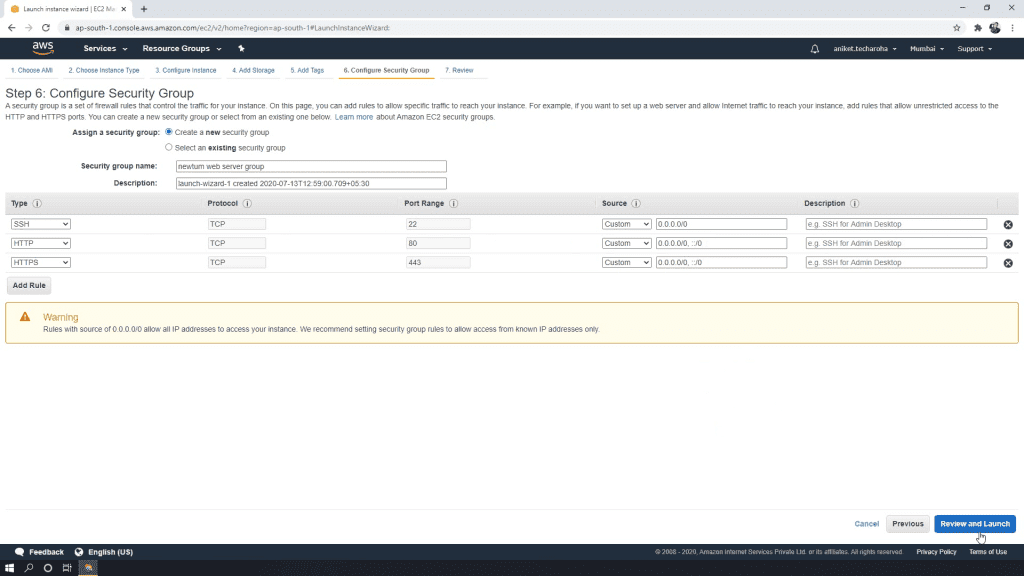
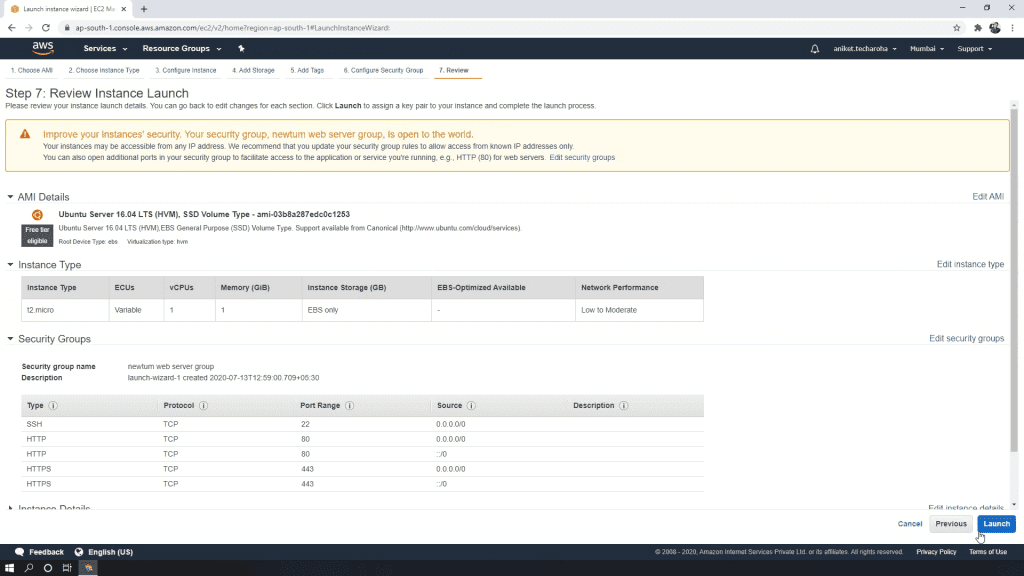
11. Step 6: Configure Security Group, write Security group name as “newtum webserver group”. Add type SSH, HTTP, and HTTPS into the rules. Click on the Review and Launch button.
12. On the next page, Step 7: Review Instance Launch, verify all the settings. And click on the Launch button to continue.
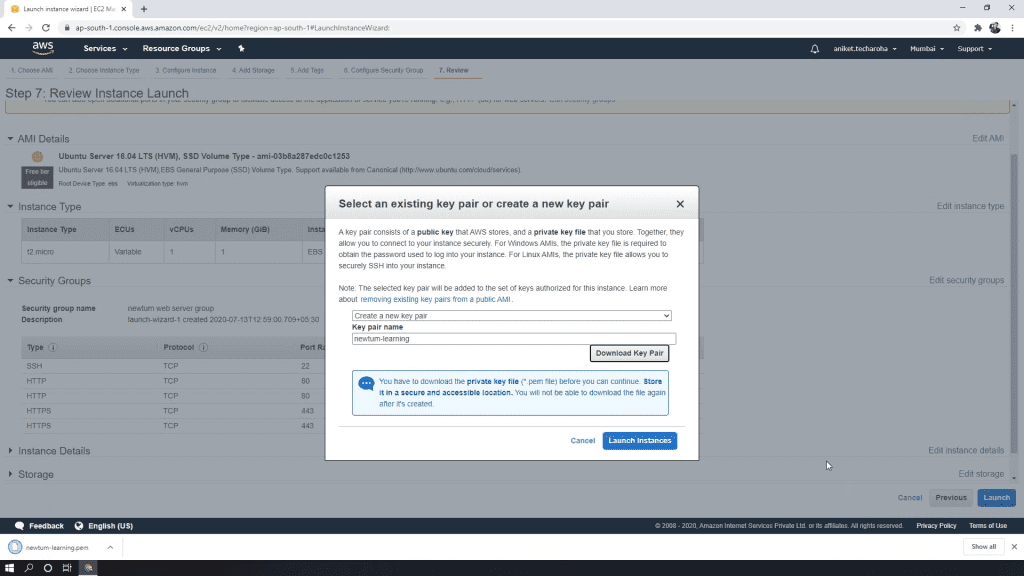
13. In the next a popup window will appear to create a key pair. A key pair is a combination of public and private keys. These keys are important to remotely connect to our instance. In the first dropdown, choose “Create a new key pair” and give the name “newtum-learning”, Download Key Pair. A poem file will be downloaded. Keep the file secured and do not lose it; without this key you will not be able to access the instance. You cannot re-download the file.
14. Once the file download is complete, hit on the Launch Instances button.
15. You can see created instance on the EC2 instances list by clicking the “View Instances” button.
Elastic IP Allocation
An Elastic IP address is a reserved public IP address that you can assign to any EC2 instance in a particular region until you choose to release it. We use this Elastic IP address to connect to our server using WinSCP and Putty.
When you associate an Elastic IP address with an EC2 instance, it replaces the default public IP address. If an external hostname was allocated to the instance from your launch settings, it would also replace this hostname; otherwise, it will create one, for instance. The Elastic IP address remains in place through events that normally cause the address to change, such as stopping or restarting the instance.
Please follow the below steps to create an Elastic IP for your EC2 instance.
1. Click on the Elastic IPs link from the left menu drawer under Network & Security group.
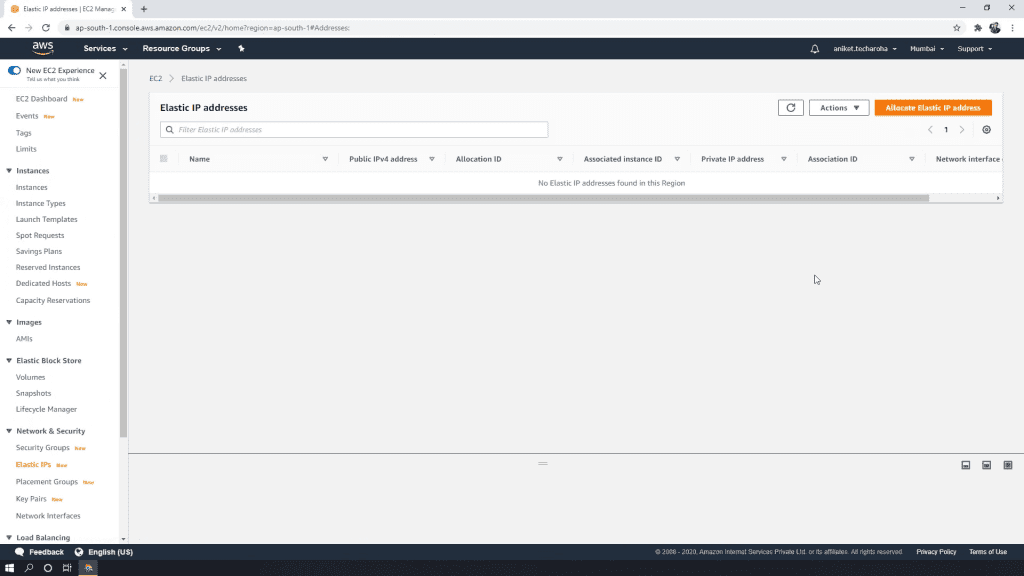
2. Click on Allocate Elastic IP address button on the top right.
3. On Allocate Elastic IP Address page, keep default settings selected and click on Allocate button to get a static IP address.
4. From the list of Elastic IP Addresses, click the IP address link to open Elastic IP address details.
5. Click on the Associate Elastic IP address button to continue.
6. On the Associate Elastic IP address page, select instance in the “choose your instance” text box. Click on the Associate button, and the Static IP address will get allocated to your instance. Using the same IP you can connect to your server instance using WinSCP and Putty
Generate PPK file from PEM file for WinSCP and Putty
We already have pem file downloaded from the AWS cloud while creating the EC2 instance. We will use the same pem file to generate ppk file. This ppk file will be used to connect aws ec2 instance from our desktop.
Below step by step guide that will help you with PPK Generation.
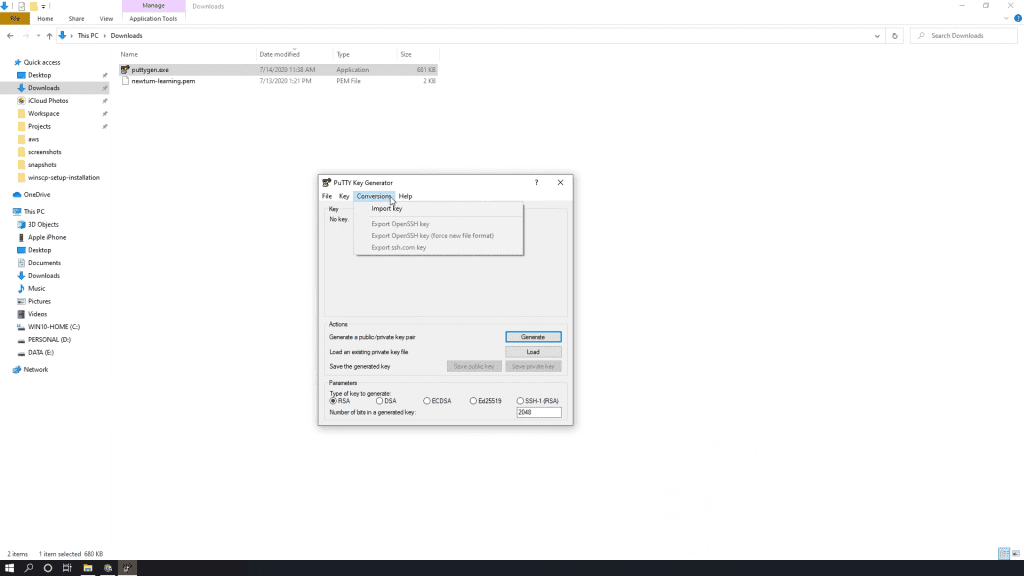
1. Run Puttygen executable
2. Go to menu option “Conversions”, and choose “Import Key”.
3. In the browse window, select pem file and click Open.
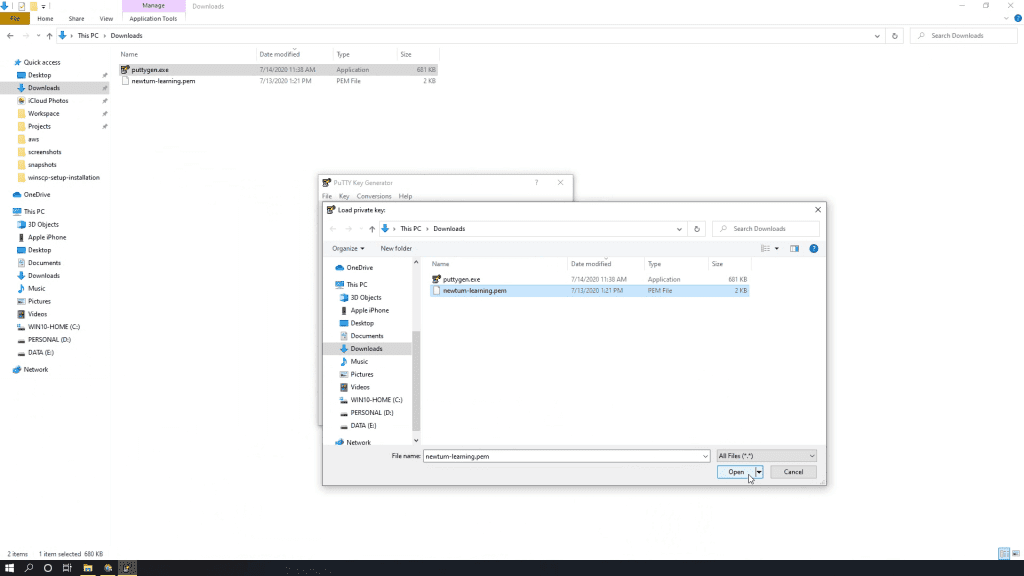
4. In Puttygen window, fill up the details. Set Key comment as “newtum-aws-server-key”.
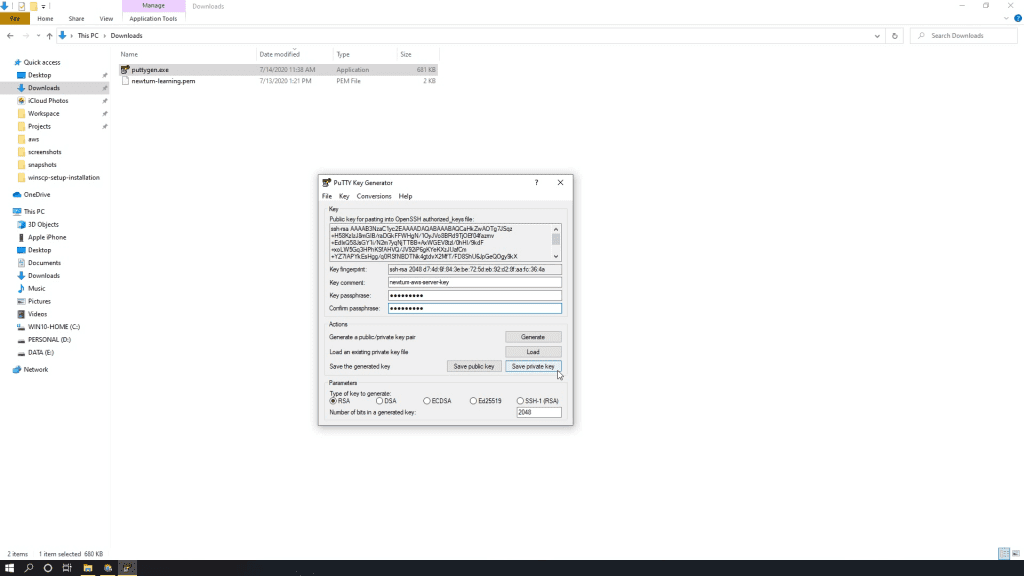
5. Set passphrase and note it down somewhere safe. Passphrase is a password that will prompt while connecting to ec2 instance from winscp.
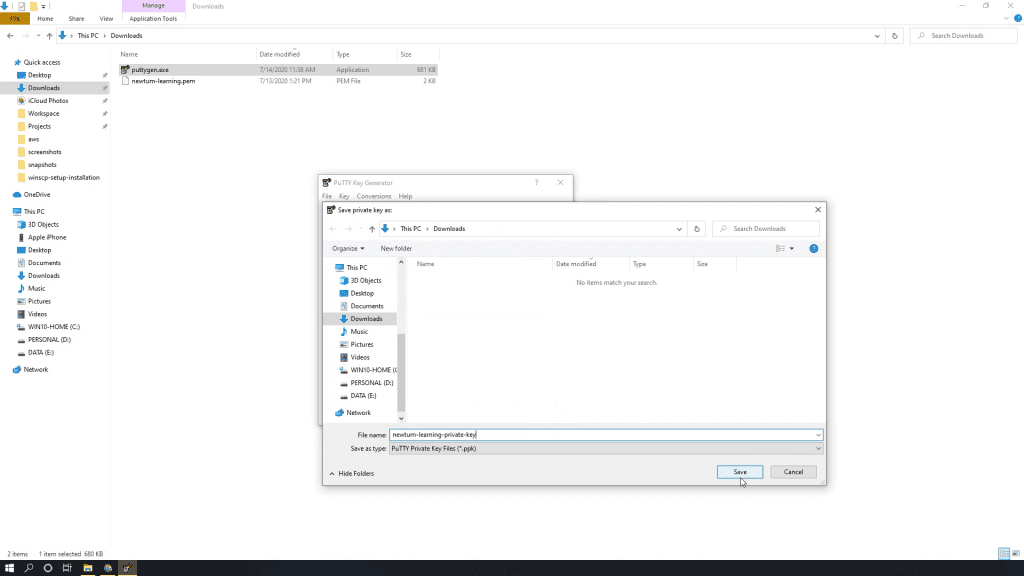
6. Click on Save private key button, and save the generated ppk file as “newtum-learning-private-key.ppk”
Connect to EC2 instance using WinSCP
Well, this is the final stage of connecting to our AWS EC2 instance using WinSCP.
Step to connect EC2 using WinSCP
1. Open WinSCP application
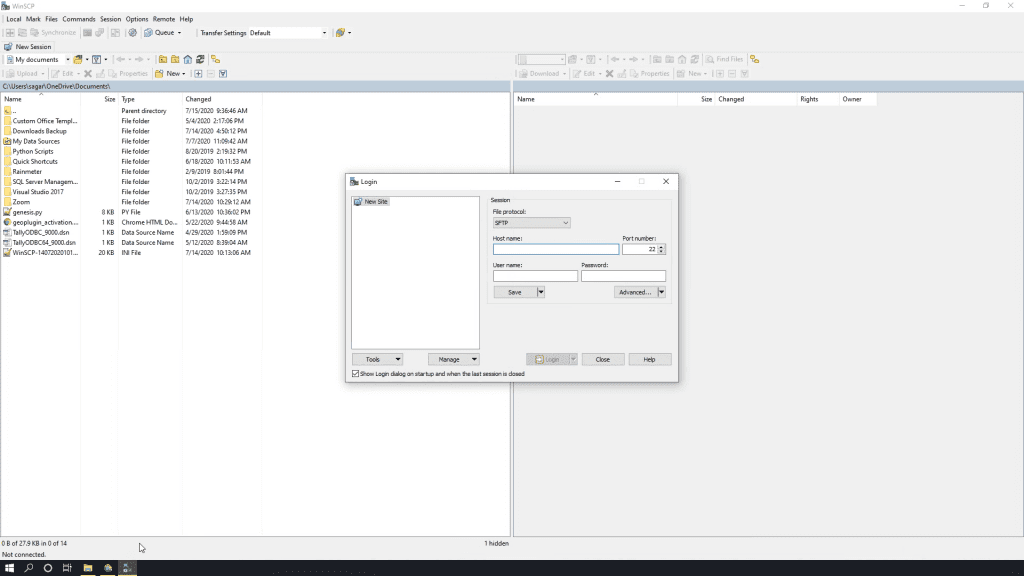
2. Connection Hostname will be the IP address of our ec2 instance. Go to our AWS ec2 dashboard, and copy the IPv4 Public IP value of our instance. Please refer to the screenshot for your reference.
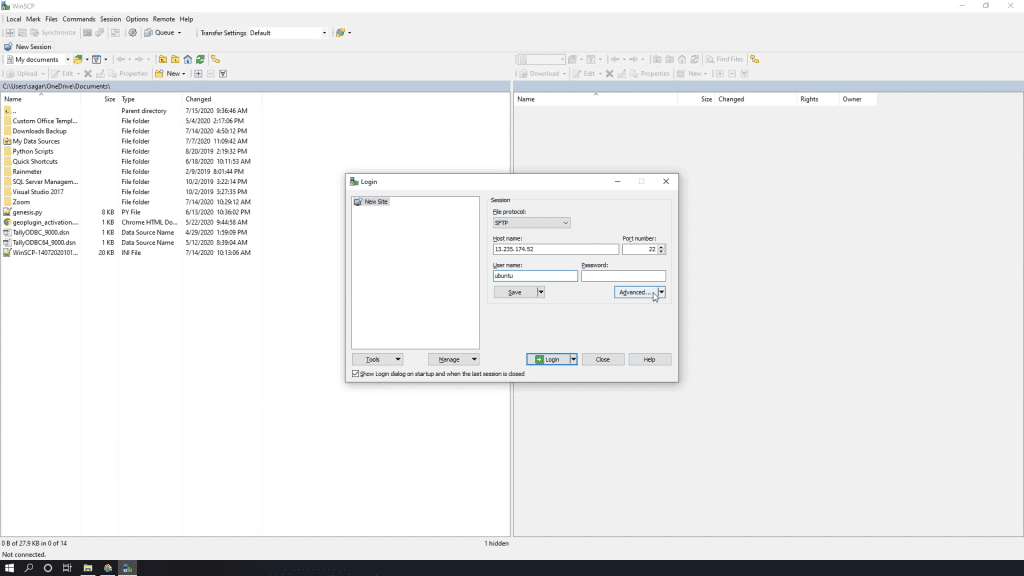
3. Enter the User name as “ubuntu”. This will be the default username for our instant access.
4. Click on the Advanced button, and select the option Authentication from the left menu panel.

5. Browse the Private key file as our “newtum-learning-private-key.ppk” file and click on Ok.
6. Click on Login to continue logging into the server.
7. WinSCP will show dialog to add host key in cache; click on Yes.

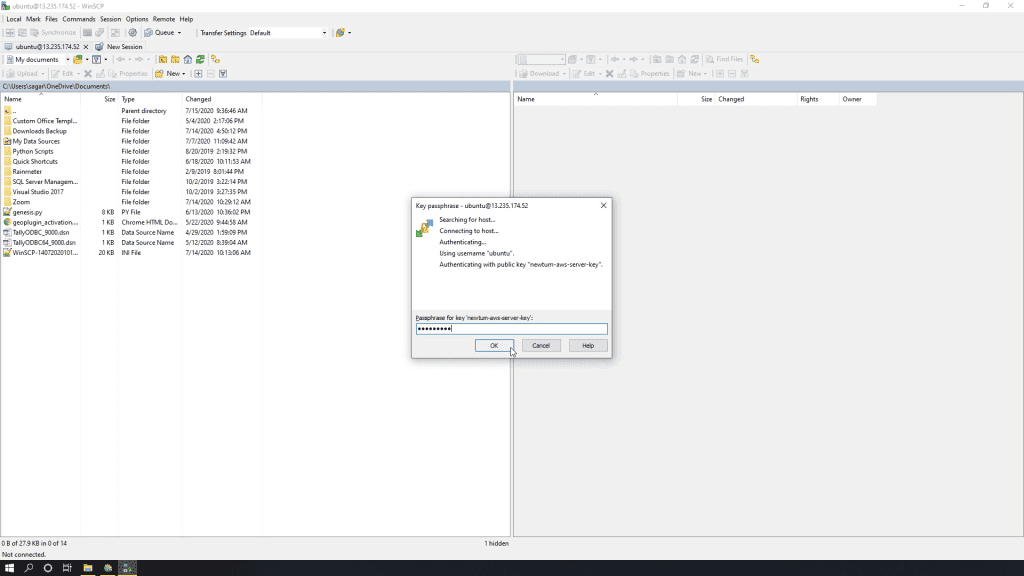
8. Enter the passphrase when prompted, and click OK.
9. You are now connected to EC2 server instance.
Connect to EC2 instance using Putty
Well , you have connected EC2 instance with WinSCP in the last section. But WinSCP alone will not help.
To execute the commands in our server, we require terminal access. Terminal access of the Ubuntu server will be done using Putty.
Step to connect to Putty with EC2 Instance
1. Connect to AWS EC2 instance using WinSCP.
2. Go to the Commands menu, and choose the “Open in Putty” option from the list. You can also use “Ctrl + P” as a keyboard shortcut.
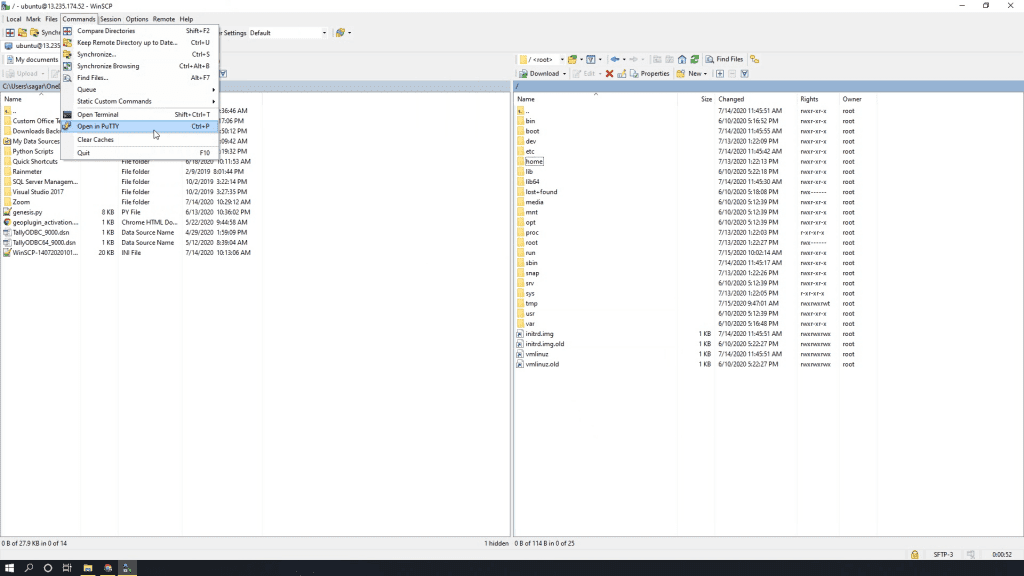
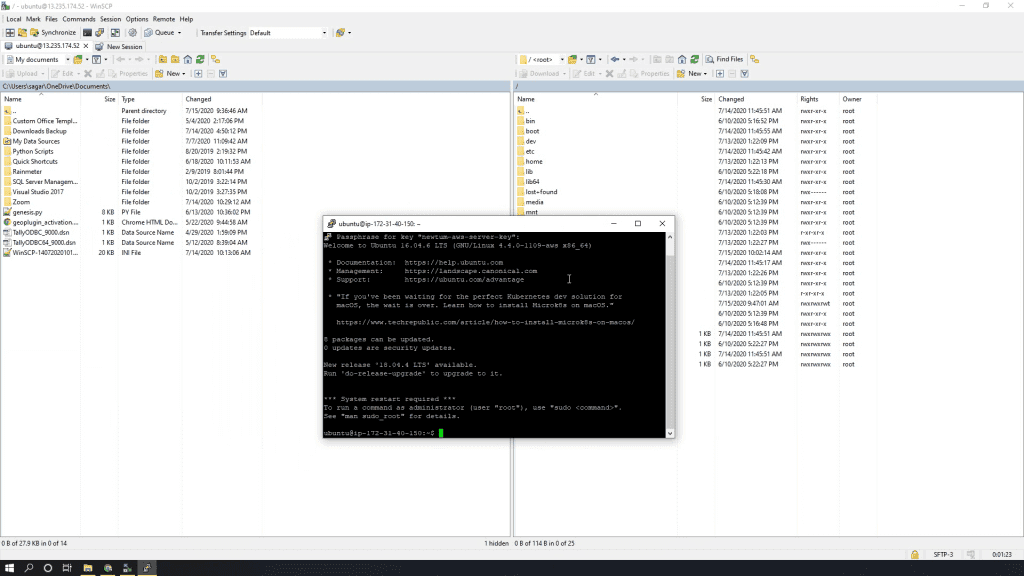
3. Enter passphrase in putty command prompt, hit Enter.
4. You are now connected to EC2 instance server command line using putty.
Connecting Google Compute Engine with WinSCP and putty
Google Cloud consists of a set of physical assets, such as computers and hard disk drives, and virtual resources, such as virtual machines (VMs), that are contained in Google’s data centres around the globe. Each data centre location is in a region. You shall get $300 free credits to use across all services of google cloud in the free trial.
Registering with Google Cloud
1. Navigate to the google cloud console using this URL http://console.cloud.google.com/
2. On page load, you will be asked for your country/region. Choose your country from the dropdown list, read & agree on the Terms of Service and click on AGREE AND CONTINUE.
3. You shall see the “Getting Started” page, and click on button Try for Free button.
4. Confirm your country and agree to the terms & services of the google cloud platform free trial. Click Continue to proceed.
5. In next Customer Info page, choose Account Type as Individual and fill in the required personal details into the form.
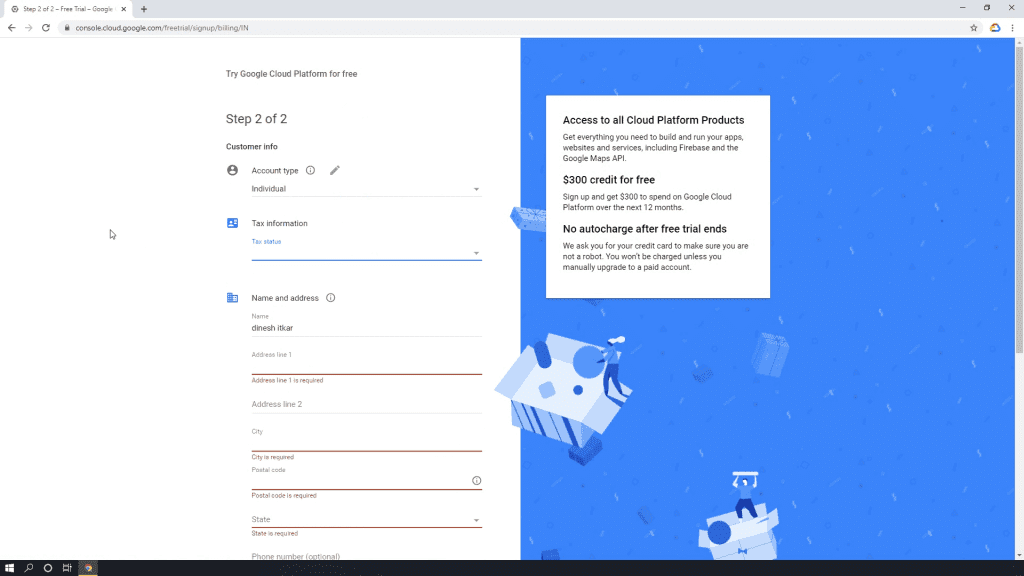
6. Personal info also involves payment information. You need to add your credit card details as billing info.
7. After confirming the billing info, you need to answer few basic questions to setup your account. You can skip this section by clicking Skip button in the bottom.
8. Done. Your Google Cloud Account has been activated.
Creating a Google Compute Engine VM Instance
Google Compute Engine (GCE) offers virtual machines running in Google’s data centres connected to its worldwide fibre network. The tooling and workflow offered enables scaling from single instances to global, load-balanced cloud computing.
These VMs boot quickly, come with persistent disk storage and deliver consistent performance. The machines are available in many configurations, including predefined sizes and can also be created with Custom Machine Types optimized for your specific needs.
Follow the Below Steps to Create Your VM (GCE Instance)
1. In the Google Cloud Platform (GCP) Console, go to Compute Engine from the left panel, and choose VM Instances.
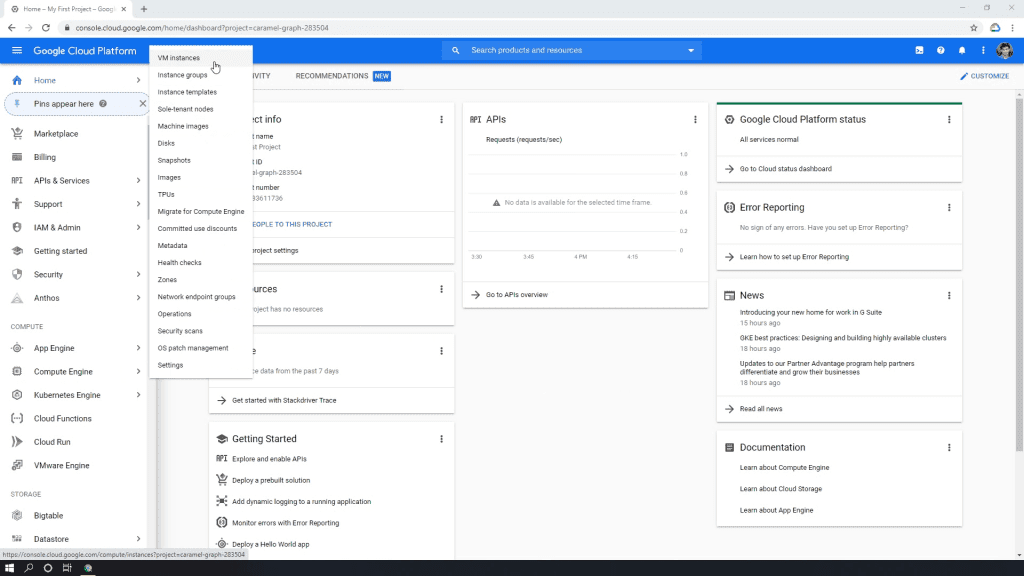
2. On VM Instance page, Click on Create.
3. Specify a Name for your instance as “newtum-glcoud-learning”.
4. You can change the Region and Zone for your instance. Closer server region will give you faster network response times.
5. In Machine configuration, you can change machine vCPU and Memory settings by choosing Machine Type as “custom”. We will keep the default configuration to n1-standard-1 for our instance.
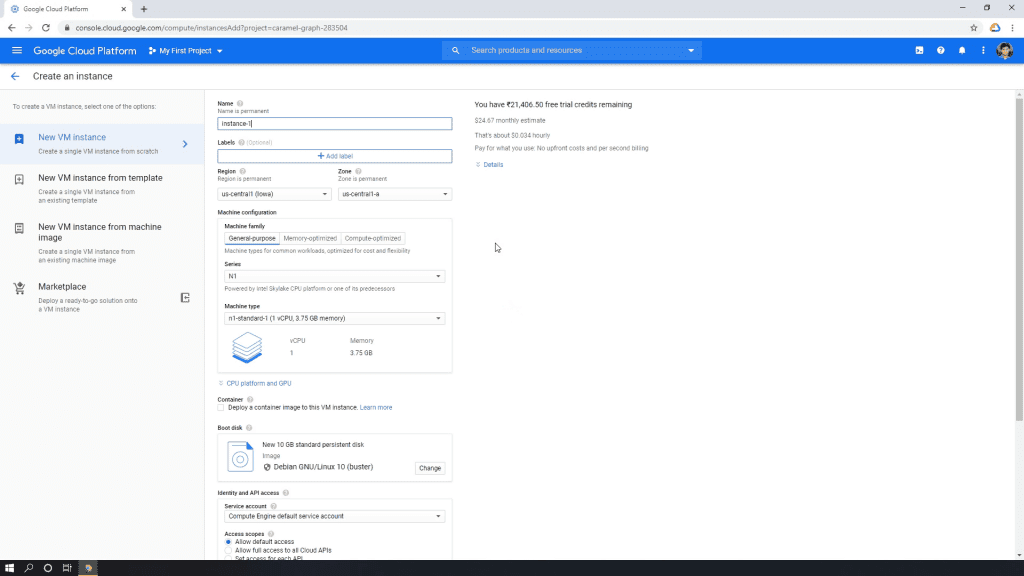
6. In the Boot disk section, you can choose Operating System and Boot disk space. Click Change to configure your boot disk.
7. In the Public images tab, choose an Operating system as “Ubuntu”, Version as “Ubuntu 18.04 LTS” and set Size value to “20”. The Boot disk size value is in Gigabytes.
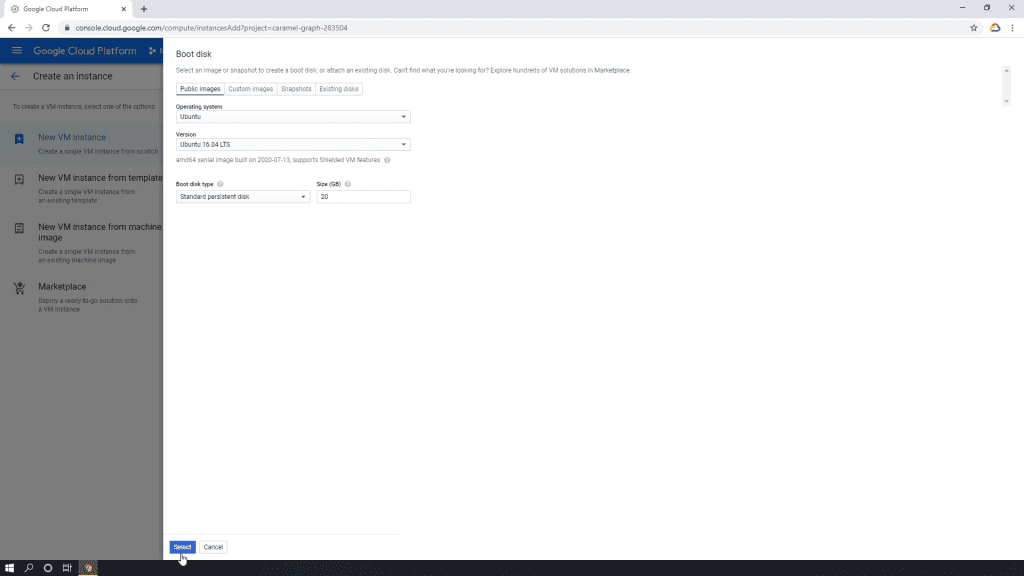
8. Click Select to confirm your boot disk options.
9. Select Allow HTTP traffic and Allow HTTPS traffic to permit HTTP or HTTPS traffic to the VM instance.
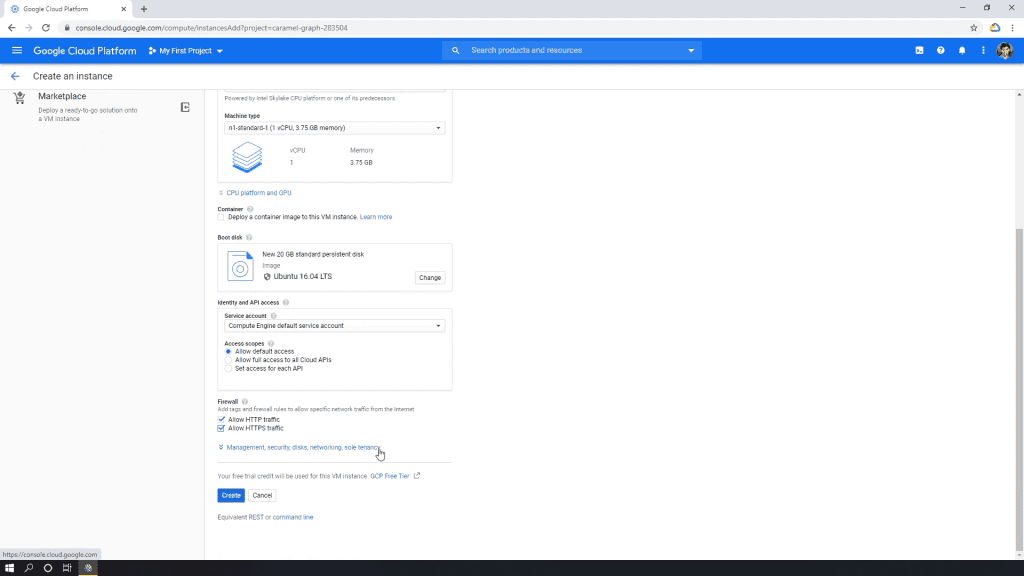
10. Click on Create button to create our google vm instance.
Setting up SSH Meta in Google VM for WinSCP Connection
A Set of SSH keys needs to configure so that we can connect to the Google Compute Engine VM instance with WinSCP.
Step by Step Details to Setup SSH Meta in Google Cloud Console
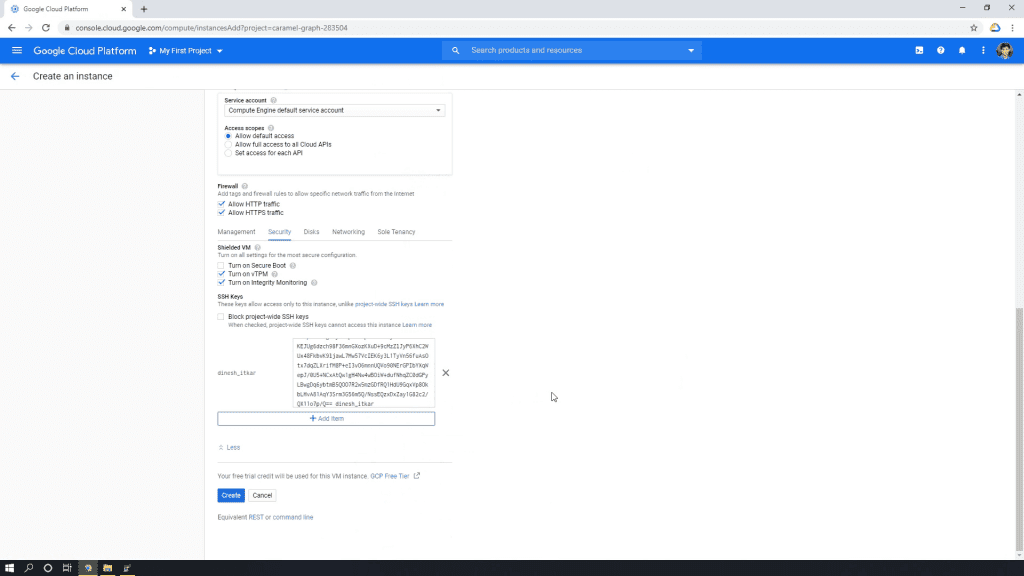
1. Open Google Cloud Console and Click on VM Instance and Click on edit
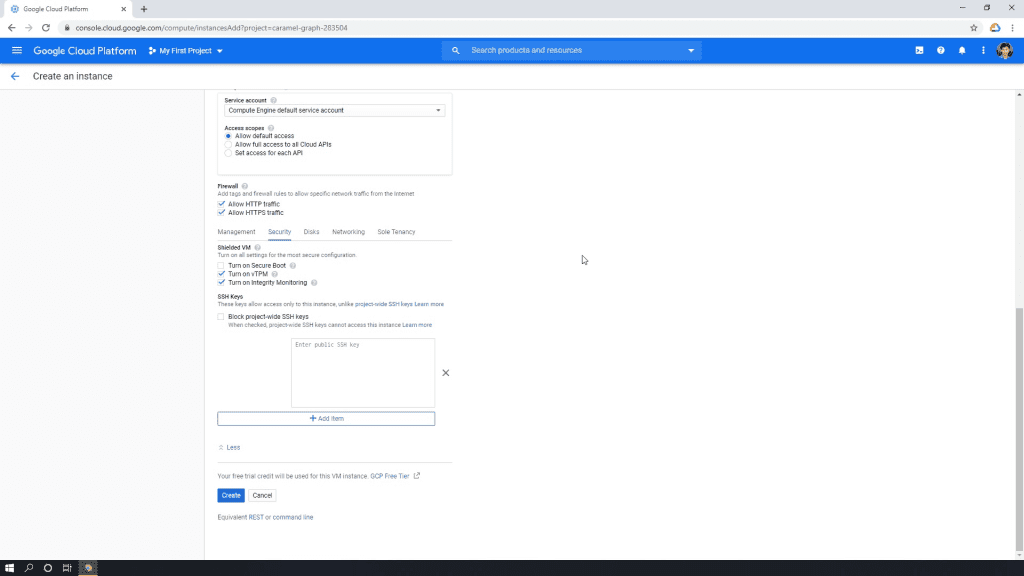
2. Click the Management, security, disks, networking, sole tenancy section.
3. Select Security, this is where we will enter the public SSH key.
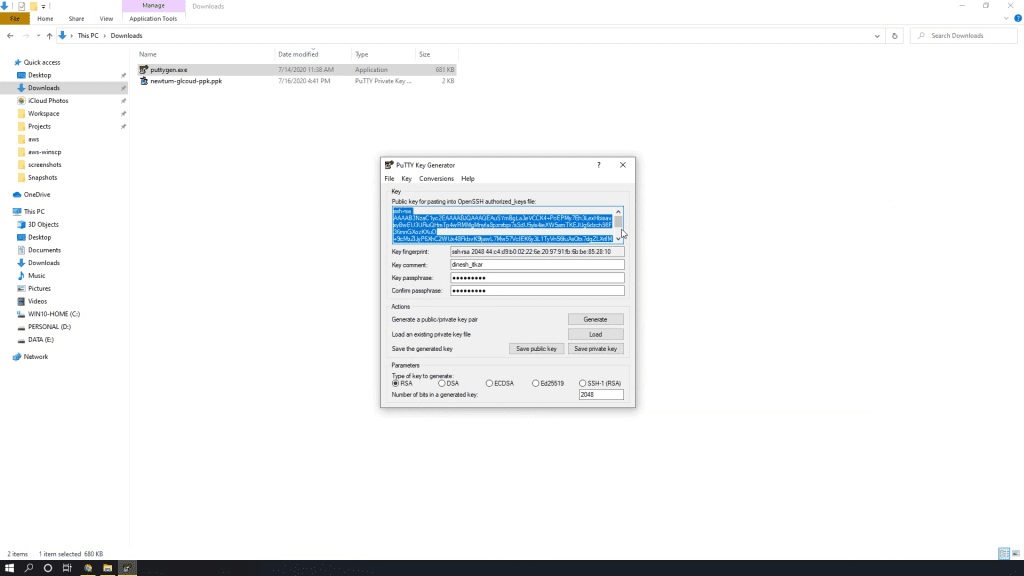
4. To generate the ssh key, Open PuTTYgen Generator and click Generate
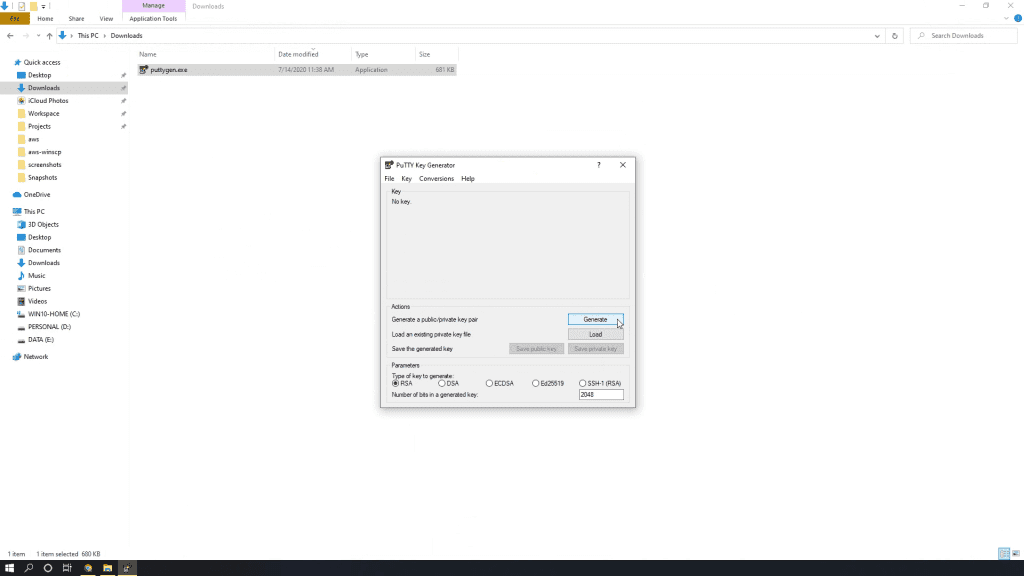
5. Move your mouse cursor randomly on key section blank area to generate key.
6. Specify your google username for connecting to GCP in the Key comment box.
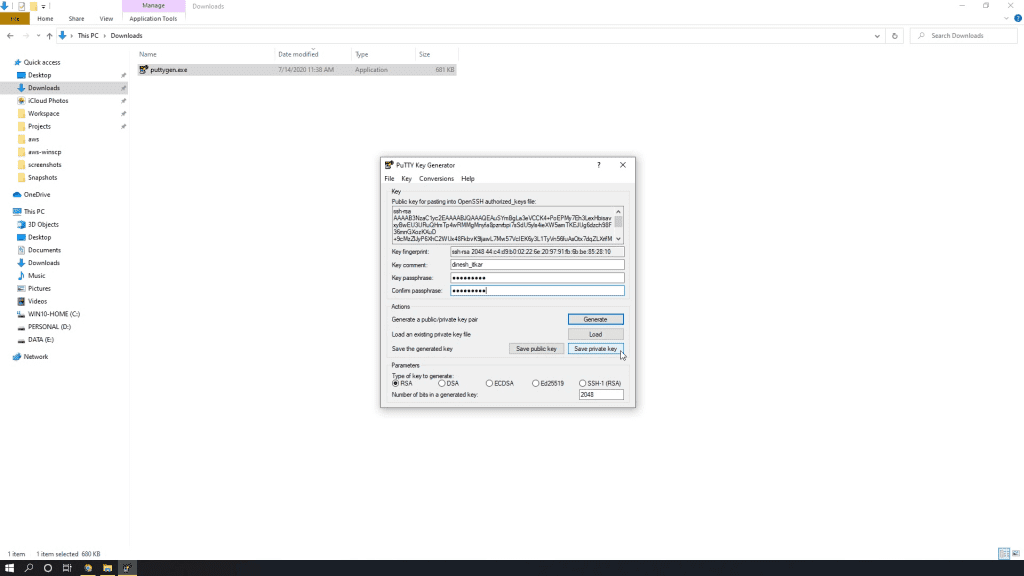
7. Specify password in the Key passphrase and Confirm passphrase box.
8. Click on Save private key as “newtum-gcloud-ppk.ppk”.
9. Select all the contents in the Public key field and copy it to the clipboard.
10. In the GCP console paste the copied key value in the Enter public SSH key section.
Reserving a Static IP Address for Google Compute Engine
A static external IP address is an external IP address that is reserved for your project until you decide to release it.
If you have an IP address that your customers or users rely on to access your service, you can reserve that IP address so that only your project can use it
When we restart the server or stop the server, there is a possibility that IP address may change.
This causes lot of problems and domain pointing issues, if any.To solve this problem best thing is to reserve the static IP address for our VM instance.
Step by Step Guide – How to reserve static instance
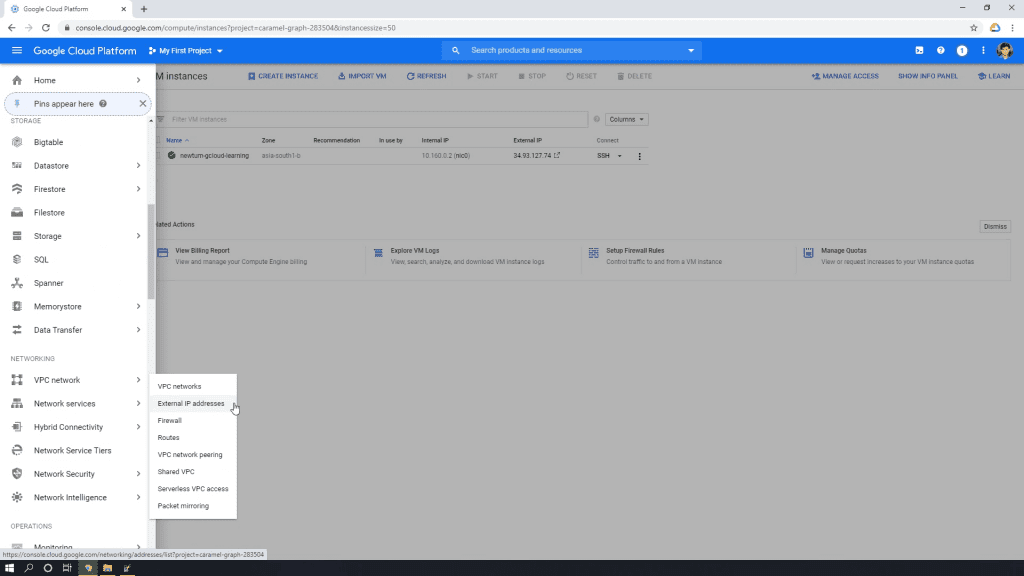
1. In the GCP console, go to VPC network, select External IP addresses
2. Select the VM instance that we created as “newtum-glcoud-learning”.
3. Change Type column value, set it to Static.
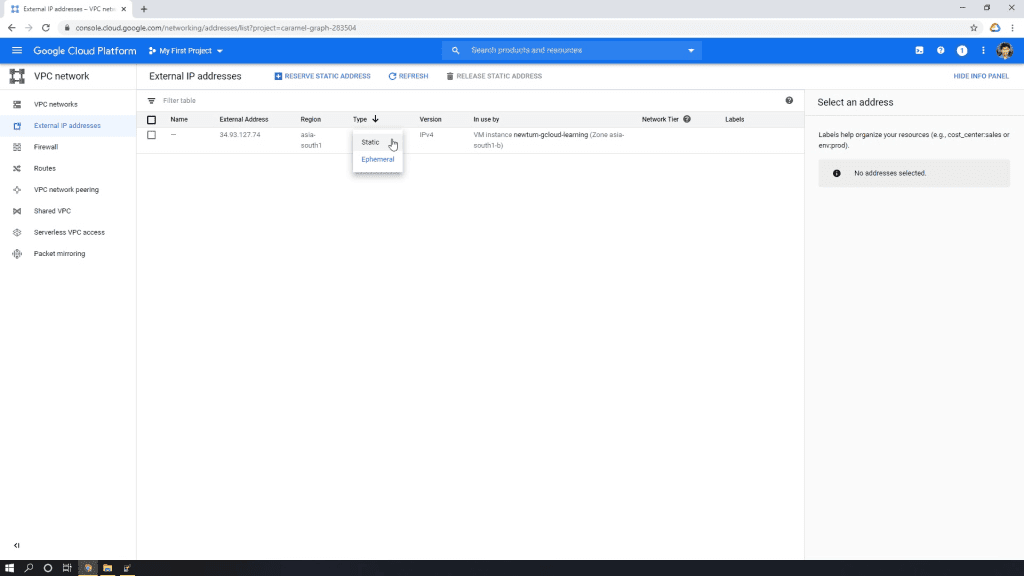
4. Specify a Name for the Static IP address as “newtum-gcloud-learning-ip1”.
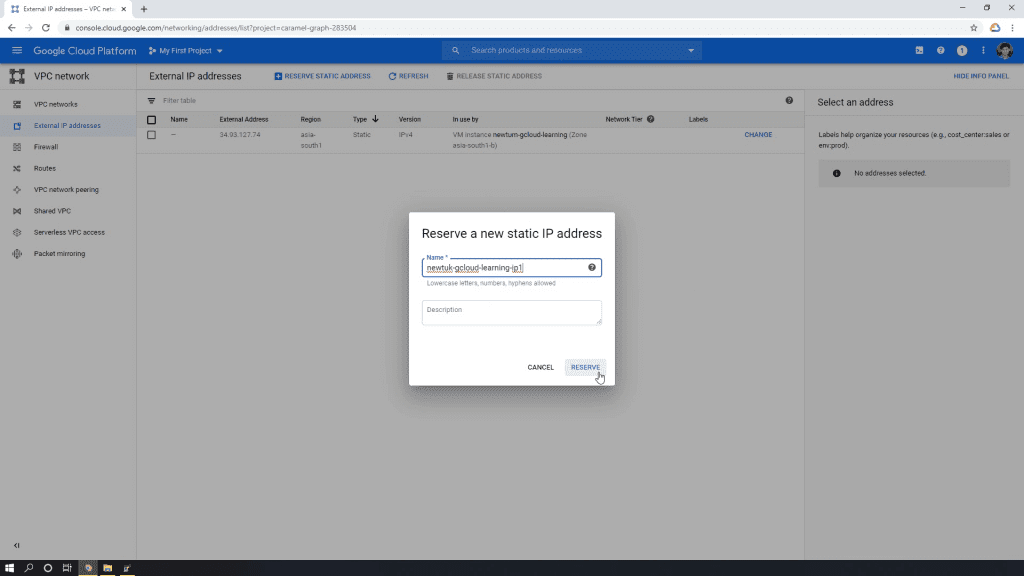
5. You can also enter a description to the static IP. This step is optional.
6. Click on Reserve.
Connect to Google GCE Server using WinSCP
WinSCP is an open-source, free SFTP client, FTP client for Windows. Its main function is file transfer between a local and a remote computer. PuTTY is an SSH and telnet client for Windows
Follow the Below Final Steps to connect to Google Server Using WinSCP
1. In the GCP console, go to Compute Engine, select VM instances
2. Copy the IP from the External IP section
3. Open WinSCP.
4. In the Hostname section enter the copied IP from the External IP section
5. Enter the User name as your google account username. Tip: replace dot(.) value by an underscore (“_”)
6. Click on Advanced, and select Authentication.
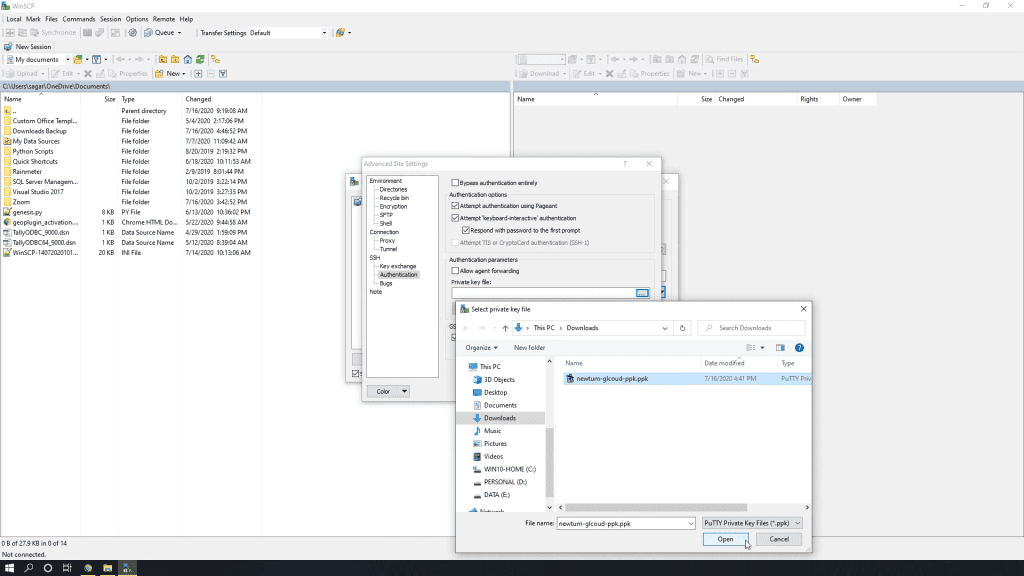
7. In Private key file browse and select the saved ssh private key “newtum-gcloud-ppk.ppk”.
8. Click on Login.
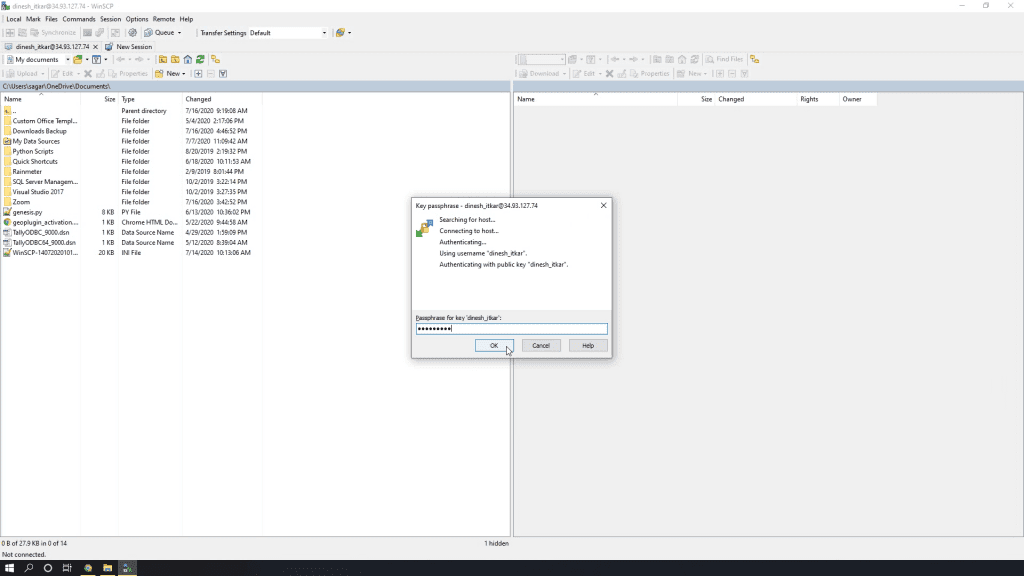
9. Enter the Passphrase.
10. In the Menu bar, select Commands, and click Open in PuTTy. You can use the shortcut key as Ctrl+P.
11. Enter the Passphrase.
Connecting to Servers using WinSCP & Putty
So, in this article, we have explained how to connect servers using WinSCP and Putty. Though we have covered topics of servers brought from AWS, Google and Digital Ocean, there are still many other service providers. Other service providers include GoDaddy, Digital Ocean, Azure etc.
Soon we will add more details to connect servers from other service providers using WinSCP & Putty. If you want any information on specific server providers, please comment in the box; we will include that service provider in our blog as soon as possible.
Conclusion
This blog is part of the course on how to create your own Cryptocurrency. If you want to understand the complete process of coin building, please go to this of How to create Cryptocurrency if you are not already enrolled. To Enroll directly on the course, please visit this link Create Own Cryptocurrency.


That’s a very good point.