If you have been searching for a practical, no-fluff way to build a REST API in Java, you are in the right place. Most tutorials jump straight into heavyweight frameworks without explaining what is actually happening under the hood. This guide takes a different approach – we use JAX-RS (Java API for RESTful Web Services) with Jersey, the reference implementation, so you understand the core mechanics before reaching for any magic.
By the end of this guide, you will have a fully working API that handles real HTTP requests, returns JSON data, and is ready to be extended into a production-grade project.
What Is a REST API and Why Java?
REST (Representational State Transfer) is an architectural style that defines how client applications communicate with servers using standard HTTP methods. When you build a REST API in Java, you create a layer that exposes your application’s data and logic to the outside world through clean, predictable URLs.
Java remains one of the most dominant languages for backend development for good reason – it is strongly typed, has a massive ecosystem, runs on the JVM, and offers enterprise-grade stability. JAX-RS is the standard Java specification for building RESTful services, which means skills you learn here transfer across any compliant framework.
| HTTP Method | Action | Example Endpoint |
|---|---|---|
| GET | Retrieve data | /api/books |
| POST | Create new resource | /api/books |
| PUT | Update existing resource | /api/books/{id} |
| DELETE | Remove a resource | /api/books/{id} |
Tools and Prerequisites
Before you build a REST API in Java, make sure you have the following installed on your machine:
- JDK 11 or later
Download from adoptium.net. Confirm withjava -versionin your terminal. - Apache Maven 3.8+
The build tool that manages your dependencies and packaging. - IDE — IntelliJ IDEA or VS Code
Either works well. IntelliJ offers the best Java support out of the box. - Postman
A GUI tool for sending HTTP requests and inspecting responses during testing.
Setting Up Your Java Project (Maven + JAX-RS)
Create a new Maven project and add the following dependencies to your pom.xml. We use Jersey (JAX-RS implementation) and Grizzly as our embedded HTTP server – no application server needed.
<!-- pom.xml dependencies -->
<dependencies>

  <!-- Jersey JAX-RS implementation -->
  <dependency>
    <groupId>org.glassfish.jersey.containers</groupId>
    <artifactId>jersey-container-grizzly2-http</artifactId>
    <version>3.1.3</version>
  </dependency>

  <!-- JSON serialization -->
  <dependency>
    <groupId>org.glassfish.jersey.media</groupId>
    <artifactId>jersey-media-json-jackson</artifactId>
    <version>3.1.3</version>
  </dependency>

  <!-- DI injection container -->
  <dependency>
    <groupId>org.glassfish.jersey.inject</groupId>
    <artifactId>jersey-hk2</artifactId>
    <version>3.1.3</version>
  </dependency>

</dependencies>
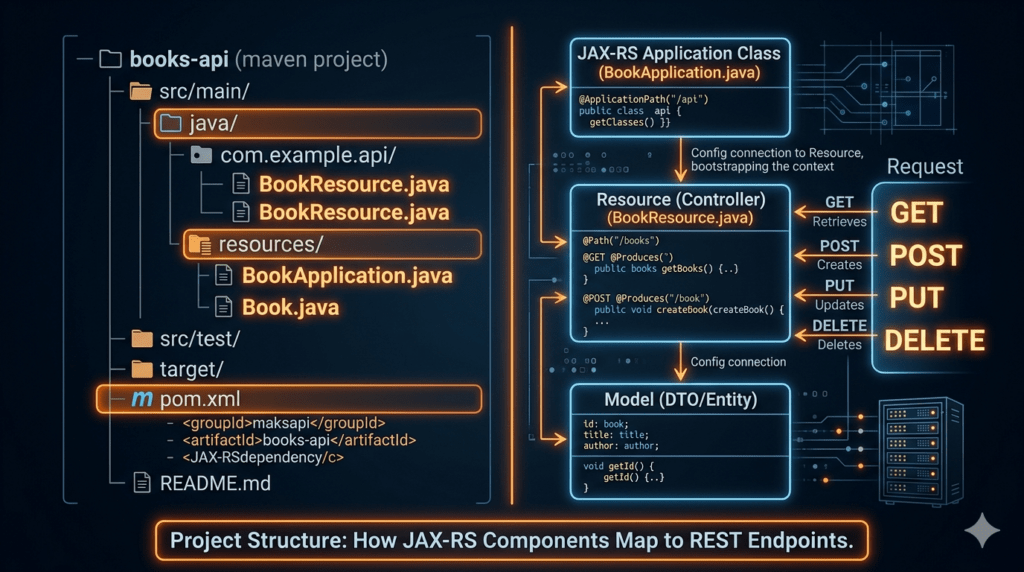
Writing Your First Endpoint
The fastest way to build a REST API in Java with JAX-RS is to annotate a plain Java class. No XML configuration, no boilerplate — just annotations that tell Jersey how to route incoming requests.
First, create a simple Book model:
public class Book {
    private Long   id;
    private String title;
    private String author;

    // Getters and setters
    public Long getId()           { return id; }
    public void setId(Long id)  { this.id = id; }
    public String getTitle()     { return title; }
    public void setTitle(String t) { this.title = t; }
    public String getAuthor()    { return author; }
    public void setAuthor(String a){ this.author = a; }
}
Now create the resource class that maps HTTP routes:
@Path("/books")
@Produces(MediaType.APPLICATION_JSON)
@Consumes(MediaType.APPLICATION_JSON)
public class BookResource {

    private static final Map<Long, Book> store = new HashMap<>();
    private static long nextId = 1L;

    @GET
    public List<Book> getAllBooks() {
        return new ArrayList<>(store.values());
    }

    @GET
    @Path("/{id}")
    public Response getBook(@PathParam("id") Long id) {
        Book book = store.get(id);
        if (book == null)
            return Response.status(Response.Status.NOT_FOUND).build();
        return Response.ok(book).build();
    }
}
Implementing CRUD Operations
When you build a REST API in Java for real-world use, supporting Create, Read, Update, and Delete operations is essential. Add the remaining methods to your BookResource:
    @POST
    public Response createBook(Book book) {
        book.setId(nextId++);
        store.put(book.getId(), book);
        return Response.status(Response.Status.CREATED).entity(book).build();
    }

    @PUT
    @Path("/{id}")
    public Response updateBook(@PathParam("id") Long id, Book updated) {
        if (!store.containsKey(id))
            return Response.status(Response.Status.NOT_FOUND).build();
        updated.setId(id);
        store.put(id, updated);
        return Response.ok(updated).build();
    }

    @DELETE
    @Path("/{id}")
    public Response deleteBook(@PathParam("id") Long id) {
        if (store.remove(id) == null)
            return Response.status(Response.Status.NOT_FOUND).build();
        return Response.noContent().build();
    }
Pro Tip: Return proper HTTP status codes — 201 Created for successful POST, 204 No Content for DELETE, and 404 Not Found for missing resources. This is what separates a well-designed REST API from a sloppy one.
Handling JSON Responses
Jersey’s Jackson integration automatically serializes your Java objects to JSON. When you build a REST API in Java using this setup, any object returned from a resource method annotated with @Produces(MediaType.APPLICATION_JSON) is converted to a JSON string transparently. No manual serialization code is needed.
Your application entry point starts the Grizzly HTTP server and registers your resources:
public class Main {
    public static void main(String[] args) throws IOException {
        ResourceConfig config = new ResourceConfig()
            .packages("com.example.api")
            .register(JacksonFeature.class);

        HttpServer server = GrizzlyHttpServerFactory
            .createHttpServer(URI.create("http://localhost:8080/"), config);

        System.out.println("API running at http://localhost:8080/books");
        System.in.read(); // Keep server alive
        server.shutdown();
    }
}
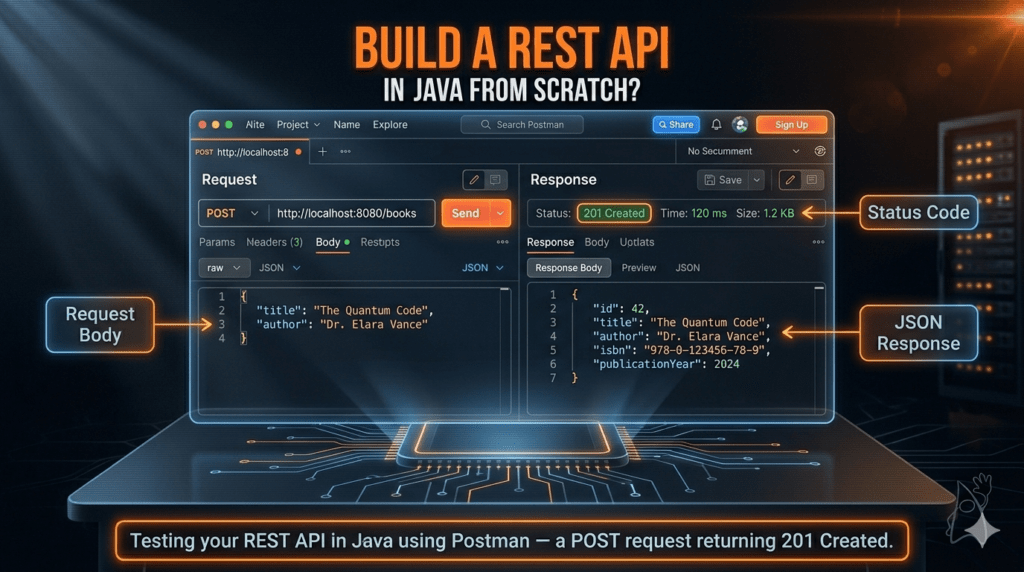
Testing Your API with Postman
Once your server is running, open Postman. Testing is a non-negotiable step when you build a REST API in Java — it verifies your endpoints behave exactly as designed before any frontend or client consumes them.
- GET all books
Send aGETrequest tohttp://localhost:8080/books. Expect an empty JSON array[]initially. - POST a new book
Set Body → raw → JSON. Send{"title":"Clean Code","author":"Robert Martin"}. Expect201 Createdwith the book object including its generatedid. - GET by ID
SendGET http://localhost:8080/books/1. You should receive the book you just created. - DELETE a book
SendDELETE http://localhost:8080/books/1. Expect204 No Content. A subsequent GET for the same ID should return404.
Common Beginner Mistakes to Avoid- build a REST API in Java
Developers who build a REST API in Java for the first time often run into the same pitfalls. Being aware of them saves hours of debugging:
1. Missing @Produces or @Consumes annotations
Without telling JAX-RS what media type your resource handles, responses may default to plain text or fail with 415 Unsupported Media Type errors. Always declare your content types explicitly.
2. Returning null from resource methods
Returning null causes Jersey to send a 204 No Content silently. Use Response.ok(data).build() consistently so you control the output.
3. Ignoring HTTP status semantics
Sending 200 OK for every response — even errors — is one of the most common REST anti-patterns. Proper status codes make your API self-documenting and easier for clients to consume correctly.
4. Not validating input
When you build a REST API in Java, always validate incoming request bodies. JAX-RS supports Bean Validation via @NotNull, @Size, and @Valid annotations, which integrate cleanly with Jersey.
Conclusion
Learning to build a REST API in Java using JAX-RS gives you a deep, transferable understanding of how REST services actually work – without the abstraction layers that can obscure the fundamentals.
You have set up a Maven project with Jersey and Grizzly, created a model class, written CRUD endpoints with proper HTTP semantics, handled JSON automatically with Jackson, and tested everything with Postman. This project is a solid foundation – next steps include adding a real database (with JDBC or JPA), request validation, and authentication with JWT tokens.
Every production-grade Java backend service starts with exactly these fundamentals. The ability to build a REST API in Java confidently opens doors to microservices, cloud deployment, and backend engineering at scale. Keep building, keep iterating.
Visit a Newtum website for an informative blog and topics.