Python, being a versatile and powerful programming language, offers a fascinating way to explore creative pursuits. Among its many applications, drawing with Python using Turtle graphics stands out as an enjoyable and educational endeavor. In this tutorial, we will delve into the world of Naruto, the beloved anime character, and recreate his iconic appearance using Python’s Turtle graphics.
Learn how to Draw Naruto in Python Using Turtle
Get Complete Python Interview Questions and Answers, here!
# Draw Naruto in Python Using Turtle
# import turtle
import turtle

screen = turtle.Screen()
screen.setup(900,900)
screen.setworldcoordinates(-600,-600,600,500)

d = turtle.Turtle()

d.pencolor("red")
d.pensize(4)
d.hideturtle()
turtle.tracer(5)
d.pencolor('black')
d.left(13)
d.speed(8)
d.fillcolor("yellow")
d.begin_fill()
d.penup()
d.forward(190)
d.pendown()

# Hair
d.right(25)
d.forward(60)
d.left(135)
d.forward(100)
d.right(95)
d.forward(95)
d.left(135)
d.forward(110)
d.right(105)
d.forward(115)
d.left(135)
d.forward(145)
d.right(112)
d.forward(115)
d.left(137)
d.forward(163)
d.right(110)
d.forward(115)
d.left(130)
d.forward(142)
d.right(85)
d.forward(120)
d.left(130)
d.forward(128)
d.right(100)
d.forward(110)
d.left(126)
d.forward(115)
d.right(73)
d.forward(82)
d.left(136)
d.forward(60)

d.pensize(3)
d.left(70)
d.forward(15)
d.right(59)

def curve1(a,c):
    for i in range(c):
        d.right(a)
        d.forward(1)

def curve2(a,c):
    for i in range(c):
        d.left(a)
        d.forward(1)

curve1(0.1,260)
curve1(0.2,80)
d.left(6)
curve1(0.1,90)
d.right(60)
d.forward(11)
d.end_fill()


d.begin_fill()
d.fillcolor('#373737')
d.pensize(8)
curve1(0.2,72)
d.pensize(5)
d.right(80)
curve1(0.01,240)
d.right(2)
curve1(0.01,100)
d.right(2)
curve1(0.02,77)
d.right(75)
d.pensize(8)
curve1(0.2,65)
d.pensize(3)
d.forward(18)
d.right(63.5)
curve1(0.1,250)
d.right(5)
curve1(0.1,100)
d.left(3)
curve1(0.1,83)
d.right(70)
d.forward(10)
d.pensize(5)
d.forward(73)
d.end_fill()
d.fillcolor('#E8BEAC')
d.begin_fill()
d.pensize(8)
d.left(40)
curve1(1,60)
d.forward(60)
d.right(60)
curve1(0.3,27)
d.left(85)
curve1(0.2,85)
d.right(30)
d.forward(133)
d.right(40)
d.forward(80)
d.right(37)
d.forward(150)
d.right(35)
curve1(0.1,67)
d.left(80)
d.forward(32)
d.right(50)
curve1(0.5,63)
d.right(10)
curve1(0.1,40)
d.right(10)
curve1(0.3,20)
d.right(70)
d.forward(7)
d.pensize(5)
curve2(0.01,418)
d.end_fill()

d.backward(10)

d.fillcolor('yellow')
d.begin_fill()
d.right(118)
d.forward(70)
d.right(150)
d.forward(64.5)
d.right(91)
d.forward(45)
d.end_fill()


d.penup()
d.backward(100)
d.pendown()
d.fillcolor('yellow')
d.begin_fill()
d.right(155)
d.forward(90)
d.right(155)
d.forward(50)
d.right(54)
d.forward(50)
d.end_fill()

d.penup()
d.backward(180)
d.pendown()

d.fillcolor('yellow')
d.begin_fill()
d.right(41)
d.forward(65)
d.right(165)
d.forward(91)
d.right(153)
d.forward(40)
d.end_fill()

d.penup()
d.backward(110)
d.pendown()

d.fillcolor('yellow')
d.begin_fill()
d.right(90)
d.forward(62)
d.right(158)
d.forward(72)
d.right(120)
d.forward(40)
d.end_fill()

d.penup()
d.left(40)
d.forward(40)
d.right(34)
d.pendown()


d.fillcolor('grey')
d.begin_fill()
curve2(0.01,247)
d.left(85)
curve2(0.02,50)
d.left(3)
curve2(0.1,35)
d.left(82)
curve2(0.01,140)
d.left(2)
curve2(0.1,110)
d.left(77)
curve2(0.1,86)
d.end_fill()

d.penup()
d.left(138)
d.forward(20)
d.dot(10)
d.left(35)
d.forward(25)
d.dot(10)
d.forward(25)
d.dot(10)

d.penup()
d.right(85)
d.forward(155)
d.pendown()
d.right(135)
d.forward(22)
d.right(100)
d.forward(2)
curve2(2.2,110)
curve2(3,45)
curve2(5,30)
d.penup()
d.right(130)
d.forward(25)
d.left(85)
d.pendown()
d.forward(30)
d.left(112)
d.forward(35)
d.penup()
d.left(25)
d.forward(120)
d.pendown()

d.dot(10)
d.right(120)
d.penup()
d.forward(30)
d.pendown()
d.dot(10)
d.penup()
d.forward(30)
d.pendown()
d.dot(10)
d.penup()
d.left(60)
d.forward(118)
d.left(120)
d.pendown()
d.pensize(4)
d.forward(20)
curve2(11,15)
d.forward(35)
curve2(7,8)
d.right(15)
d.forward(15)
d.right(70)
d.forward(23)
d.left(40)
d.forward(15)
curve2(15,10)
d.forward(20)
d.penup()
d.left(20)
d.forward(43)
d.pendown()
d.left(80)
d.forward(20)

d.penup()
d.left(28)
d.forward(403)
d.right(95)
d.pendown()
d.forward(28)
curve1(10,15)
d.right(3)
d.forward(45)
curve1(8,10)
d.forward(8)
d.left(3)
curve2(7,12)
d.left(10)
d.forward(15)
curve1(12,13)
d.right(5)
d.forward(15)
d.penup()
d.right(195)
d.forward(60)
d.left(90)
d.pendown()
curve1(1,45)
d.penup()
d.right(119)
d.forward(65)
d.right(180)
d.pendown()
curve1(1,50)
d.penup()
d.right(110)
d.forward(55)
d.right(190)
d.pendown()
curve1(1,38)
d.penup()
d.right(53)
d.forward(35)
d.pendown()
d.left(20)
d.forward(70)
curve2(0.2,70)
d.left(30)
d.forward(20)
d.penup()
d.left(130)
d.forward(109)
d.right(35)
d.pendown()
d.forward(15)
d.right(90)
curve2(1,30)
d.penup()
d.right(76.5)
d.forward(143)
d.pendown()
curve1(1,47)
d.penup()
d.right(120)
d.forward(55)
d.pendown()
d.right(192)
curve1(1,47)
d.penup()
d.right(120)
d.forward(45)
d.pendown()
d.right(220)
curve1(1,41)
d.penup()
d.right(170)
d.forward(153)
d.right(138)
d.forward(5)
d.pendown()
curve2(0.5,65)
d.penup()
d.right(5)
d.backward(35)
d.left(80)
d.forward(5)
d.pendown()
d.right(75)
d.forward(10)
d.fillcolor('white')
d.begin_fill()
d.circle(22)
d.end_fill()
curve2(3,20)
d.pendown()
d.fillcolor('white')
d.begin_fill()
curve2(6,85)
d.end_fill()
d.dot(15)
d.penup()
d.left(121)
d.forward(32)
d.left(80)
d.pendown()
d.pensize(10)
d.forward(30)
d.left(95)
d.pensize(8)
d.forward(20)
d.pensize(7)
curve2(1,80)

# second eye
d.right(54)
d.penup()
d.forward(115)
d.pendown()
d.pensize(3)
d.backward(4)
curve1(0.5,60)
d.penup()
d.backward(27)
d.right(90)
d.forward(8)
d.pendown()
d.right(90)
d.fillcolor('white')
d.begin_fill()
d.circle(22)
curve2(3,30)
d.end_fill()
curve2(6,85)
d.dot(15)
d.penup()
d.right(30)
d.forward(43)
d.pendown()
d.right(85)
d.pensize(8)
d.forward(27)
d.pensize(8)
d.right(85)
d.forward(20)
d.pensize(5)
curve1(1,80)
d.end_fill()

turtle.done()
Get complete Best Python Books for Programmers here!
Explanation of the code:
The given code uses Python’s Turtle graphics library to draw an image of the popular anime character, Naruto. Let’s break down the code step-by-step to understand how the drawing is created:
1. Importing the Turtle Library:
The first line of code imports the Turtle graphics library in Python.
2. Setting Up the Screen:
The next few lines set up the drawing screen, defining its size and coordinates to create the desired canvas for our drawing.
3. Creating the Turtle Object:
The line `d = turtle.Turtle()` creates a Turtle object named ‘d’ that will act as our drawing pen.
4. Drawing Naruto’s Face:
The code starts by drawing Naruto’s face. The turtle moves in specific directions and angles to create the outline of his face, utilizing the `forward()` and `backward()` commands to draw lines, and the `circle()` command to create curves.
5. Creating Naruto’s Hair:
The code then proceeds to draw Naruto’s distinctive spiky hair. By moving the turtle in specific patterns and directions, it creates the signature look of Naruto’s hair.
6. Designing Naruto’s Outfit:
The next step involves drawing Naruto’s outfit, which is colored in orange. The turtle is directed to draw the outlines and patterns of the outfit.
7. Finalizing the Drawing:
The drawing is then refined with additional details, like Naruto’s facial features, eyes, and mouth, giving the drawing a more realistic appearance.
8. Fill Colors:
The `fillcolor()` and `begin_fill()` commands are used to color the different parts of Naruto’s face, hair, and outfit.
9. Customizations:
The code utilizes various pen sizes and pen colors to add depth and dimension to the drawing.
10. Dot Markings:
The `dot()` command places small dots on the drawing to indicate features like eyes or accessories.
11. Turtle Movement:
The turtle moves around the screen, drawing lines and curves to create the image of Naruto.
12. Drawing Completion:
The drawing is finalized, and the `turtle.done()` command is used to keep the window open, allowing us to view the complete drawing.
Learn How to Generate Random Numbers in Python, Now!
Output:
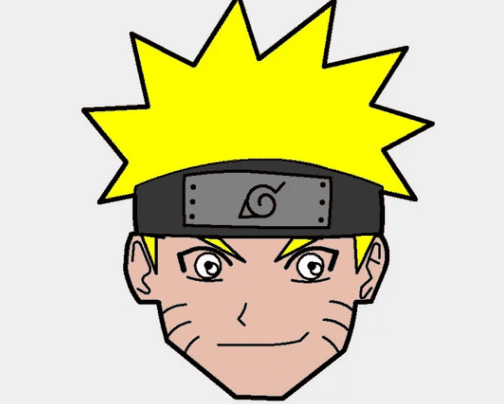
In conclusion, the program draws the anime character Naruto on a canvas using the Turtle graphics library from Python. The character’s appearance, including his face, hair, and attire, is replicated by the code by combining particular turtle movements and commands. By using Python’s Turtle graphics, the fill colors and dot markings further improve the drawing’s aesthetic appeal and produce a recognizable and endearing representation of Naruto.
We hoped you found our blog post on how to “Draw Naruto in Python Using Turtle” to be interesting and helpful. For more coding-related blogs and online coding courses visit our website Newtum’s. Happy coding!