What is conditional rendering in React?
Conditional rendering in React is the practice of showing or hiding UI elements based on conditions like state, props, or user actions. It allows React apps to dynamically update the interface without reloading the page.
Explain why conditional rendering matters today:
- Modern apps are interactive and state-driven
- Users expect personalized, responsive UI
- Conditional rendering keeps code clean and logic predictable
Quick Summary: Conditional Rendering Patterns
if / else→ Best for complex logic- Ternary operator (
? :) → Ideal for simple UI switches - Logical AND (
&&) → Clean for optional components - Switch statements → Useful for multi-state views
- Component-level conditions → Improves reusability
What Is Conditional Rendering in React?
Conditional rendering in React means showing different UI elements based on a condition (like user state, data availability, or loading status).
Instead of always displaying the same UI, React lets you decide what to render and when.
Simple idea:
If a condition is true, show this UI. Otherwise, show something else.
Basic Concept Explained with UI Examples
Imagine a screen that depends on user actions:
- User not logged in → Show Login button
- User logged in → Show Dashboard
React evaluates a condition and renders the correct UI automatically.
UI Logic Example (conceptual):
isLoggedIn = false→ Login screenisLoggedIn = true→ Welcome message
This makes apps feel dynamic and responsive, even for small beginner projects.
Real-World Beginner Scenarios
1. Loading State
When data is being fetched from an API:
- Before data loads → Show Loading…
- After data loads → Show Content
{isLoading && <p>Loading...</p>}
2. Login State
Show different UI based on authentication:
{isLoggedIn ? <Dashboard /> : <Login />}
3. Empty State
When a list has no data:
{items.length === 0 && <p>No items found</p>}
These scenarios are very common in beginner apps, such as to-do lists, dashboards, and forms.
Why Conditional Rendering Matters for Beginner Apps
1. Cleaner UI Logic
Instead of messy UI updates or manual DOM handling, React automatically updates the UI when conditions change.
✔ Less code
✔ Fewer bugs
✔ Easier understanding
2. Better User Experience
Users always see the right screen at the right time:
- Loading feedback
- Helpful messages
- Clear navigation flow
This makes even simple apps feel professional.
3. Easier Debugging and Readability
When UI is controlled by clear conditions:
- Bugs are easier to locate
- Logic is easier to follow
- Code is more maintainable as the app grows
Common Conditional Rendering Patterns
1. if / else Statements
Best when logic is complex or outside JSX.
if (isLoggedIn) {
  return <Dashboard />;
}
return <Login />;
✔ Easy to read
✔ Good for beginners
2. Ternary Operator (condition ? A : B)
Useful for simple two-condition UI.
{isLoggedIn ? <Dashboard /> : <Login />}
✔ Compact
✖ Can reduce readability if nested
3. Logical AND (&&) Rendering
Used when you only want to render something if a condition is true.
{isAdmin && <AdminPanel />}
✔ Clean and short
✔ Very common for optional UI
4. Switch-Case Pattern for Multiple States
Helpful when handling multiple UI states (loading, error, success).
switch (status) {
  case "loading":
    return <Loading />;
  case "error":
    return <Error />;
  default:
    return <Data />;
}
✔ Best for scalability
✔ Keeps JSX clean
Best Pattern to Use for Beginners: Conditional Rendering in React
For beginners, the best conditional rendering pattern is the one that is easiest to read and understand, not the shortest one.
👉 Start with clarity, then optimize later.
Recommended order for beginners:
- if / else statements
- Logical AND (
&&) rendering - Ternary operator
- Switch-case pattern (as apps grow)
When to Use Each Pattern
1. if / else Statements
Best for:
- Complex conditions
- Multiple checks
- Clear separation of logic and UI
if (!isLoggedIn) {
  return <Login />;
}
return <Dashboard />;
✔ Most readable
✔ Beginner-friendly
✔ Easy to debug
2. Logical AND (&&) Rendering
Best for:
- Optional UI elements
- Showing something only when a condition is true
{isLoading && <Loading />}
✔ Simple and clean
✔ Very readable
✖ Not suitable when you need an else condition
3. Ternary Operator
Best for:
- Simple yes/no UI decisions
- Small components
{isLoggedIn ? <Dashboard /> : <Login />}
✔ Compact
✖ Becomes confusing if nested
✖ Harder to read when logic grows
4. Switch-Case Pattern
Best for:
- Multiple UI states (loading, error, success, empty)
- Medium-sized beginner apps
switch (status) {
  case "loading":
    return <Loading />;
  case "error":
    return <Error />;
  case "empty":
    return <Empty />;
  default:
    return <Content />;
}
✔ Excellent readability
✔ Scales well
✔ Keeps JSX clean
Readability vs Simplicity
Beginners often choose shorter code, but shorter does not always mean better.
- Readable code → Easier to maintain and debug
- Over-optimized code → Confusing and error-prone
👉 Rule of thumb:
If you have to think twice to understand it, simplify it.
Always favor clear logic over clever shortcuts.
Common Mistakes Beginners Make in Conditional Rendering in React
1. Overusing Ternaries
Nested ternary operators quickly become unreadable.
❌ Bad example:
{isLoggedIn ? (isAdmin ? <Admin /> : <User />) : <Login />}
✔ Better approach: use if / else or switch
2. Mixing Too Much Logic Inside JSX
Placing complex logic directly in JSX makes code messy.
❌ Avoid:
{user && user.profile && user.profile.name}
✔ Instead, prepare values before rendering.
3. Forgetting Fallback UI
Beginners often forget what users see when:
- Data is empty
- API fails
- Condition is false
❌ Blank screens confuse users
✔ Always provide:
- Loading messages
- Empty states
- Error feedback
Best Practices for Clean Conditional Rendering in React
Clean conditional rendering in React keeps your apps easy to read, easy to debug, and easy to scale. Beginners who follow these practices avoid most common UI bugs early on.
1. Keep JSX Readable
JSX should look like UI, not complex logic.
✔ Prefer simple conditions
✔ Avoid nested ternaries
✔ Move logic outside JSX when it grows
Example:
const isUserReady = isLoggedIn && !isLoading;

return (
  <>
    {isUserReady && <Dashboard />}
  </>
);
If JSX feels hard to read, that’s a signal to simplify the logic.
2. Extract Components Early
When conditional blocks become large, extract them into separate components.
❌ Avoid:
{isLoggedIn && (
  <div>
    <h1>Welcome</h1>
    <Profile />
    <Settings />
  </div>
)}
✔ Better:
{isLoggedIn && <UserDashboard />}
Benefits:
- Cleaner parent component
- Reusable UI pieces
- Easier testing and debugging
3. Handle Edge Cases Early
Always think about what happens when things go wrong.
✔ Data is empty
✔ API fails
✔ User has no access
Example:
if (isLoading) return <Loading />;
if (error) return <Error />;
if (!data) return <EmptyState />;
Handling edge cases early:
- Prevents blank screens
- Improves user trust
- Makes UI behavior predictable
Designing UI State Models Before Conditional Rendering in React
Most developers learn conditional rendering by writing if / else statements inside JSX. While this works for small demos, it quickly breaks down in real applications.
Professional React developers do not start with conditions.
They start by designing the UI states first.
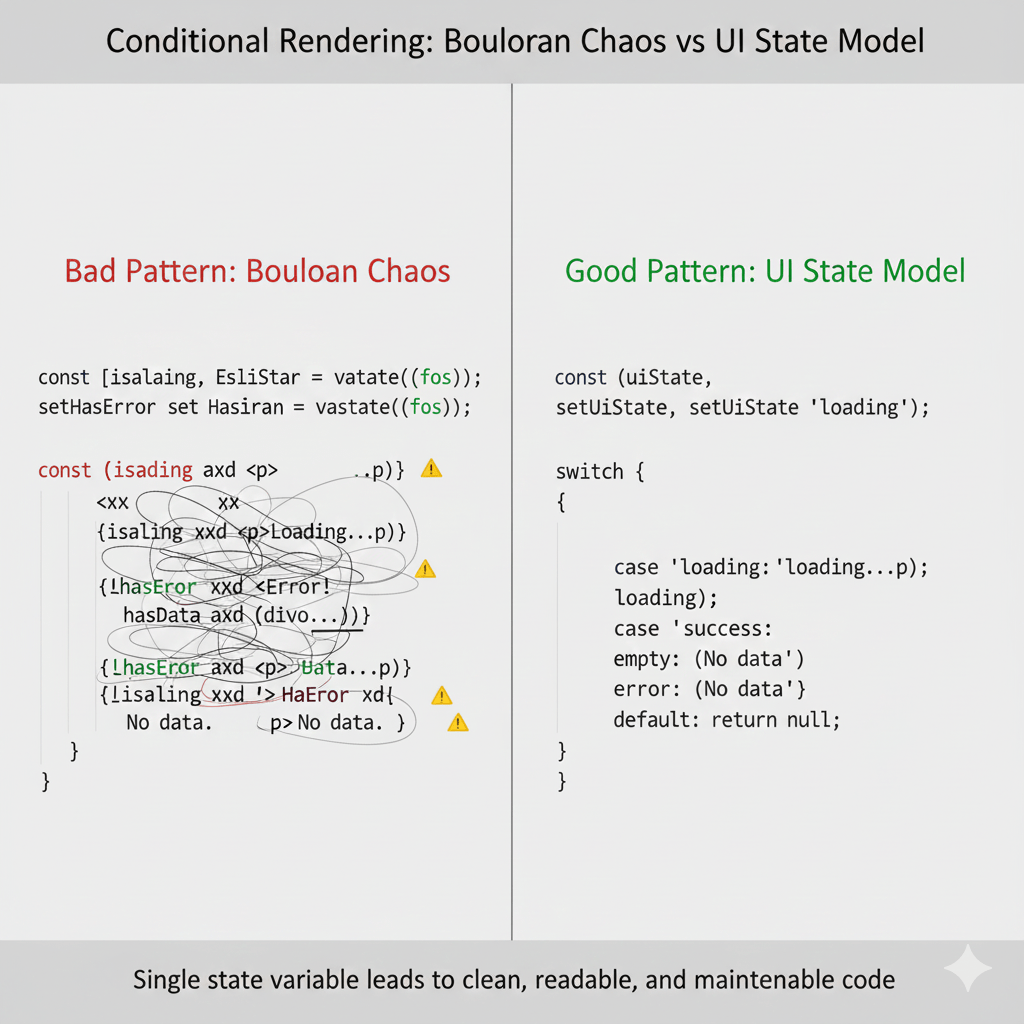
Why Multiple Booleans Break UI Logic
Beginners often manage UI like this:
const [isLoading, setIsLoading] = useState(false);
const [hasError, setHasError] = useState(false);
const [data, setData] = useState(null);
This creates impossible UI states, such as:
- Loading and error shown together
- Empty state appearing before loading finishes
- UI flickering between states
The problem isn’t React — it’s the lack of a clear UI state model.
Model UI as Finite States
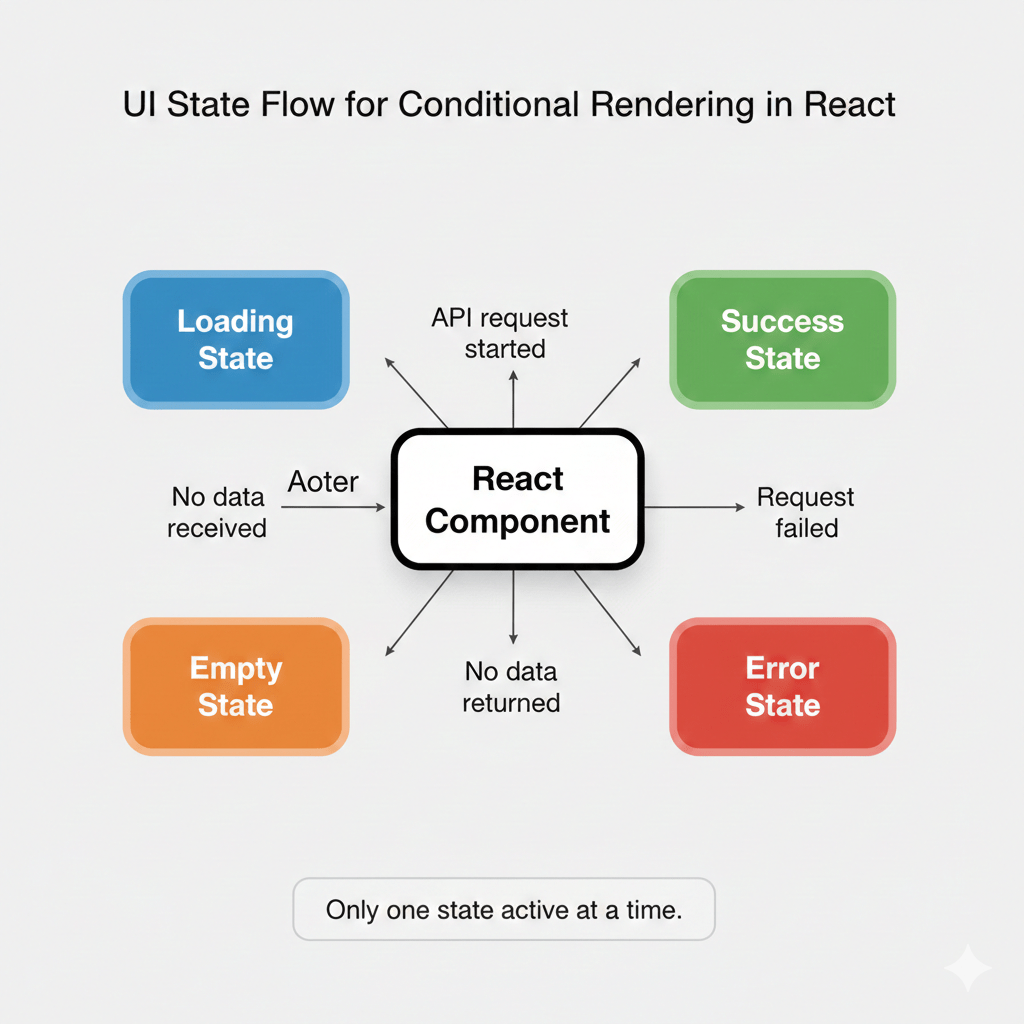
Instead of thinking in conditions, think in states.
A beginner app usually has only one valid UI state at a time:
loadingsuccessemptyerror
Model this directly:
const [uiState, setUiState] = useState("loading");
Now your UI logic becomes predictable and easy to reason about.
Map Each UI State to One Clear UI
Once UI states are defined, conditional rendering becomes simple and clean:
switch (uiState) {
  case "loading":
    return <Loading />;
  case "error":
    return <Error />;
  case "empty":
    return <EmptyState />;
  default:
    return <Content />;
}
Each state:
- Has one responsibility
- Renders exactly one UI
- Cannot conflict with another state
This eliminates accidental bugs caused by overlapping conditions.
Why This Approach Scales in Real Projects
This pattern is widely used in production React applications because it:
- Prevents impossible UI states
- Makes conditional rendering boring (and safe)
- Improves debugging and testing
- Keeps JSX readable as the app grows
When a bug occurs, you debug state values, not nested conditions.
Real-Life Uses of Conditional Rendering in React
1. E-commerce Website (Amazon)
Amazon uses conditional rendering to display product details dynamically based on user interaction and availability. When users select a specific product, the information shown might vary according to stock status or user preferences.
{`function ProductDetails({ product }) { return ( <> {product.isInStock ? ( Product is available! ) : ( Out of Stock )} </> ); }`}Output: This ensures customers see real-time stock updates, enhancing shopping convenience.
2. Streaming Platform (Netflix)
Netflix leverages conditional rendering for their user profiles and movie recommendations. Based on individual viewing histories, Netflix personalizes user experiences by displaying tailored content on the dashboard.{`function UserDashboard({ profile }) { return ( <> {profile.hasWatchedToday ? ( Continue Watching ) : ( Recommended for You )} </> ); }`}
{`function UserDashboard({ profile }) { return ( <> {profile.hasWatchedToday ? ( Continue Watching ) : ( Recommended for You )} </> ); }`}Output: It lets users have a customized interface, which increases engagement.
3. Social Media Platform (Facebook)
Facebook uses conditional rendering for privacy settings. Depending on user choices, certain profile elements are either shown or hidden from public view.
{`function ProfileSettings({ isPrivate }) { return ( <> {isPrivate ? ( Your profile is set to private ) : ( Your profile is public )} </> ); }`}Output: This feature enhances user privacy awareness and control.
Conditional Rendering in React – Interview Questions
When diving into the world of React and specifically conditional rendering, even the brightest minds can find themselves with a head full of questions. Here are some of the most frequently asked but less commonly answered curiosities:
- What’s the difference between conditional rendering and conditional statements in React?
While conditional statements (like `if`, `else`) are used in JavaScript, conditional rendering determines what gets displayed in the UI based on state changes. React uses JSX to elegantly integrate both. - Can you use logical AND (&&) for rendering multiple conditions?
Absolutely! A logical AND is a concise way to check multiple conditions before rendering a component or element. Just remember it can lead to unexpected results if not used cautiously. - How does the ternary operator help in conditional rendering?
The ternary operator is a handy tool for rendering one of two different elements based on a condition. It’s succinct and improves readability.{isLoggedIn ? : } - Is there a performance impact when using conditional rendering?
Generally, React’s rendering process is optimised, but excessive, unnecessary conditional rendering can slow down your app as it grows. - Can you render null if there’s nothing to display?
Definitely. Returning `null` is a neat way to prevent rendering anything if certain conditions aren’t met. - What role does state play in conditional rendering?
State is pivotal in determining what gets displayed since it reflects the current situation or status of your component, providing dynamic rendering. - Are there drawbacks to multiple nested conditionals?
Yes, nesting can reduce readability and maintainability, making debugging a tad challenging. Strive for simple structures. - How can you debug issues in conditional rendering?
Use React Developer Tools and console logs strategically to isolate and resolve rendering logic issues. It helps in tracking what conditions lead to various render paths.
Discover our AI-powered js online compiler, where you can instantly write, run, and test your code. Our intelligent compiler simplifies your coding experience, offering real-time suggestions and debugging tips, streamlining your journey from coding novice to expert with ease. Explore it today and boost your coding skills!
Conclusion
Conditional Rendering in React empowers developers to make dynamic, user-friendly applications by efficiently rendering components based on specific conditions. Mastering this concept boosts your coding skills and enhances your project outcomes. Ready to elevate your coding abilities? Check out Newtum for more programming insights and resources.
Edited and Compiled by
This article was compiled and edited by @rasikadeshpande, who has over 4 years of experience in writing. She’s passionate about helping beginners understand technical topics in a more interactive way.