So you want to create your own cryptocurrency? That’s exciting! The first step in any cryptocurrency project is generating what’s called a genesis block – the very first block in your blockchain. Think of it as the foundation stone of your entire cryptocurrency.
Now, I know what you’re thinking: “This sounds technical. I’m not a programmer!” Don’t worry. This guide is written specifically for beginners who have little to no programming experience. We’ll walk through everything step by step, explaining each part in plain English. By the end of this guide, you’ll have successfully generated your very own genesis block. Ready? Let’s dive in!
What You’ll Learn in This Guide
By the end of this tutorial, you’ll understand:
- What a genesis block is
- Why it is important in blockchain
- How to generate genesis block step-by-step
- How to configure parameters correctly
- How to fix common errors
What Is a Genesis Block?
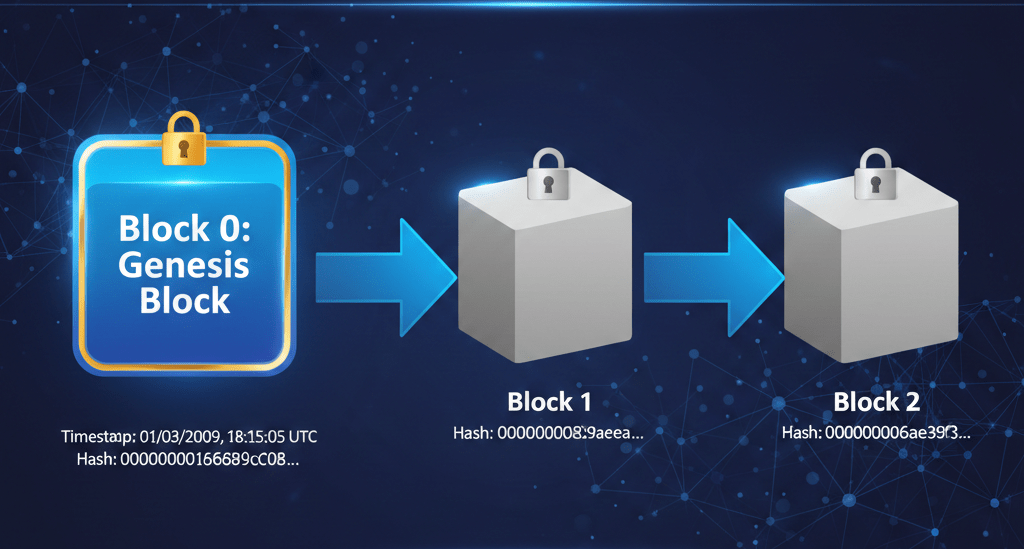
A genesis block is:
- The first block of a blockchain
- Hardcoded into cryptocurrency source code
- The starting point of all transactions
- The base of your entire blockchain network
Every other block in your blockchain links back to this first block.
Without a genesis block, your cryptocurrency cannot exist.
Important Beginner Terms (Simple Definitions)
Before we start, here are a few simple definitions:
Blockchain → A digital ledger that stores transactions in blocks.
Nonce → A number used once to create a valid block hash.
Merkle Root → A hash that summarizes all transactions in a block.
Mainnet → The real blockchain network.
Testnet → A testing version of the blockchain.
Before You Start – System Requirements
Make sure you have:
- Python 3.x installed
- Basic command line knowledge
- At least 2–4 GB RAM
- Stable internet connection
Now let’s begin.
Step 1: Download and Set Up Your Project
Getting the Files You Need
First things first – you need to download the genesis block generator tool. This is a collection of files that will do all the heavy lifting for you. The tool is hosted on Google Drive, and downloading it takes just a few seconds.
Here’s how to do it:
- Visit the download link: Download File or use the following link: https://drive.google.com/drive/folders/1wmXJY1JV48VVv4lPvSCviLJijUa2vLxO?usp=sharing
- Click the download button to save the ZIP file to your computer
- Once downloaded, find the ZIP file (probably in your Downloads folder)
- Right-click the file and select “Extract All” or “Unzip” depending on your operating system
- Choose a location where you want to save the extracted folder – somewhere easy to find like your Desktop or Documents folder
Great! Now you have a folder called genesis_block_generation-local. This folder contains all the scripts and tools you need. Keep this folder somewhere you can easily access it – we’ll be coming back to it several times.
Step 2: Install Python (Your Programming Foundation)
Python is a programming language, and it’s what powers the genesis block generator. Don’t worry – you don’t need to learn Python to use it. You just need to have it installed on your computer so the generator can run.
Do You Already Have Python?
You might already have Python installed. Here’s how to check:
For Windows users:
- Press the Windows key + R on your keyboard
- Type cmd and press Enter
- In the black window that appears, type python –version and press Enter
For Linux/Ubuntu users:
- Open your Terminal application
- Type python3 –version and press Enter
If you see a version number like “Python 3.10.2” or similar, congratulations! You have Python installed. If you see an error message, don’t worry – we’ll install it now.
Installing Python (If You Need It)
Installing Python is straightforward. The exact steps depend on whether you’re using Windows or Linux:
Windows:
- Open your web browser and search for “download Python for Windows.”
- Go to the official Python website (python.org)
- Download the latest Python 3.x version
- Run the installer
- IMPORTANT: Check the box that says “Add Python to PATH” before clicking Install
Linux/Ubuntu:
Python usually comes pre-installed on Linux systems. If not, open Terminal and type:
sudo apt-get update && sudo apt-get install python3
Step 3: Install the Required Python Packages
Now that Python is installed, we need to add two special packages that the genesis block generator needs to function. These packages are called scrypt and construct. Think of them as add-ons that give Python extra capabilities for cryptocurrency work.
For Windows Users
Here’s the step-by-step process:
- Open Command Prompt (press Windows key + R, type cmd, and press Enter)
- Navigate to your project folder by typing this command:
cd C:\path\to\genesis_block_generation-local
Note: Replace “C:\path\to” with the actual location where you extracted the folder. For example, if you extracted it to your Desktop, it might look like: cd C:\Users\YourName\Desktop\genesis_block_generation-local
- Once you’re in the correct folder, type this command:
pip install scrypt construct
- Press Enter and wait. You’ll see some text scrolling by – that’s normal. The installation might take 1-2 minutes.
Troubleshooting: If you see an error message, try this alternative command instead:
python -m pip install scrypt construct
For Linux/Ubuntu Users
- Open your Terminal application
- Navigate to your project folder:
cd ~/genesis_block_generation-local
- Install the packages:
pip3 install scrypt construct
- If you get a permission error, try:
pip3 install –user scrypt construct
Step 4: Configure Your Genesis Block Parameters
This is where things get interesting! Now you’re going to customize your genesis block with your own unique parameters. Think of this as filling out a form that defines the characteristics of your cryptocurrency.
Opening the Configuration File
In your genesis_block_generation-local folder, you’ll find a file called genesis_params.json. This is a simple text file that contains all your settings. You can open it with any text editor:
- Windows: Right-click the file and select “Open with” → “Notepad”
- Linux: Right-click and select “Open with Text Editor” or use gedit or nano
- If you have VS Code or another code editor installed, you can use that too!
When you open the file, you’ll see something like this:
{ "algorithm": "scrypt", "timestamp_message": "I am learning coin development on this day of 2026", "timestamp": "1770371670", "rewards_coin": "100", "pub_secret_key": "091084710fa689ad5023690c80f3a49c8f13f8d45b8c857fbcbc8bc4a8e4d3eb4b10f4d4604fa08dce601aaf0f470216fe1b51850b4acf21b179c45070ac7b03a9"}Don’t be intimidated! Let’s break down each parameter and what it means.
Parameter Explanation (Easy Table)
| Parameter | What It Means | Example |
| algorithm | Security method | scrypt |
| timestamp_message | Your custom message | “Launching MyCoin 2026” |
| timestamp | Unix time | 1770371670 |
| rewards_coin | Block reward | 100 |
| pub_secret_key | Cryptographic key | 130-character hex string |
Understanding Each Parameter
1. Algorithm
The algorithm is the cryptographic method used to secure your blockchain. You have two choices:
- “scrypt” – This is more secure and memory-intensive. It’s used by popular cryptocurrencies like Litecoin. Choose this if you want stronger security.
- “sha256” – This is faster and less resource-intensive. It’s used by Bitcoin. Choose this if you want faster block generation.
2. Timestamp Message
This is your personal message that gets embedded permanently into the first block of your blockchain. It’s like a digital time capsule! This tradition comes from Bitcoin’s genesis block, which included the message: “The Times 03/Jan/2009 Chancellor on brink of second bailout for banks.”
Make it meaningful and unique! Some ideas:
- “MyCoin launch – Building the future of finance”
- “Starting my blockchain journey – February 2026”
- “Dedicated to creating decentralized solutions”
Remember: Keep the quotes around your message, and make it unique to you!
3. Timestamp
This is the time when your genesis block is created, represented in Unix time (the number of seconds since January 1, 1970). To get the current timestamp:
- Visit https://www.unixtimestamp.com/
- Copy the number you see (it’ll be something like 1770371670)
- Paste it into your configuration file, keeping it in quotes
4. Rewards Coin
This determines how many coins are created in your genesis block. In most cryptocurrencies, this is the block reward – the number of coins miners receive for creating a block.
Common values:
- “50” (similar to early Bitcoin)
- “100” (a nice round number)
- “1000” (if you want higher rewards)
Choose whatever makes sense for your project!
5. Public Secret Key
This is a cryptographic key that helps secure your genesis block. It’s a 130-character string made up of numbers and letters (hexadecimal format).
The example key provided in the file is perfectly fine to use for learning purposes. However, for a real cryptocurrency project, you’d want to generate your own unique key.
⚠ IMPORTANT WARNING
Genesis block values cannot be changed later. If you modify parameters, you must regenerate the genesis block from scratch. Double-check everything before running the script.
Saving Your Configuration
Once you’ve edited all your parameters:
- Double-check that all your values are enclosed in quotes
- Make sure you didn’t accidentally delete any commas or curly braces
- Press Ctrl + S (or Cmd + S on Mac) to save the file
- Close your text editor
Step 5: Generate Your Genesis Block!
This is the moment you’ve been waiting for! Now we’re going to run the generation script and create your genesis block.
For Windows Users
- Open Command Prompt again (Windows key + R, type cmd, press Enter)
- Navigate to your project folder:
cd C:\path\to\genesis_block_generation-local
- Run the generation script:
python generate_genesis_local.py
For Linux/Ubuntu Users
- Open Terminal
- Navigate to your project folder:
cd ~/genesis_block_generation-local
- Run the generation script:
python3 generate_genesis_local.py
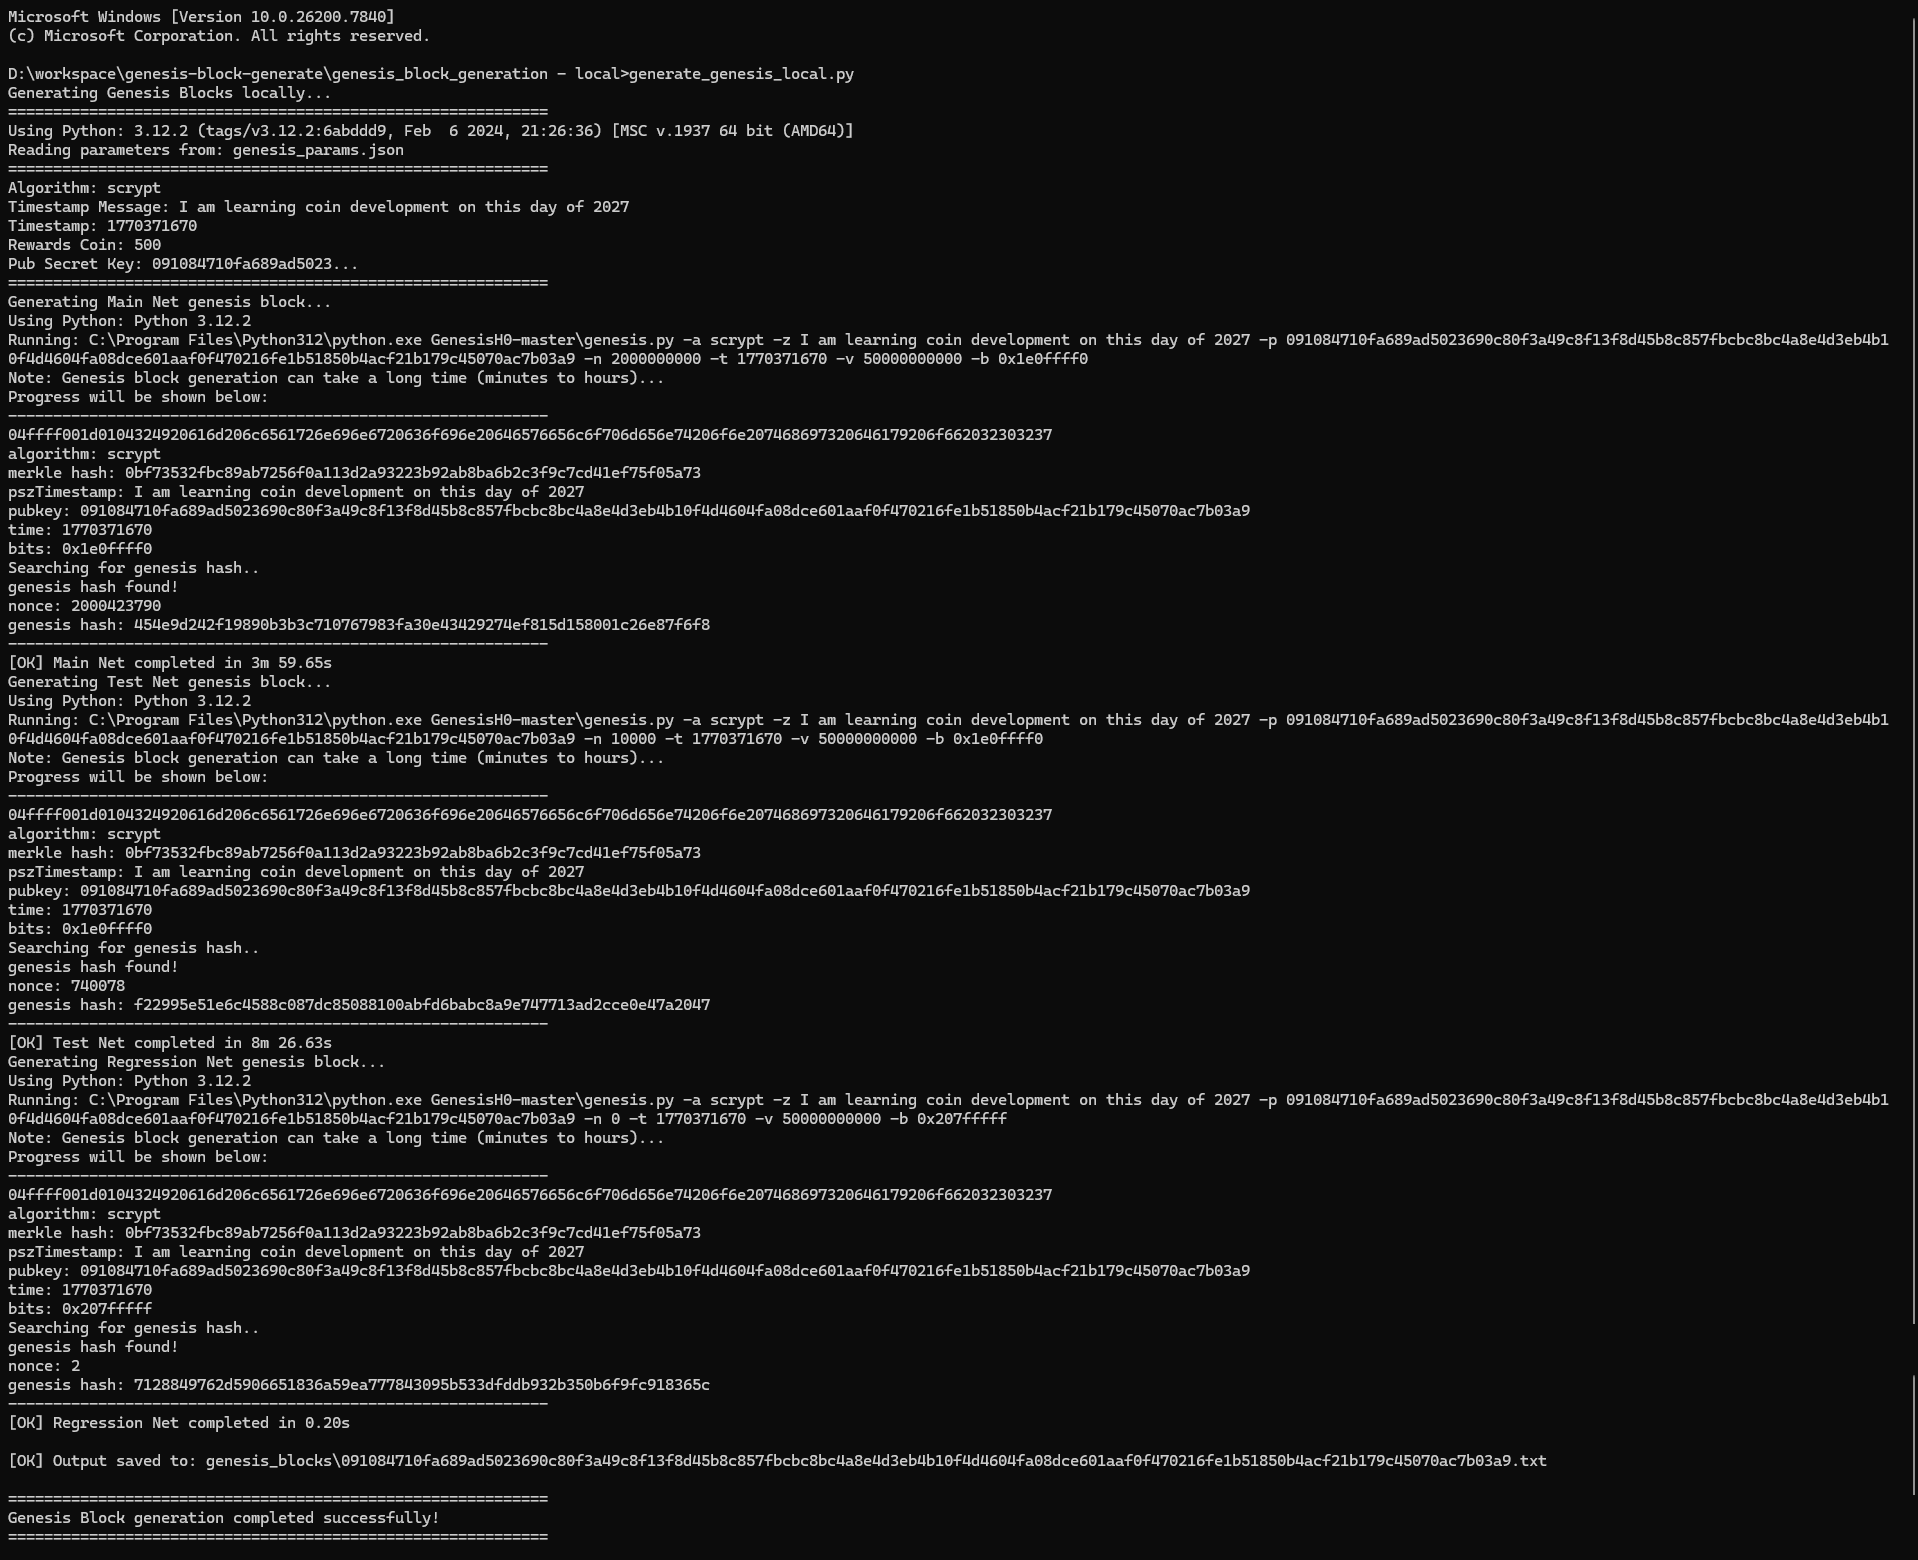
What Happens Next: The Generation Process
Once you run the command, the script will spring into action. Here’s what it does:
- Reads your configuration: First, it loads all the parameters you set in the genesis_params.json file and displays them on screen so you can verify everything looks correct.
- Generates Main Net block: This is your primary blockchain genesis block. This step involves solving complex cryptographic puzzles, so it can take anywhere from a few minutes to several hours depending on your computer’s processing power.
- Generates Test Net block: This is a testing version of your blockchain that developers use for experimenting without affecting the main network.
- Generates Regression Test Net block: This is used for automated testing and development.
- Saves everything to a file: All your generated blocks are saved in an organized format that you can use in your cryptocurrency project.
IMPORTANT: Be Patient!
Genesis block generation is computationally intensive. Your computer is solving cryptographic puzzles that are designed to be difficult. This is completely normal and expected!
- Don’t close the Command Prompt or Terminal window while it’s running
- You’ll see progress messages on screen – this means it’s working!
- The Main Net generation might take the longest – sometimes several hours on slower computers
- Feel free to let it run in the background while you do other things (just don’t close the window!)
Step 6: Finding Your Results
Congratulations! If you’ve made it this far, your genesis blocks have been successfully generated. Now let’s find them!
Navigate to your genesis_block_generation-local folder. Inside, you’ll find a new folder called genesis_blocks. This is where all your results are stored.
In the genesis_blocks folder, you’ll see a text file named after your public secret key. For example:
091084710fa689ad5023690c80f3a49c8f13f8d45b8c857fbcbc8bc4a8e4d3eb4b10f4d4604fa08dce601aaf0f470216fe1b51850b4acf21b179c45070ac7b03a9.txtOpen this file with any text editor. Inside, you’ll find three sections:
- Main Net Genesis Block: This contains your merkle hash, nonce, timestamp, and all the other values for your main blockchain
- Test Net Genesis Block: The same information but for your testing network
- Regression Test Net Genesis Block: The values for your development and automated testing environment
Keep this file safe! These values are unique to your cryptocurrency and you’ll need them when you’re building your blockchain.
Troubleshooting Common Issues
Even with the best instructions, sometimes things don’t go exactly as planned. Here are solutions to the most common issues:
Problem: “Python is not recognized as a command”
Solution: Python wasn’t added to your system PATH during installation. Try reinstalling Python and make sure you check the “Add Python to PATH” option. Alternatively, try using the full path to Python, like C:\Python310\python.exe
Problem: “pip is not recognized as a command”
Solution: Use python -m pip install scrypt construct instead of just pip install
Problem: “Permission denied” on Linux
Solution: Add –user to your pip command: pip3 install –user scrypt construct
Problem: The generation is taking forever
Solution: This is actually normal! Genesis block generation can take several hours, especially on older or less powerful computers. As long as you see progress messages, the script is working. Just be patient and let it complete.
Problem: JSON syntax errors
Solution: Check your genesis_params.json file carefully. Make sure:
- All values are in quotes
- Every line except the last has a comma at the end
- The opening and closing curly braces { } are present
- You didn’t accidentally delete any commas or quotes
Still Having Issues?
If you’ve tried everything and still can’t get it working, don’t worry! Send your configuration parameters to info@newtum.com for assistance. The team will be happy to help you troubleshoot.
What to Do with Your Genesis Block
Now that you have your genesis block, you might be wondering what’s next. Your generated genesis block contains several important values that you’ll use in your cryptocurrency’s configuration:
- Merkle Root Hash: This is the cryptographic hash of your genesis transaction
- Genesis Block Hash: The unique identifier for your first block
- Nonce: The number that was found to make your block hash valid
- Timestamp: When your genesis block was created
These values will be hardcoded into your cryptocurrency’s source code, serving as the permanent foundation of your blockchain.
Final Thoughts
Congratulations 🎉You have now learned how to generate a genesis block step-by-step for cryptocurrency development. This is a major milestone. Keep your configuration file and output file safe. From here, your blockchain journey truly begins.Happy building 🚀
Need Help? Contact us at info@newtum.com