The arrival of ERC20 tokens on the Ethereum network has really pushed forward blockchain technology. These tokens make it easier for different apps and platforms to work together, like speaking the same language. They’ve set up a standard way to create and use digital tokens, making things simpler in the world of decentralized systems. Smart contracts, which are super important for ERC20 tokens, basically automate how digital assets, like these tokens, are created and traded on blockchains by following specific rules.
Understanding ERC20 Token Standards
Learning about the ERC20 token standards is similar to grasping the digital currency norms. Think of it as a universal language that allows tokens to communicate with many platforms. The creation, movement, and use of tokens are outlined in these guidelines along with dos and don’ts. They guarantee that tokens function seamlessly across a range of applications, much like toolkits. One of their key characteristics is that they are simple to divide, exchange, or move. Tokens such as the widely used Tether (USDT) in the cryptocurrency field , for example, demonstrate these standards in action and demonstrate how versatile they are in supporting a wide range of projects in the area.
Requirements
- MetaMask Wallet: Essential for managing transactions and engaging with the network. For installation, access the following link: MetaMask Installation.
- Remix IDE: An inclusive development environment utilized for coding, testing, and deploying smart contracts. To explore Remix IDE, visit: remix.ethereum.org.
- Solidity Language: Understanding Solidity, the programming language for smart contracts, is crucial for writing the ERC20 token contract code.
- Gas Fees on Main Network: Having coins to cover gas fees is essential when deploying smart contracts on the mainnet.
These tools and steps are instrumental in simplifying the process of deploying an ERC20 token smart contract.
Understanding the structure of an ERC20 token contract
let’s break down the structure of an ERC20 token contract in simpler terms.
An ERC20 token contract is a blueprint that outlines the behavior and interaction of a digital asset on the blockchain.
- Basic Information:
- Every ERC20 contract starts with some essential details. It includes the token’s name, symbol (like a ticker symbol for stocks), total supply (how many tokens exist), and the number of decimals used to display the tokens accurately.
- Token Balances:
- This part keeps track of who owns how many tokens. It’s like a ledger that records who has what amount of the token. Each person’s balance is updated when they receive or send tokens.
- Functions:
- These are like the commands or actions you can perform with the token. For instance:
- Transfer: Allows users to send tokens to others.
- Balance Inquiry: Lets people check how many tokens they have.
- Approval: Permits someone to spend tokens on behalf of another person.
- These are like the commands or actions you can perform with the token. For instance:
- Events and Logging:
- This part is like a logbook. It records important activities happening with the token. For example, when tokens are transferred or when there are changes in ownership.
- Token Standards Compliance:
- ERC20 tokens follow a specific set of rules (standards) to ensure they work properly on the Ethereum blockchain. By adhering to these standards, tokens become compatible with various wallets and exchanges.
Understanding the token structure is crucial for its predictable behavior and compatibility with other applications, as it provides a well-defined set of rules for its use.
ERC20 token contracts are created using Solidity programming language, governing token operations and user interaction according to specified rules once deployed on the blockchain.
Deploying Your ERC20 Token Contract
There are various processes involved in deploying an ERC20 token contract. Before proceeding further make sure you have setup your metamask wallet with your coin network, Here we are already connected to metamask with our newtum coin.so, Let’s take a clear look at it:
Creating your Smart Contract Code
- Visit remix.ethereum.org, an Ethereum IDE.
- Create a new Solidity file titled “Chef.sol” to begin coding your token contract.
- Within the “Chef.sol” file, specify crucial parameters like Token Symbol, Name, Decimals, and Total Supply. For example:
- Symbol: “CHEF”
- Name: “CHEF Coin”
- Decimals: 8
- Total Supply: 1 billion
- Modify the provided code in “Chef.sol” to align with your token’s specifics. Replace the placeholders accordingly:
- Line 49: Replace “CHEF” with your token name.
- Line 52: Substitute the placeholder with your chosen symbol.
- Line 53: Replace the placeholder with your preferred token name.
- Line 54: Insert the desired number of decimals for your token.
- Line 61: Enter your intended total supply amount.
Here’s the code template for reference:
// SPDX-License-Identifier: MIT
pragma solidity ^0.8.0;

// Safe Math Library
library SafeMath {
    function safeAdd(uint256 a, uint256 b) internal pure returns (uint256 c) {
   	 c = a + b;
   	 require(c >= a, "SafeMath: addition overflow");
    }

    function safeSub(uint256 a, uint256 b) internal pure returns (uint256 c) {
   	 require(b <= a, "SafeMath: subtraction overflow");
   	 c = a - b;
    }

    function safeMul(uint256 a, uint256 b) internal pure returns (uint256 c) {
   	 if (a == 0) {
   		 return 0;
   	 }
   	 c = a * b;
   	 require(c / a == b, "SafeMath: multiplication overflow");
    }

    function safeDiv(uint256 a, uint256 b) internal pure returns (uint256 c) {
   	 require(b > 0, "SafeMath: division by zero");
   	 c = a / b;
    }
}

// ERC Token Standard #20 Interface
interface ERC20Interface {
    function totalSupply() external view returns (uint256);
    function balanceOf(address tokenOwner) external view returns (uint256 balance);
    function allowance(address tokenOwner, address spender) external view returns (uint256 remaining);
    function transfer(address to, uint256 tokens) external returns (bool success);
    function approve(address spender, uint256 tokens) external returns (bool success);
    function transferFrom(address from, address to, uint256 tokens) external returns (bool success);

    event Transfer(address indexed from, address indexed to, uint256 tokens);
    event Approval(address indexed tokenOwner, address indexed spender, uint256 tokens);
}

// Contract function to receive approval and execute function in one call
interface ApproveAndCallFallBack {
    function receiveApproval(address from, uint256 tokens, address token, bytes calldata data) external;
}

// Actual token contract
contract CHEF is ERC20Interface {
    using SafeMath for uint256;

    string public symbol = "CHEF";
    string public name = "CHEF Coin";
    uint8 public decimals = 8;
    uint256 public override totalSupply;

    mapping(address => uint256) balances;
    mapping(address => mapping(address => uint256)) allowed;

    constructor() {
   	 totalSupply = 1000000000 * (10 * uint256(decimals));
   	 balances[msg.sender] = totalSupply;
   	 emit Transfer(address(0), msg.sender, totalSupply);
    }

    function balanceOf(address tokenOwner) public view override returns (uint256 balance) {
   	 return balances[tokenOwner];
    }

    function transfer(address to, uint256 tokens) public override returns (bool success) {
   	 balances[msg.sender] = balances[msg.sender].safeSub(tokens);
   	 balances[to] = balances[to].safeAdd(tokens);
   	 emit Transfer(msg.sender, to, tokens);
   	 return true;
    }

    function approve(address spender, uint256 tokens) public override returns (bool success) {
   	 allowed[msg.sender][spender] = tokens;
   	 emit Approval(msg.sender, spender, tokens);
   	 return true;
    }

    function transferFrom(address from, address to, uint256 tokens) public override returns (bool success) {
   	 balances[from] = balances[from].safeSub(tokens);
   	 allowed[from][msg.sender] = allowed[from][msg.sender].safeSub(tokens);
   	 balances[to] = balances[to].safeAdd(tokens);
   	 emit Transfer(from, to, tokens);
   	 return true;
    }

    function allowance(address tokenOwner, address spender) public view override returns (uint256 remaining) {
   	 return allowed[tokenOwner][spender];
    }

    function approveAndCall(address spender, uint256 tokens, bytes memory data) public returns (bool success) {
   	 allowed[msg.sender][spender] = tokens;
   	 emit Approval(msg.sender, spender, tokens);
   	 ApproveAndCallFallBack(spender).receiveApproval(msg.sender, tokens, address(this), data);
   	 return true;
    }

    receive() external payable {
   	 revert("Fallback function not allowed");
    }
}
Code Explanation:
SafeMath Library:
The SafeMath library contains functions to perform arithmetic operations safely to avoid common vulnerabilities like overflow and underflow.
- safeAdd: Safely adds two uint256 numbers and checks for addition overflow.
- safeSub: Safely subtracts two uint256 numbers and checks for subtraction overflow.
- safeMul: Safely multiplies two uint256 numbers and checks for multiplication overflow.
- safeDiv: Safely divides two uint256 numbers and checks for division by zero.
ERC20 Interface:
An interface outlining the ERC20 token standard functions required for interaction with ERC20-compatible contracts. These include functions for checking total supply, balances, allowances, and executing transfers and approvals.
ApproveAndCallFallback Interface:
An interface for executing approval and function call in a single transaction.
CHEF Token Contract:
- The CHEF contract implements the ERC20 interface and utilizes the SafeMath library for secure arithmetic operations.
- symbol, name, and decimals define the token’s symbol, name, and decimal places.
- totalSupply represents the total supply of tokens upon contract deployment.
- balances keeps track of token balances for each address.
- allowed manages allowances for spending tokens by another address.
The constructor initializes the total supply and assigns it to the contract deployer’s address (msg.sender).
Functions include:
- balanceOf: Checks the token balance of a specified address.
- transfer: Transfers tokens from the sender to a specified address.
- approve: Allows a specified address to spend tokens on behalf of the sender.
- transferFrom: Executes a transfer of tokens from one address to another if allowed by the sender.
- allowance: Checks the amount of tokens a spender is allowed to spend on behalf of an owner.
- approveAndCall: Approves spending tokens and triggers a function call on the recipient contract.
- The receive function rejects incoming ether transactions to prevent accidental token loss.
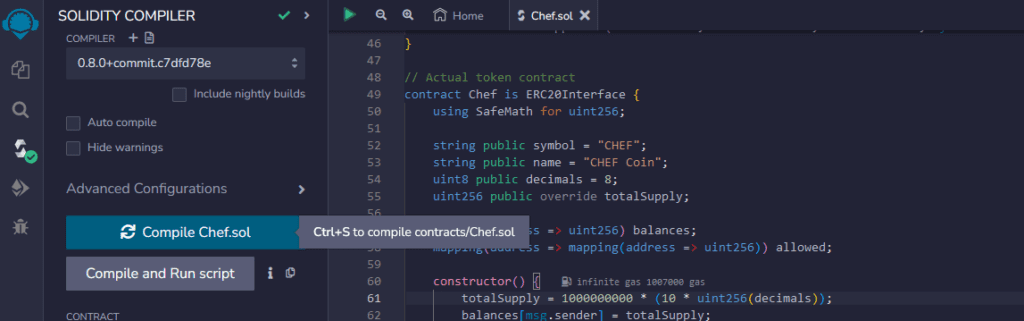
Compile the Code:
On REMIX, click on the Solidity icon on the left side of the screen, and click on compile. You might also want to activate auto compile, to allow REMIX to listen for code changes, and compile your code.
Note: we are using 0.8.0 version so select the compiler accordingly.
Deploying with MetaMask:
click on the Ethereum logo under the Solidity icon, select environment injected provider – Metamask, select your contract in the dropdown menu, and click on deploy.
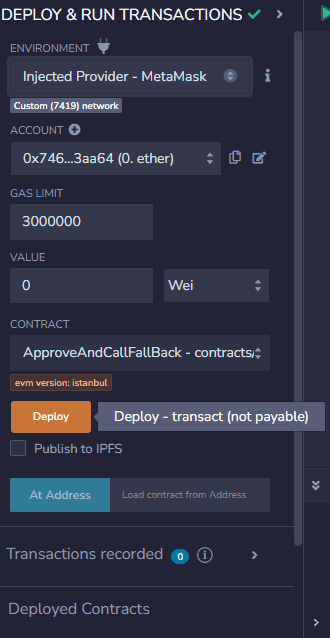
If you receive an error message before deployment “This contract may be abstract”, make sure to select the appropriate contract under the Contract tab. Confirm the transaction in Metamask
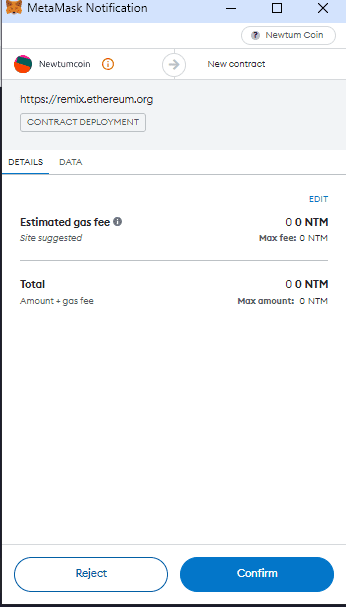
If everything worked as expected, you’ve just created and deployed an token!
Adding the Token to MetaMask:
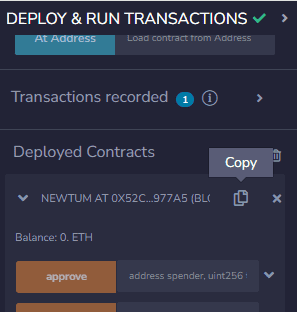
- After successful deployment, copy the deployed contract’s address from the “Deployed Contracts” section in REMIX.
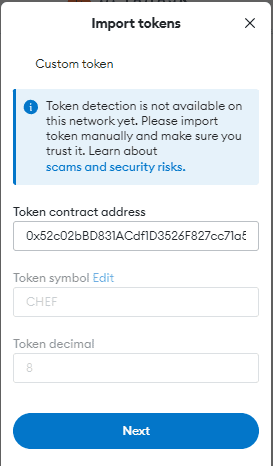
- Open your MetaMask wallet interface.
- Navigate to the “Custom Token” option.
- Paste the contract’s address in the designated field to enable MetaMask to fetch token details automatically.
- Proceed with the addition of your token by following the prompts in MetaMask.
- Upon completion, your newly created token will be visible and accessible within your MetaMask wallet under the assets section.
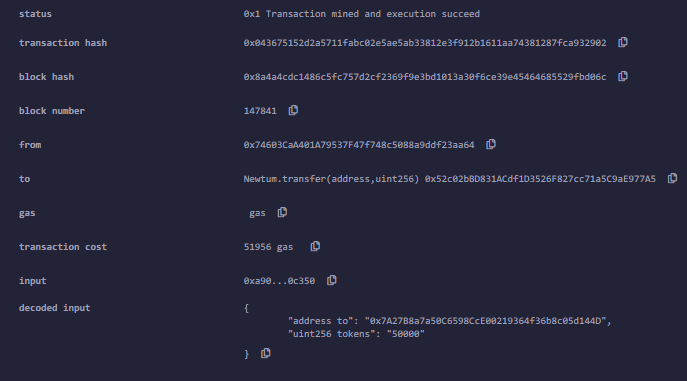
- You can perform functions like transferring tokens or checking balances.
Deploying an ERC20 token contract using MetaMask and Remix IDE involves understanding the basics of Solidity, interacting with the Ethereum blockchain, and managing transactions securely. Always ensure you follow best practices and conduct thorough testing before deploying contracts to the live network.
Creating and deploying ERC20 tokens via smart contracts is a pivotal step towards decentralized finance (DeFi) and blockchain innovation. With a clear understanding of ERC20 standards, smart contract development, and deployment processes, individuals can contribute to the evolving landscape of tokenization and blockchain technology.