Have you ever wondered how weather websites and apps display live temperature, humidity, and forecasts in real time? The answer lies in APIs – and Python makes consuming them incredibly simple. This Python API project tutorial is your hands-on guide to building a real-time weather application from scratch, step by step.
Whether you are a beginner looking to move beyond basic syntax exercises or an intermediate developer who wants a portfolio-worthy project, this Python API project tutorial gives you exactly what you need. By the end, you will have a working command-line weather app that fetches live data from the OpenWeatherMap API and displays it in a clean, readable format.
What makes this tutorial different from generic guides? We go beyond just calling an API. We cover project structuring, error handling, environment variable security, and how to extend the app to display 5-day forecasts, practical skills that matter in real development.
Let’s get started.
What You Will Build
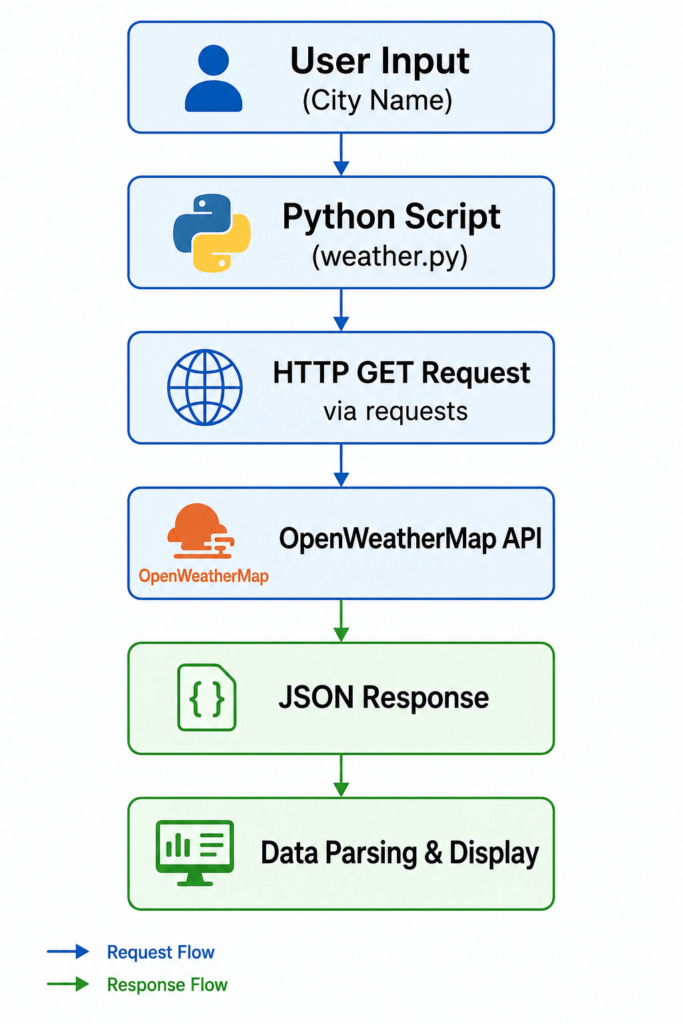
By completing this Python API project tutorial, you will create a weather app that:
- Accepts any city name as user input
- Connects to the OpenWeatherMap API using Python’s
requestslibrary - Retrieves and displays live weather data including temperature, humidity, wind speed, and weather description
- Handles invalid city names and network errors gracefully
- Stores your API key securely using environment variables
- Optionally displays a 5-day weather forecast
This project teaches you real-world Python skills: working with HTTP requests, parsing JSON responses, managing secrets, and writing clean modular code.
Prerequisites
Before diving into this Python API project tutorial, make sure you have the following:
- Python 3.7 or higher installed on your machine
- Basic knowledge of Python (variables, functions, loops, and dictionaries)
- A free account on OpenWeatherMap to get an API key
pipfor installing packages- A code editor such as VS Code or PyCharm
If you are comfortable printing output, writing functions, and using if-else statements in Python, you are ready for this tutorial.
Step 1 -Setting Up Your Project
Start by creating a dedicated project folder and a virtual environment to keep dependencies isolated.
bash
mkdir weather_app
cd weather_app
python -m venv venv
source venv/bin/activate        # On Windows: venv\Scripts\activate
Next, install the two packages this project requires:
bash
pip install requests python-dotenv
- requests — handles all HTTP communication with the OpenWeatherMap API
- python-dotenv — loads your API key from a
.envfile so it never appears in your source code
Create the following file structure inside weather_app/:
weather_app/
├── .env
├── weather.py
└── forecast.py
Step 2 – Getting Your OpenWeatherMap API Key
- Visit https://openweathermap.org/ and sign up for a free account.
- Navigate to My API Keys from your profile menu.
- Copy the default API key (or generate a new one).
- Free-tier keys support up to 1,000 API calls per day — more than enough for this Python API project tutorial.
Open your .env file and add:
API_KEY=your_actual_api_key_here
Never commit this file to GitHub. Add .env to your .gitignore immediately.
Step 3 – Fetching Current Weather Data
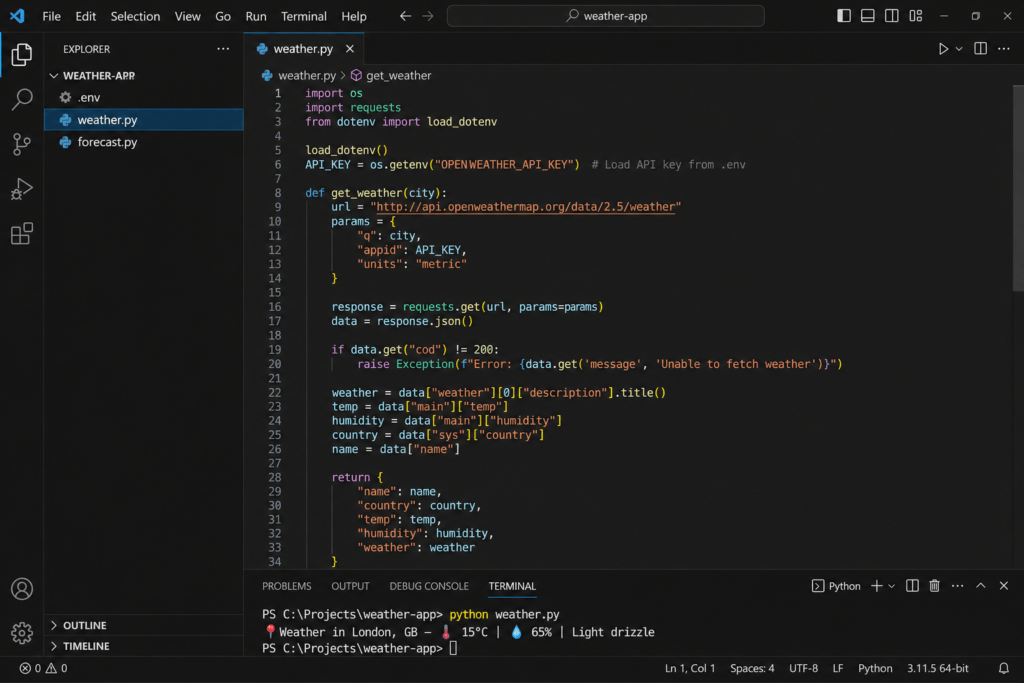
Now create weather.py. This file contains the core logic of your Python API project tutorial project.
python
import requests
import os
from dotenv import load_dotenv

# Load environment variables from .env
load_dotenv()
API_KEY = os.getenv("API_KEY")
BASE_URL = "https://api.openweathermap.org/data/2.5/weather"

def get_weather(city: str) -> dict | None:
    """
    Fetch current weather data for the given city.
    Returns a dictionary of weather details or None on failure.
    """
    params = {
        "q": city,
        "appid": API_KEY,
        "units": "metric"   # Use 'imperial' for Fahrenheit
    }

    try:
        response = requests.get(BASE_URL, params=params, timeout=10)
        response.raise_for_status()
        return response.json()

    except requests.exceptions.HTTPError as http_err:
        if response.status_code == 404:
            print(f"❌ City '{city}' not found. Please check the spelling.")
        elif response.status_code == 401:
            print("❌ Invalid API key. Please check your .env file.")
        else:
            print(f"❌ HTTP error occurred: {http_err}")
        return None

    except requests.exceptions.ConnectionError:
        print("❌ Network error. Please check your internet connection.")
        return None

    except requests.exceptions.Timeout:
        print("❌ Request timed out. Try again later.")
        return None


def display_weather(data: dict) -> None:
    """
    Parse and print weather data in a human-readable format.
    """
    city_name    = data["name"]
    country      = data["sys"]["country"]
    temperature  = data["main"]["temp"]
    feels_like   = data["main"]["feels_like"]
    humidity     = data["main"]["humidity"]
    description  = data["weather"][0]["description"].capitalize()
    wind_speed   = data["wind"]["speed"]

    print("\n" + "=" * 40)
    print(f"📍 Weather in {city_name}, {country}")
    print("=" * 40)
    print(f"🌡️  Temperature : {temperature}°C (Feels like {feels_like}°C)")
    print(f"💧 Humidity    : {humidity}%")
    print(f"🌬️  Wind Speed  : {wind_speed} m/s")
    print(f"🌤️  Condition   : {description}")
    print("=" * 40 + "\n")


if __name__ == "__main__":
    city = input("Enter city name: ").strip()
    if city:
        weather_data = get_weather(city)
        if weather_data:
            display_weather(weather_data)
    else:
        print("❌ City name cannot be empty.")
Running the App
bash
python weather.py
Sample Output:
Enter city name: Mumbai

========================================
📍 Weather in Mumbai, IN
========================================
🌡️  Temperature : 31°C (Feels like 36°C)
💧 Humidity    : 78%
🌬️  Wind Speed  : 4.5 m/s
🌤️  Condition   : Haze
========================================
Step 4 – Understanding the JSON Response
A major skill in any Python API project tutorial is learning how to read and navigate a JSON response. Here is a simplified version of what OpenWeatherMap returns:
json
{
  "name": "Mumbai",
  "sys": { "country": "IN" },
  "main": {
    "temp": 31.0,
    "feels_like": 36.2,
    "humidity": 78
  },
  "weather": [
    { "description": "haze" }
  ],
  "wind": { "speed": 4.5 }
}
Each key maps to a specific data point. By accessing data["main"]["temp"], you drill into the nested dictionary to retrieve the temperature. This pattern of dot-notation thinking applied to Python dictionary key access is something you will use in almost every real-world API project.
Want to build an AI-powered recommender like Netflix? Check out this complete guide on Movie Recommendation System in Python Tutorial to learn how collaborative and content-based filtering work in real projects.
Step 5 – Adding a 5-Day Forecast Feature
Extend your project by creating forecast.py. This uses the /forecast endpoint which returns weather data in 3-hour intervals across 5 days.
python
import requests
import os
from dotenv import load_dotenv
from datetime import datetime

load_dotenv()
API_KEY = os.getenv("API_KEY")
FORECAST_URL = "https://api.openweathermap.org/data/2.5/forecast"

def get_forecast(city: str) -> None:
    params = {
        "q": city,
        "appid": API_KEY,
        "units": "metric",
        "cnt": 40   # 40 entries = 5 days × 8 readings/day
    }

    try:
        response = requests.get(FORECAST_URL, params=params, timeout=10)
        response.raise_for_status()
        data = response.json()

    except requests.exceptions.HTTPError:
        print(f"❌ Could not fetch forecast for '{city}'.")
        return
    except requests.exceptions.ConnectionError:
        print("❌ No internet connection.")
        return

    print(f"\n📅 5-Day Forecast for {city.title()}\n" + "-" * 40)

    # Show one forecast entry per day (noon reading)
    seen_dates = set()
    for entry in data["list"]:
        dt_text = entry["dt_txt"]
        date_str = dt_text.split(" ")[0]
        time_str = dt_text.split(" ")[1]

        if time_str == "12:00:00" and date_str not in seen_dates:
            seen_dates.add(date_str)
            date_obj    = datetime.strptime(date_str, "%Y-%m-%d")
            day_name    = date_obj.strftime("%A, %d %b")
            temp        = entry["main"]["temp"]
            desc        = entry["weather"][0]["description"].capitalize()
            humidity    = entry["main"]["humidity"]

            print(f"📆 {day_name}")
            print(f"   🌡️  {temp}°C  |  💧 {humidity}%  |  {desc}")
            print()


if __name__ == "__main__":
    city = input("Enter city name: ").strip()
    if city:
        get_forecast(city)
    else:
        print("❌ Please enter a valid city name.")
Sample Output:
📅 5-Day Forecast for Mumbai
----------------------------------------
📆 Wednesday, 07 May
   🌡️  31°C  |  💧 77%  |  Haze

📆 Thursday, 08 May
   🌡️  30°C  |  💧 80%  |  Light rain

📆 Friday, 09 May
   🌡️  29°C  |  💧 82%  |  Moderate rain
...
Step 6 – Securing Your API Key (Best Practices)
Security is a critical real-world skill that most beginner tutorials skip. In this Python API project tutorial, we treat API key protection as a first-class concern.
Never hardcode API keys like this:
python
# ❌ BAD — Do not do this
API_KEY = "a1b2c3d4e5f6g7h8"
Always load from environment variables:
python
# ✅ GOOD
import os
from dotenv import load_dotenv
load_dotenv()
API_KEY = os.getenv("API_KEY")
Additional security tips:
- Add
.envto.gitignorebefore your firstgit commit - On production servers, use system-level environment variables or a secrets manager like AWS Secrets Manager or HashiCorp Vault
- Rotate your API key immediately if it is accidentally exposed in a public repository
Step 7 – Error Handling Like a Professional
Robust error handling separates a tutorial project from a production-ready one. In this Python API project tutorial, we handle five distinct failure scenarios:
| Error Type | HTTP Status | User-Friendly Message |
|---|---|---|
| City not found | 404 | “City not found. Check spelling.” |
| Invalid API key | 401 | “Invalid API key. Check .env file.” |
| Rate limit exceeded | 429 | “Too many requests. Wait and retry.” |
| Server error | 500 | “OpenWeatherMap server issue. Try later.” |
| No internet | — | “Network error. Check your connection.” |
Using response.raise_for_status() combined with specific status_code checks gives you precise, actionable messages rather than cryptic Python tracebacks — exactly the kind of experience users (and code reviewers) appreciate.
How to Extend This Python API Project
Now that your core Python API project tutorial project works, here are five ways to level it up:
- Build a GUI with Tkinter — Add a graphical interface with input fields and weather icon images instead of terminal output
- Add a Flask Web Frontend — Serve your weather app as a webpage, accepting city names via an HTML form and rendering results on screen
- Schedule Automated Alerts — Use Python’s
schedulelibrary to send yourself daily weather summaries via email usingsmtplib - Store Historical Data in SQLite — Log each API call’s results into a local database and query historical weather trends
- Deploy to the Cloud — Host your Flask weather app on platforms like Render or Railway and share a live URL in your portfolio
Each extension transforms this foundational Python API project tutorial into an increasingly complex application — giving you progressively stronger portfolio pieces.
Common Mistakes and How to Avoid Them
Even seasoned developers make these mistakes on their first Python API project tutorial build:
- Mistake 1 – Not checking
response.status_codeAlways validate the response before parsing JSON. A failed request returns an error payload, not the weather data you expect. - Mistake 2 – Hardcoding the city name Design your functions to accept city names as parameters, not as hardcoded strings. This makes your code reusable and testable.
- Mistake 3 – Ignoring
timeoutinrequests.get()Without a timeout, your program can hang indefinitely if the API server is slow. Always passtimeout=10or a similar value. - Mistake 4 – Skipping virtual environments Installing packages globally pollutes your system Python. Always create and activate a virtual environment per project.
- Mistake 5 – Committing
.envto version control This is the most dangerous mistake. Add.envto.gitignorebefore writing a single line of code.
What Skills This Project Teaches You
Completing this Python API project tutorial builds several high-demand, transferable skills:
- HTTP communication using the
requestslibrary — foundational for any API integration - JSON parsing — reading and navigating nested data structures in Python dictionaries
- Environment variable management — keeping secrets out of source code
- Modular code design — splitting logic into clean, single-responsibility functions
- Exception handling — writing code that fails gracefully with helpful user messages
- CLI app development — building interactive command-line programs
These skills apply directly to backend development, data engineering, DevOps scripting, and building integrations for any web service.
Conclusion
Building a real-time weather app is one of the most satisfying beginner-to-intermediate Python projects because it connects your code to live, real-world data instantly. This Python API project tutorial walked you through every stage: setting up a secure project environment, calling the OpenWeatherMap API, parsing JSON, displaying formatted output, and extending the app with a 5-day forecast.
The patterns you learned here making authenticated HTTP requests, handling errors gracefully, and protecting credentials with environment variables, are the exact same patterns used in production Python applications every day.
Your next step is to pick one extension from Step 7 and build it. Add a Flask frontend. Schedule daily email alerts. Deploy it to the cloud. Every feature you add turns this Python API project tutorial project into a stronger portfolio piece that demonstrates not just Python knowledge, but real developer thinking.
Now open your terminal, activate your virtual environment, and check the weather. For more informative blogs like this, please visit our website, Newtum. Happy coding! 🌤️
Frequently Asked Questions
Is the OpenWeatherMap API free?
Yes. The free tier allows up to 1,000 API calls per day and includes both current weather and 5-day forecast endpoints, plenty for personal projects and this Python API project tutorial.
Can I use a different weather API for this project?
Absolutely. WeatherAPI.com and Tomorrow.io are popular alternatives with similar REST structures. The Python code logic remains almost identical, only the endpoint URLs and JSON key names change.
How do I make the app display temperatures in Fahrenheit?
Change the "units" parameter in your API call from "metric" to "imperial". Temperatures will then be returned in Fahrenheit and wind speed in miles per hour.
Can I run this weather app on a Raspberry Pi?
Yes! This Python API project tutorial project runs on any device with Python 3.7+ and internet access, including Raspberry Pi. It is a great use case for a dedicated always-on weather station.
How do I add weather icons to the output?
OpenWeatherMap returns an icon code in the response (e.g., "01d" for clear sky). You can construct an icon image URL as https://openweathermap.org/img/wn/{icon_code}@2x.png and display it in a GUI built with Tkinter or a web frontend built with Flask.