So you’ve learned the basics of React – components, props, state, and now you’re staring at a blank screen, wondering: what do I actually build? The answer is right here. A React beginner project quiz app is one of the most rewarding, concept-packed mini-projects you can complete in a single weekend. It’s practical, portfolio-worthy, and genuinely fun to build.
This guide walks you through every step from project setup to score calculation in a way that makes sense even if you’ve only been using React for a few weeks. No Redux. No complex libraries. Just clean React with hooks, a dash of logic, and a working app you’ll be proud of.
Why a Quiz App Is the Perfect React Starter Project
Before writing a single line of code, let’s understand why this specific project is recommended for beginners over and over again.
A react beginner project quiz app covers almost every foundational concept you need to know:
- useState – to track the current question, selected answer, and score
- Conditional rendering – to show questions, feedback, or the results screen
- Component composition – breaking UI into Question, Options, and Result components
- Event handling – responding to button clicks and user selections
- Array manipulation – cycling through a list of questions using an index
You’ll walk away not just with a cool project, but with a concrete mental model of how React applications work. That’s the real win.
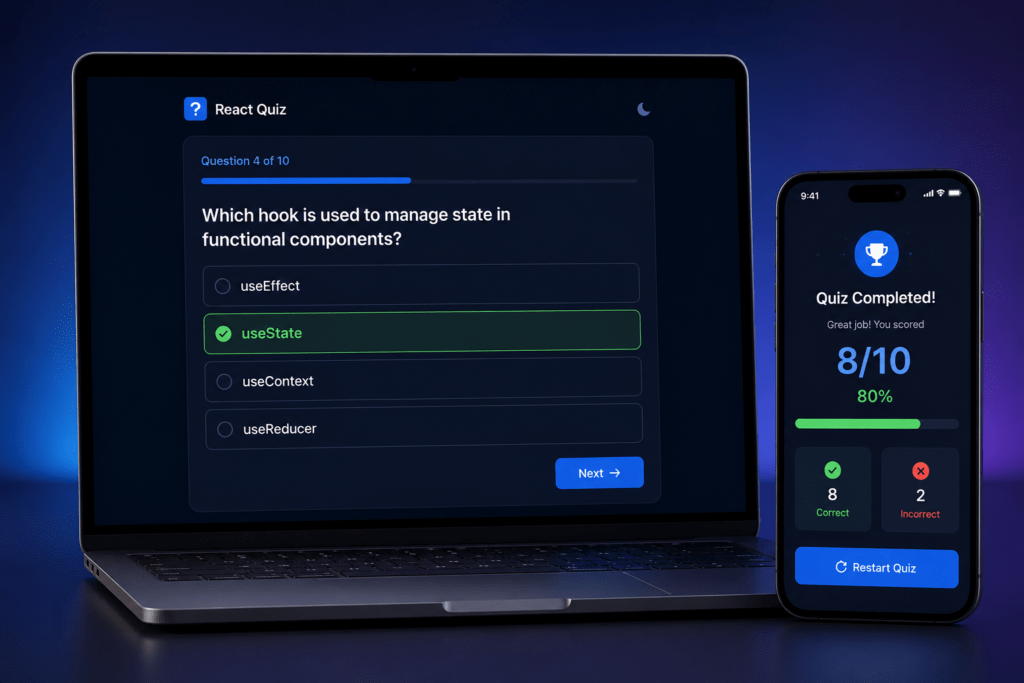
What You’ll Build: A Quick Preview
Here’s the feature list for our quiz app:
- A welcome/start screen with a “Start Quiz” button
- Multiple-choice questions displayed one at a time
- Highlighted correct/incorrect feedback after each answer
- A live question counter (“Question 3 of 10”)
- A final score screen with a performance message
- A “Restart Quiz” button to play again
Simple. Clean. Completely doable in a weekend.
Prerequisites: What You Should Know First
This tutorial is designed as a react beginner project quiz app, so the bar is intentionally low. You should be comfortable with:
- Basic JavaScript (arrays, functions, arrow functions, ternary operators)
- React fundamentals: JSX, components, props, and
useState - Running a project with
npmoryarn
If you’ve completed any introductory React course or tutorial, you’re good to go.
Step 1: Set Up Your Project
Open your terminal and run:
bash
npx create-react-app react-quiz-app
cd react-quiz-app
npm start
Your app will open in the browser at localhost:3000. Inside the src folder, delete App.test.js, logo.svg, and reportWebVitals.js to keep things clean.
Your src folder structure will look like this:
src/
├── components/
│   ├── StartScreen.jsx
│   ├── QuizScreen.jsx
│   ├── Question.jsx
│   ├── OptionList.jsx
│   └── ResultScreen.jsx
├── data/
│   └── questions.js
├── App.jsx
└── index.js
Step 2: Create Your Question Data
In src/data/questions.js, define your questions as an array of objects:
js
const questions = [
  {
    id: 1,
    question: "What hook is used to manage state in React?",
    options: ["useEffect", "useState", "useContext", "useRef"],
    answer: "useState",
  },
  {
    id: 2,
    question: "What does JSX stand for?",
    options: [
      "JavaScript XML",
      "Java Syntax Extension",
      "JSON XML",
      "JavaScript Extension",
    ],
    answer: "JavaScript XML",
  },
  {
    id: 3,
    question: "Which method renders a React component to the DOM?",
    options: ["React.render()", "ReactDOM.render()", "render()", "mountDOM()"],
    answer: "ReactDOM.render()",
  },
  // Add 7 more questions as desired
];

export default questions;
Keeping your data separate from your UI is a clean habit that will serve you well as projects grow.
Step 3: Build the StartScreen Component
jsx
// src/components/StartScreen.jsx
function StartScreen({ onStart }) {
  return (
    <div className="start-screen">
      <h1>React Knowledge Quiz</h1>
      <p>10 questions. Test how well you know React basics.</p>
      <button onClick={onStart}>Start Quiz</button>
    </div>
  );
}

export default StartScreen;
Nothing complicated here — just a title, a blurb, and a button that triggers onStart, a function passed down from App.jsx.
Step 4: Build the Question and Options Components
Question.jsx renders the current question text:
jsx
function Question({ question, current, total }) {
  return (
    <div className="question-section">
      <p className="question-count">
        Question {current} of {total}
      </p>
      <h2>{question}</h2>
    </div>
  );
}

export default Question;
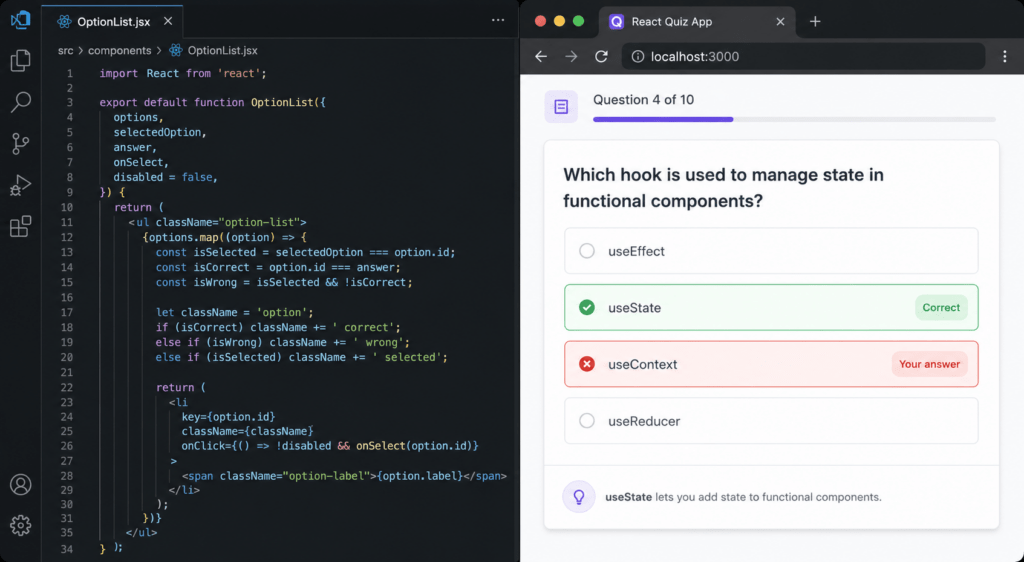
OptionList.jsx renders the four answer choices:
jsx
function OptionList({ options, selected, answer, onSelect }) {
  return (
    <ul className="options-list">
      {options.map((option) => {
        let className = "option";
        if (selected) {
          if (option === answer) className += " correct";
          else if (option === selected) className += " wrong";
        }
        return (
          <li
            key={option}
            className={className}
            onClick={() => !selected && onSelect(option)}
          >
            {option}
          </li>
        );
      })}
    </ul>
  );
}

export default OptionList;
This component is the logic heart of our react beginner project quiz app. After an answer is selected, it colors options green (correct) or red (incorrect) before allowing the user to move on.
Step 5: Build the QuizScreen Component
This is where the magic comes together:
jsx
// src/components/QuizScreen.jsx
import { useState } from "react";
import Question from "./Question";
import OptionList from "./OptionList";
import questions from "../data/questions";

function QuizScreen({ onFinish }) {
  const [currentIndex, setCurrentIndex] = useState(0);
  const [selected, setSelected] = useState(null);
  const [score, setScore] = useState(0);

  const current = questions[currentIndex];

  const handleSelect = (option) => {
    setSelected(option);
    if (option === current.answer) {
      setScore((prev) => prev + 1);
    }
  };

  const handleNext = () => {
    if (currentIndex + 1 < questions.length) {
      setCurrentIndex((prev) => prev + 1);
      setSelected(null);
    } else {
      onFinish(score + (selected === current.answer ? 0 : 0));
    }
  };

  return (
    <div className="quiz-screen">
      <Question
        question={current.question}
        current={currentIndex + 1}
        total={questions.length}
      />
      <OptionList
        options={current.options}
        selected={selected}
        answer={current.answer}
        onSelect={handleSelect}
      />
      {selected && (
        <button className="next-btn" onClick={handleNext}>
          {currentIndex + 1 === questions.length ? "See Results" : "Next →"}
        </button>
      )}
    </div>
  );
}

export default QuizScreen;
Notice how selected is reset to null on each new question — a small but important detail that keeps the state clean.
Step 6: Build the ResultScreen Component
jsx
// src/components/ResultScreen.jsx
function ResultScreen({ score, total, onRestart }) {
  const percentage = Math.round((score / total) * 100);

  const getMessage = () => {
    if (percentage >= 80) return "Excellent! You're a React pro! 🏆";
    if (percentage >= 50) return "Good effort! Keep practicing. 💪";
    return "Keep learning — you'll get there! 📚";
  };

  return (
    <div className="result-screen">
      <h2>Quiz Complete!</h2>
      <p className="score">
        {score} / {total}
      </p>
      <p className="percentage">{percentage}%</p>
      <p className="message">{getMessage()}</p>
      <button onClick={onRestart}>Restart Quiz</button>
    </div>
  );
}

export default ResultScreen;
Step 7: Wire Everything Together in App.jsx
jsx
// src/App.jsx
import { useState } from "react";
import StartScreen from "./components/StartScreen";
import QuizScreen from "./components/QuizScreen";
import ResultScreen from "./components/ResultScreen";
import questions from "./data/questions";
import "./App.css";

function App() {
  const [stage, setStage] = useState("start"); // "start" | "quiz" | "result"
  const [finalScore, setFinalScore] = useState(0);

  const handleStart = () => setStage("quiz");

  const handleFinish = (score) => {
    setFinalScore(score);
    setStage("result");
  };

  const handleRestart = () => {
    setFinalScore(0);
    setStage("start");
  };

  return (
    <div className="app">
      {stage === "start" && <StartScreen onStart={handleStart} />}
      {stage === "quiz" && <QuizScreen onFinish={handleFinish} />}
      {stage === "result" && (
        <ResultScreen
          score={finalScore}
          total={questions.length}
          onRestart={handleRestart}
        />
      )}
    </div>
  );
}

export default App;
The stage state variable acts as a simple router, deciding which screen to show. This is a pattern used in many real-world React apps, making this react beginner project quiz app a genuinely practical learning experience.
Step 8: Style Your App
Here’s a minimal but clean CSS foundation (App.css):
css
* {
  box-sizing: border-box;
  margin: 0;
  padding: 0;
}

body {
  font-family: "Segoe UI", sans-serif;
  background: #0f172a;
  color: #f8fafc;
  display: flex;
  justify-content: center;
  align-items: center;
  min-height: 100vh;
}

.app {
  background: #1e293b;
  border-radius: 16px;
  padding: 2.5rem;
  max-width: 560px;
  width: 100%;
  box-shadow: 0 20px 60px rgba(0, 0, 0, 0.4);
}

button {
  background: #3b82f6;
  color: white;
  border: none;
  padding: 0.75rem 2rem;
  border-radius: 8px;
  font-size: 1rem;
  cursor: pointer;
  margin-top: 1.5rem;
  transition: background 0.2s;
}

button:hover {
  background: #2563eb;
}

.options-list {
  list-style: none;
  margin-top: 1.5rem;
}

.option {
  background: #334155;
  border-radius: 8px;
  padding: 0.85rem 1.25rem;
  margin-bottom: 0.75rem;
  cursor: pointer;
  transition: background 0.15s;
}

.option:hover {
  background: #475569;
}

.option.correct {
  background: #16a34a;
}

.option.wrong {
  background: #dc2626;
}

.score {
  font-size: 3rem;
  font-weight: 700;
  color: #3b82f6;
}
📸 IMAGE 2 — In-Blog Visual
Concepts You’ve Learned by Building This
Let’s take stock. By completing this react beginner project quiz app, you’ve practiced:
| Concept | Where It Appeared |
|---|---|
useState | Tracking question index, score, selected answer, and stage |
| Conditional rendering | Showing StartScreen, QuizScreen, or ResultScreen |
| Props drilling | Passing onStart, onFinish, onRestart between components |
| Event handling | onClick for answer selection and navigation |
| Array indexing | Accessing questions[currentIndex] |
| Derived state | Computing percentage from score / total |
| Component decomposition | Splitting UI into focused, single-purpose components |
That’s a serious amount of real React knowledge packed into one tiny weekend project.
Want More Project Ideas? Learn How to Build a Movie Recommendation System in Python
Common Mistakes Beginners Make (And How to Avoid Them)
1. Mutating state directly Never do score++. Always use setScore(prev => prev + 1). React’s rendering depends on immutability.
2. Forgetting to reset selected state When moving to the next question, always call setSelected(null). Otherwise the previous answer highlight carries over.
3. Putting all logic in one component It’s tempting to write everything in App.jsx. Resist that urge. Component separation is what makes React code maintainable.
4. Using index as the key prop for questions If you ever reorder or filter questions, key={index} causes bugs. Use a unique id field from your question object instead.
Ways to Level Up This Project
Once your core react beginner project quiz app is working, here are meaningful ways to extend it:
- Add a countdown timer using
useEffectandsetInterval - Shuffle questions with
Array.sort(() => Math.random() - 0.5) - Fetch questions from an API like Open Trivia DB (
opentdb.com) usinguseEffect - Persist high scores using
localStorage - Add categories so users can pick a topic before starting
- Animate transitions between questions using CSS keyframes or Framer Motion
Each of these upgrades is a new concept to learn — and a natural next step after completing the base build.
Final Thoughts
A react beginner project quiz app might sound simple, but it packs in more real-world React patterns than most tutorials twice its length. You’ve built a multi-screen app with clean state management, reusable components, user interaction logic, and a polished result experience — all without a single third-party state library.
This is exactly the kind of project that belongs in a beginner’s portfolio. It’s small enough to explain in an interview, complex enough to demonstrate real understanding, and fun enough that you’ll actually finish it.
Now close this tab, open your terminal, and go build it.
Looking to go deeper with React? Explore more hands-on tutorials and beginner-friendly courses at Newtum.
FAQ- react beginner project quiz app
Q1: Can I build a react beginner project quiz app without using Create React App?
Yes. You can use Vite (npm create vite@latest) for a faster setup. The component structure and logic stay exactly the same.
Q2: How many questions should a beginner quiz app have?
Start with 5–10. It’s enough to test all your app’s logic without the data setup becoming a chore.
Q3: Should I use class components or functional components?
Always functional components with hooks for new projects. Class components are legacy and rarely used in modern React codebases.
Q4: Can I turn this react beginner project quiz app into a full-stack app?
Absolutely. Once comfortable, connect it to a Node.js/Express backend or use Firebase to store questions and scores dynamically.
Q5: How long does it realistically take to build this project?
With this guide, most beginners complete a working version in 4–6 hours. Styling and extras can take another 2–3 hours.